Engine Mechanical System
Crankshaft Damper Pulley Repair Procedures
In this manual: Engine Mechanical System
5steps
~50min
5/5difficulty
4special tools
Done 0 of 5
Removal and Installation
- Remove the right front wheel. (Refer to Suspension System - "Wheel")
- Remove the drive belt. (Refer to Valve Timing System - "Drive Belt")
- Remove the engine compartment cover. (Refer to Engine and Transaxle Assembly - "Engine Compartment Under Cover")
- Remove the crankshaft damper pulley (A).
Torque: 196.1 - 206 N·m (20.0 - 21.0 kgf·m, 144.7 - 151.9 ft-lbf)


- Do not press on the pulley or apply excessive force to prevent deformation of the rubber part.
There are two methods for holding the ring gear when removing the crankshaft damper pulley.
- Install the SST (09231-2B100, 09231-3N100) to hold the ring gear after removing the starter.

- Install the SST (09231-3D100, 09231-2W100) to hold the ring gear after removing the service cover.
- Remove the transaxle mounting bolt (A) and service cover (B) from the lower part of the oil pan.
- Remove the transaxle mounting bolt (C) from the lower part of the oil pan.

- Adjust the length of the holder (A) so that the holder grooves engage the ring gear teeth (B) in the closest position.
- Adjust the angle and length of the links (C) so that the two transaxle mounting bolts can be secured in the original installation holes.
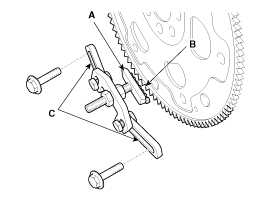
- Install the SST using the two transaxle mounting bolts. Tighten the holder and link bolts and nuts securely.

- Install in the reverse order of removal.
Inspection
Inspect the crankshaft damper pulley for vibration during rotation and oil dust deposits on the V-groove. Replace if necessary.Test yourself
A quick Hyundai Elantra AD quiz: every answer comes with an explanation and a link to the manual page.
Was this page helpful?