Body Electrical System
Seat Heater Repair Procedures
In this manual: Body Electrical System
10steps
~60min
3/5difficulty
Done 0 of 10
Inspection
Front Seat Heater- Check the circuit continuity and measure the resistance between terminals No. 3 and No. 6.
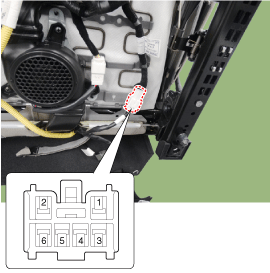
Standard value Driver/Passenger (cushion + back): 1.65 Ω ±10% / 23 °C
- Turn on the seat heater after connecting the connector, then check the thermostat by measuring the seat surface temperature. Standard value 1st: cushion: 36 ±2 °C, back: 40 ±2 °C 2nd: cushion: 39 ±2 °C, back: 45 ±2 °C 3rd: cushion: 42 ±2 °C, back: 50 ±2 °C
- Check the circuit continuity and measure the resistance between terminals No. 1 and No. 4.
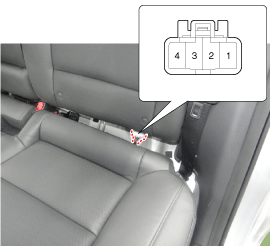
Standard value Rear seat: 1.67 Ω ±10% / 20 °C
- Turn on the seat heater after connecting the connector, then check the thermostat by measuring the seat surface temperature.
Standard value High (cushion): 38 ±2 °C Low (cushion): 42 ±2 °C
- You can enter diagnostic mode by pressing the seat heater button.
- You can enter diagnostic mode by referring to the following description.
A. Press IGN ON while pressing the seat heater button from the IGN OFF position. B. Continue pressing IGN ON for more than three seconds, then press and hold again for more than three seconds within 2 seconds. C. All LED indicators on the driver and passenger seat buttons will blink once. - After entering diagnostic mode, you can check the failure by the blinking LED. [Driver/Passenger Seat Heater]

Failure Indicator Check Items Detailed Checks Low: OFF
Medium: OFF
High: BLINKINGLow Voltage Detection - IGN1 voltage 8.5 V or less
Overvoltage Detection - IGN1 voltage 16.5 V or more
Low: BLINKING
Medium: BLINKING
High: BLINKINGFuse (Short) - Open or disconnected seat heater line B(+) connector
Low: OFF
Medium: ON
High: BLINKINGNTC (Short / Disconnected) - NTC Element Failure
- Short circuit between NTC connector terminals
- Open NTC wiring (+)
- Open NTC wiring (-)
Low: BLINKING
Medium: BLINKING
High: BLINKINGHeater (Short / Disconnected) - Heating Element Failure
- Short circuit between heater wire connector terminals
- Open heater wire (+)
- Open heater wire (-)
Low: ON
Medium: ON
High: BLINKINGLoss of Temperature Feedback - Target temperature not reached within 40 minutes
[Rear Seat Heater]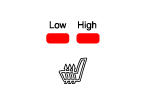
Failure Indicator Check Items Detailed Checks Low: OFF
High: OFFLow Voltage Detection - IGN1 voltage 8.5 V or less
Overvoltage Detection - IGN1 voltage 16.5 V or more
Low: BLINKING
High: BLINKINGFuse (Short) - Open or disconnected seat heater line B(+) connector
Low: OFF
High: BLINKINGNTC (Short / Disconnected) - NTC Element Failure
- Short circuit between NTC connector terminals
- Open NTC wiring (+)
- Open NTC wiring (-)
Low: BLINKING
High: BLINKINGHeater (Short / Disconnected) - Heating Element Failure
- Short circuit between heater wire connector terminals
- Open heater wire (+)
- Open heater wire (-)
Low: ON
High: BLINKINGLoss of Temperature Feedback - Target temperature not reached within 40 minutes
- You can check for a failure by observing the LED blinking pattern.
- Pressing the IGN OFF button ends the seat heater diagnostic mode.
- You can check whether the seat heater system operates correctly after turning the ignition on. If you want to check a trouble code, refer to Procedure 2 above.
Test yourself
A quick Hyundai Elantra AD quiz: every answer comes with an explanation and a link to the manual page.
Was this page helpful?