Body Electrical System
AVN (Audio Video Navigation) Head Unit Repair Procedures
In this manual: Body Electrical System
12steps
~72min
3/5difficulty
Done 0 of 12
Removal
|
- Disconnect the negative (-) battery terminal.
- Remove the side crash pad garnish assembly. (Refer to Body - "Side Crash Pad Garnish Assembly")
When working with the matte wood trim, pay close attention to the following.
- When removing with a screwdriver or pry tool, wrap the tools with protective tape.
- Be careful not to damage the parts, as the matte wood trim is easily scratched or torn.
- Take care when storing and handling the protective garnish during removal/installation, as grease and oil may leave stains on the trim.
- Remove the heater control assembly and center fascia panel assembly. (Refer to Body - "Heater & A/C Control Assembly")
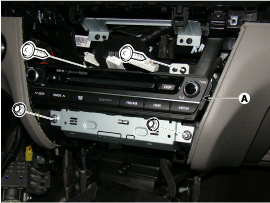
- Remove the AVN head unit (A) after loosening the mounting bolts and nuts.
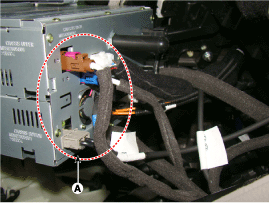
- Disconnect the connectors and cables from the AVN head unit (A).
- If the DVD does not eject, do not attempt to force it out.
- The DVD player may be damaged.
- Contact the nearest dealer for assistance.
Installation
- Install the AVN head unit after connecting the AVN head unit connectors and cable.
- Install the heater and A/C control assembly.
- Connect the negative (-) battery terminal.
- Make sure the cables and connectors are connected correctly.
- Check the AVN system for normal operation.
Inspection
How to Check the AVN Head Unit After Replacement (Variant Coding)
The AVN head unit performs the main audio, video and navigation functions. It also receives general vehicle information from other units (SWRC, FATC, BCM, PGS, AVM, Cluster, TMU, ECS, etc.) via CAN communication and delivers it to the driver. Therefore, when replacing the AVN head unit, it is essential to enter detailed option information for each vehicle model into the new AVN unit for proper system operation. This process is called variant coding.
|

- Check the options installed on the vehicle before proceeding to AVN head unit variant coding.
- Select the vehicle, then select "Variant Coding" and the AVN head unit additional function.
- Configuring options installed on the vehicle.
If you enter an incorrect option, the AVN head unit will not operate correctly.
After replacing the head unit, install the replacement, stop the engine, close and lock the door. Do not operate the vehicle for at least three minutes to save the coded data. The code is saved in the head unit only when the AVN system is completely turned off and then woken up. - Follow the on-screen instructions and wait. Wait until the save is completed, then exit.
Test yourself
A quick Hyundai Genesis DH quiz: every answer comes with an explanation and a link to the manual page.
Was this page helpful?