Heating, Ventilation, and Air Conditioning
Console Temperature Actuator Repair Procedure
In this manual: Heating, Ventilation, and Air Conditioning
18steps
~108min
4/5difficulty
Done 0 of 18
Inspection
- Turn the ignition off.
- Disconnect the console temperature control actuator connector.
- Make sure the console temperature control actuator operates to the defrost position when 12 V is applied to terminal 3 and ground terminal 4. Make sure the console actuator operates to the vent position when the connections are reversed. [Console Temperature Control Actuator]
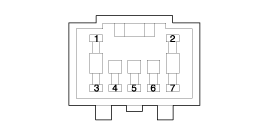
1. -
2. -
3. Console Heating
4. Sensor (+5V)5. Feedback Signal
6. Sensor Ground
7. Console Heating
[Console Mode Control Actuator]1. -
2. -
3. Rear Duct
4. Sensor (+5V)5. Feedback Signal
6. Sensor Ground
7. Rear Floor - Connect the console actuator connector.
- Turn the ignition on.
- Check the voltage between terminals 6 and 5. Specification
Door Position Voltage (V) Fault Detection Cooling 3,8 ± 0,15 Low voltage: 0.1 V or less Heating 1,2 ± 0,15 High voltage: 4.9 V or more
It will report the current actuator position to the controls. - If the measured voltage does not meet the specification, replace the console temperature actuator with a genuine part and check for proper operation.
- Replace the console temperature control actuator if it is determined to be faulty.
Replacement
[Console Temperature Control Actuator (A)]- Disconnect the negative (-) battery terminal.
- Remove the main lower airbag unit. (Refer to Body - "Main Lower Airbag Assembly")
- Remove the passenger side air vent duct (A) after loosening the screw.
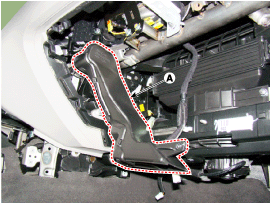
- Disconnect the connector, then remove the passenger side console temperature control actuator (B) after loosening the screws.
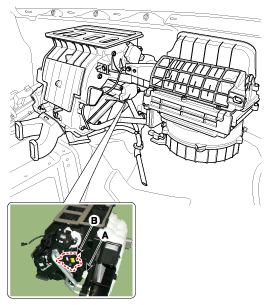
- Install in the reverse order of removal.
- Disconnect the negative (-) battery terminal.
- Remove the main lower airbag unit. (Refer to Body - "Main Lower Airbag Assembly")
- Remove the driver side air vent duct (A) after loosening the screw.
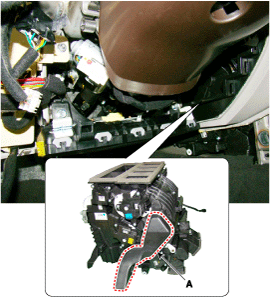
- Disconnect the connector, then remove the console temperature control actuator (A) after loosening the mounting screws.

- Install in the reverse order of removal.
Test yourself
A quick Hyundai Genesis DH quiz: every answer comes with an explanation and a link to the manual page.
Was this page helpful?