Body (Interior and Exterior)
Crash Pad Main Lower Assembly Repair Procedures
In this manual: Body (Interior and Exterior)
16steps
~96min
4/5difficulty
Done 0 of 16
Replacement
|

|

- Disconnect the negative (-) battery terminal.
- Remove the floor console assembly. (Refer to Floor Console - "Floor Console Assembly")
- Remove the side garnish assembly. (Refer to Crash Pad - "Crash Pad Side Trim Assembly [RH]")
- Remove the center fascia panel assembly. (Refer to Heating, Ventilation and Air Conditioning - "Controller")
- Remove the monitor fascia (A).

- Remove the AVN head unit. (Refer to Body Electrical System - "AVN Head Unit")
- Remove the cluster fascia. (Refer to Crash Pad - "Instrument Panel")
- Remove the side cowl trim. (Refer to Interior Trim - "Side Cowl Trim")
- Remove the crash pad lower panel. (Refer to Crash Pad - "Crash Pad Lower Panel")
- Remove the glove box. (Refer to Crash Pad - "Glove Box")
- Remove the under cover garnish [RH]. (Refer to Crash Pad - "Crash Pad Under Cover [RH]")
- Loosen the mounting screws, bolts and nuts, then remove the glove box housing (A) using a screwdriver.

- Disconnect the glove box lamp connector (A), the glove box main switch connector (B) and the lamp switch connector (C).

- Loosen the mounting screws, bolts and nuts, then remove the crash pad main lower assembly (A).

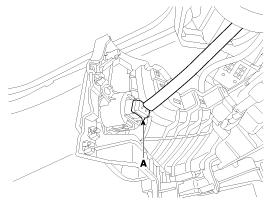
- Disconnect the start button connector (A).
- Install in the reverse order of removal.

- Make sure the connector is properly connected.
- Replace any damaged clips.
Test yourself
A quick Hyundai Genesis DH quiz: every answer comes with an explanation and a link to the manual page.
Was this page helpful?