Body Electrical System
Seat Heater Switch
In this manual: Body Electrical System
10steps
~60min
3/5difficulty
Done 0 of 10
Components and Component Location
Components
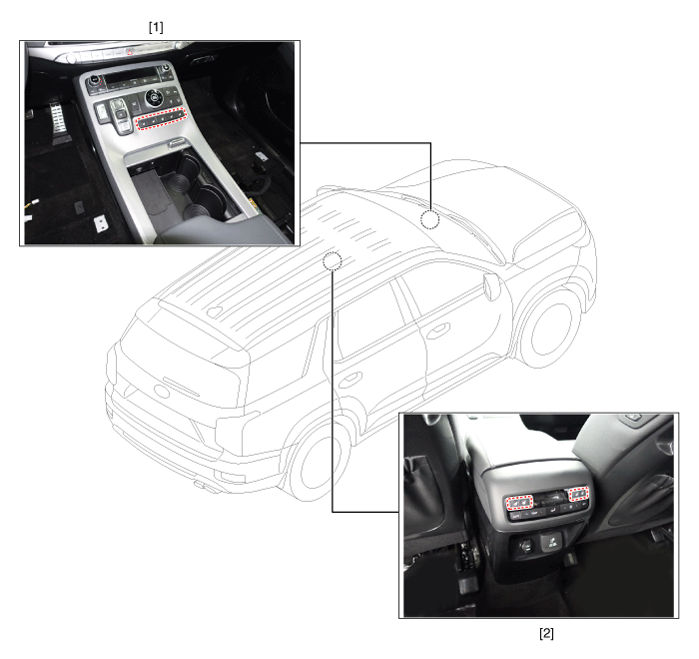
| 1. Front Seat Heater Switch. | 2. Rear Seat Heater Switch. |
Circuit Diagrams
Wiring Diagram
Front Seat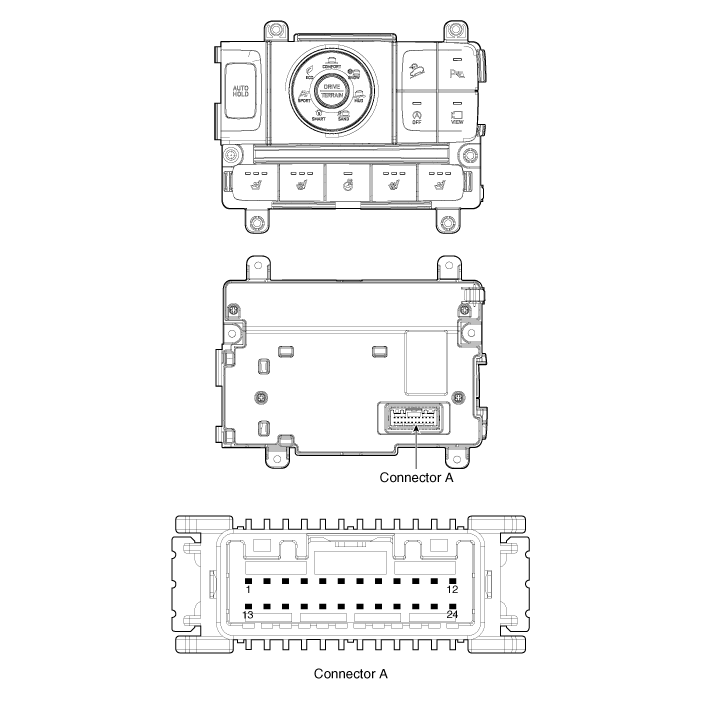
| No | Connector A |
| 1 | C_CAN (High) |
| 2 | C_CAN (Low) |
| 3 | - |
| 4 | LIN |
| 5 | - |
| 6 | Auto Hold Signal |
| 7 | - |
| 8 | Battery (+) |
| 9 | IGN |
| 10 | Illumination (+) |
| 11 | - |
| 12 | Illumination (-) |
| 13 | Ground |
| 14 | DELAY |
| 15 | - |
| 16 | PDW signal |
| 17 | Steering Heater Signal |
| 18 | DBK signal |
| 19 | ISG signal |
| 20 | SVM/RVM Signal |
| 21 | ISG Indicator |
| 22 | SVM Indicator |
| 23 | PDW Indicator |
| 24 | Steering Wheel Heater Indicator |
2nd Row
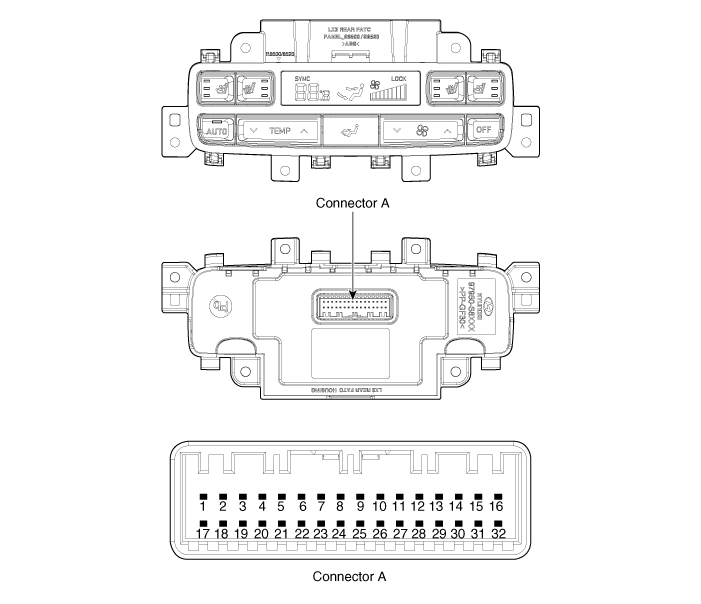
| No | Connector A |
| 1 | Battery (+) |
| 2 | ISG Power (+) |
| 3 | Illumination (+) |
| 4 | REF Sensor (+5V) |
| 5 | Mode Actuator Feedback |
| 6 | Temperature Actuator Feedback |
| 7 | Mode Actuator (Vent) |
| 8 | Mode Actuator (Defrost) |
| 9 | Temperature Actuator (Cooling) |
| 10 | Temperature Actuator (Heating) |
| 11 | DELAY (-) |
| 12 | K-Line |
| 13 | LIN Line (Rear Left Seat) |
| 14 | LIN Line (Rear Right Seat) |
| 15 | - |
| 16 | Illumination (-) |
| 17 | IGN 2 |
| 18 | IGN 1 |
| 19 | Fan Motor (+) |
| 20 | - |
| 21 | Rear FET (Drain Feedback) |
| 22 | Rear FET (Gate) |
| 23 | Left Heater Switch |
| 24 | Left Heater Indicator (High) |
| 25 | Left Heater Indicator (Medium) |
| 26 | Left Heater Indicator (Low) |
| 27 | Right Heater Switch |
| 28 | Right Heater Indicator (High) |
| 29 | Right Heater Indicator (Medium) |
| 30 | Right Heater Indicator (Low) |
| 31 | Sensor Ground |
| 32 | Ground |
Repair Procedures
Removal
Front Seat- Disconnect the negative (-) battery terminal.
- Remove the floor console upper cover assembly. (Refer to Body - "Floor Console Assembly")
- Remove the seat heater switch (A).
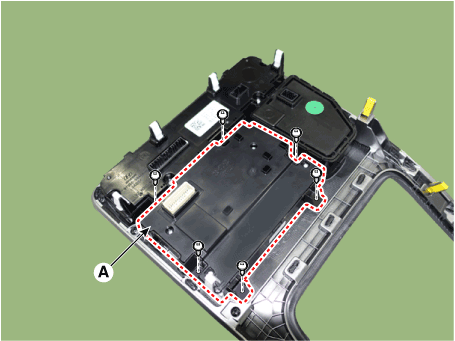
- Disconnect the negative (-) battery terminal.
- Remove the rear air conditioner and heater control unit. (Refer to Heating, Ventilation and Air Conditioning - "Heater and Air Conditioner") Control Unit (Rear)
Installation
Front Seat- Connect the seat heater switch connector.
- Install the upper console switch assembly.
- Connect the negative (-) battery terminal.
- Install the rear air conditioner and heater control unit.
- Connect the negative (-) battery terminal.
Test yourself
A quick Hyundai Palisade quiz: every answer comes with an explanation and a link to the manual page.
Was this page helpful?