Wheel replacement
1. Park on a level surface and firmly apply the parking brake.
2. Shift the transmission lever to "R" (Reverse) if the vehicle has a manual transmission, or to "P" (Park) if the vehicle has an automatic transmission.
3. Turn on the hazard warning flasher.
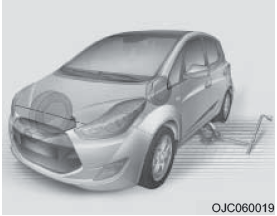
4. Remove the wheel wrench, jack, jack handle and spare tire from the vehicle.
5. Block the wheel diagonally opposite the jacking point, both front and rear.
WARNING
- Tire Replacement
• To prevent the vehicle from moving during tire replacement, always fully apply the parking brake and block the wheel diagonally opposite the wheel being replaced.
• When raising the vehicle with a jack, it is recommended to block the wheels with wheel chocks; no passengers should remain in the vehicle.
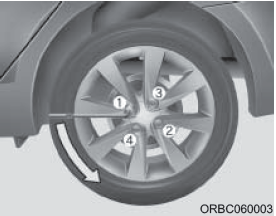
6. Loosen each wheel nut one turn counterclockwise, but do not remove them completely until the wheel is raised off the ground.
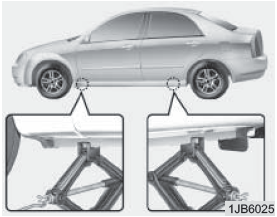
7. Position the jack at the front or rear jacking point nearest to the wheel being replaced.
Install the jack only at the designated jacking points under the frame. The jacking points are plates welded to the frame with two protrusions and a raised edge for contact with the jack.
WARNING
- Jacking point location
To reduce the risk of injury, use only the jack supplied with the vehicle, installed at the designated location; never place the jack under any other part of the vehicle.

8. Insert the jack handle and turn it clockwise to raise the vehicle until the wheel is off the ground.
This distance is approximately 30 mm (1.2 in).
Before loosening the wheel nuts, make sure the vehicle is stable and cannot move or slip off the jack.
9. Loosen the wheel nuts and remove them by hand. Carefully remove the wheel from the studs and lay it flat so it does not roll. To install the wheel on the hub, take the spare tire, align the holes with the studs and slide the wheel onto them. If difficulty occurs, tilt the wheel slightly and align the upper hole in the wheel with the upper stud.
Then rock the wheel from side to side and slide it onto the other studs.
WARNING
Wheels and wheel covers may have sharp edges. Handle them carefully to avoid serious injury. Before installation, make sure there are no foreign materials on the hub or wheel (such as dirt, resin, gravel, etc.) that could prevent the wheel from seating properly against the hub.
Remove any such material. If the mounting surfaces of the wheel and hub do not contact properly, the wheel nuts may loosen and the wheel may come off. Loss of a wheel may cause loss of vehicle control, resulting in serious injury or death.
10. To reinstall the wheel, hold it against the studs, screw on the wheel nuts and tighten them by hand. The nuts must be installed with the tapered end facing inward.
To ensure a secure fit, rock the wheel, then tighten the nuts by hand again as firmly as possible.
11. Turn the wheel wrench counterclockwise to lower the vehicle to the ground.
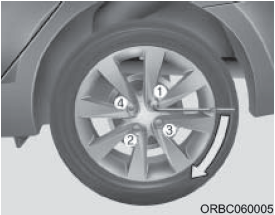
Then position the wrench as shown in the illustration and tighten the wheel nuts.
Make sure the socket fits fully over the nut (Type A).
Do not stand on the wrench handle or extend it with a pipe. Tighten each nut in a star pattern until all are firmly tightened. Then check the tightness of each nut twice.
After replacing the wheel, have the wheel nuts tightened to the specified torque at an authorized HYUNDAI dealer as soon as possible.
Test yourself
A quick Hyundai Solaris quiz: every answer comes with an explanation and a link to the manual page.