Restraints
Side Impact Sensor (SIS) Repair Procedures
In this manual: Restraints
21steps
~126min
4/5difficulty
Done 0 of 21
Removal
Side Impact Pressure Sensor
|
- Disconnect the negative battery cable and wait at least three minutes before starting work.
- Remove the front door trim panel. (Refer to Body - Front Door group)
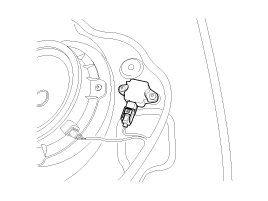
- Disconnect the front side impact sensor connector and remove the front side impact sensor mounting screws.
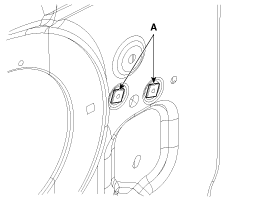
- Remove the threaded inserts (A).
- Disconnect the negative battery cable and wait at least three minutes before starting work.
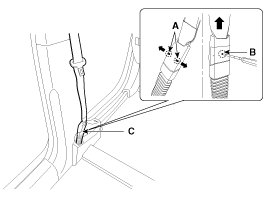
- To remove the seat belt pretensioner anchor (C), hold it while pressing the locking pins (A) in the direction of the arrow. Then remove the seat belt after pressing the locking pin (B).
- Remove the door scuff trim. (Refer to Body - Interior Trim group)
- Remove the center pillar trim. (Refer to Body - Interior Trim group)
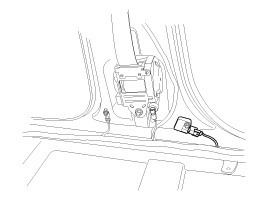
- Disconnect the side impact sensor connector.
- Loosen the side impact sensor mounting bolt and remove the side impact sensor.
Installation
Side Impact Pressure Sensor
|
- Install the threaded inserts (A).

- Do not reuse the threaded inserts (A) when installing.
- Install a new front side impact sensor with the screws, then press-fit the side impact sensor connector.
Tightening torque: 1.1 ~ 1.3 N·m
- Install the front door trim panel. (Refer to Body - Front Door group)
- Connect the negative battery cable.
- After installing the front side impact sensor, check that the system operates correctly:
A. Turn the ignition ON; the SRS indicator should illuminate for approximately six seconds, then turn off. - You must observe the specified tightening torques with the specified tool, as the pressure side impact sensors (P-SIS) may be damaged or the threaded insert may rotate.
- Durability problems with the P-SIS may occur, or the detection performance may deteriorate, if the screw insert rotates.
- The door module must not be deformed, because the SRSCM evaluates the impact pressure in the door module.
|
- Install a new side impact sensor with the bolt, then connect the side impact sensor connector.
Tightening torque: 7.0 ~ 9 N·m
- Install the center pillar trim (Refer to Body - Interior Trim group).
- Install the door scuff trim. (Refer to Body - Interior Trim group)
- Insert the seat belt into the anchor pretensioner.
Make sure the stopper pin is inserted correctly.
- Connect the negative battery cable.
- After installing the side impact sensor, check that the system operates correctly:
A. Turn the ignition ON; the SRS indicator should illuminate for approximately six seconds, then turn off.
Test yourself
A quick Hyundai Tucson LM quiz: every answer comes with an explanation and a link to the manual page.
Was this page helpful?