Fuel Hose Replacement
- Remove the fuel tank (see Fuel Tank Removal in the Fuel System (DFI) chapter).
Fuel is flammable and explosive under certain conditions and can cause severe burns. Be prepared for fuel spillage; any spilled fuel must be completely wiped up immediately. When the fuel hose is disconnected, fuel spills out from the hose and the pipe. Cover the hose connection with a clean shop towel to prevent fuel spillage.
For Primary Fuel Hose (Fuel Tank  Throttle Body Assy)
- Free the fuel hose from the clamp.
- Be sure to place a piece of cloth around the fuel hose joint.
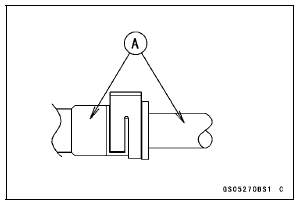
- Wipe off the dirt of the surface [A] around the connection using a cloth or a soft brush.
When removing with standard tip screwdriver
- Insert the standard tip screwdriver [A] into the slit on the joint lock [B].
- Turn the driver to disconnect the joint lock.
When removing with fingers
- Open and push up [C] the joint lock with your fingers.

NOTICE
Prying or excessively widening the joint lock ends for fuel hose removal will permanently deform the joint lock, resulting in a loose or incomplete lock that may allow fuel to leak and create the potential for a fire explosion. To prevent fire or explosion from a damaged joint lock, do not pry or excessively widen the joint lock ends when removing the fuel hose. The joint lock has a retaining edge that locks around the housing.
- Pull the fuel hose out of the pipe.
- Cover the delivery pipe with the vinyl bag to keep it clean.
- Remove the vinyl bag on the pipe.
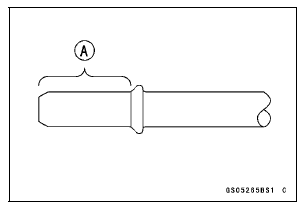
- Check that there are no flaws, burrs, and adhesion of foreign materials on the delivery pipe [A].
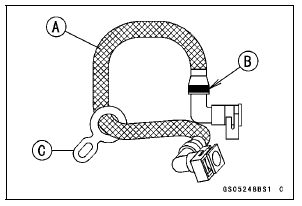
- Replace the fuel hose [A] with a new one.
The fuel hose in Brazil model has yellow paint [B].
- Install the rubber clamp [C] to the fuel hose as shown in the figure.
- Hook the rubber clamp to the clamp of the frame ground terminal (see Cable, Wire, and Hose Routing section in the Appendix chapter).
- Apply engine oil to the pipe.
- Run the fuel hose correctly (see Cable, Wire, and Hose Routing section in the Appendix chapter).
Check the yellow paint of the fuel hose in the throttle body assy side (Brazil model only).
- Insert the fuel hose joint [A] straight onto the delivery pipe [B] until the hose joint clicks.
- Push the joint lock [C].
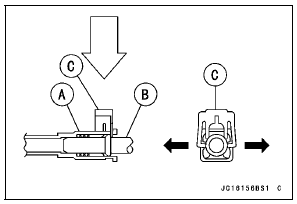
- Push and pull [A] the fuel hose joint [B] back and forth more than two times and make sure it is locked and does not come off.
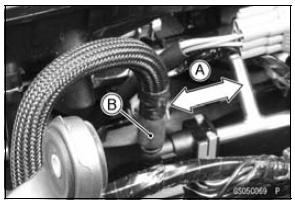
WARNING
Leaking fuel can cause a fire or explosion resulting in severe burns. Make sure the fuel hose joint is installed correctly on the delivery pipe and that it doesn’t leak.
If it comes off, reinstall the hose joint.
For Secondary Fuel Hose (Throttle Body Assy  Nozzle Assy)
- Be sure to place a piece of cloth around the fuel hose joint.
- Wipe off the dirt of the surface [A] around the connection using a cloth or a soft brush.
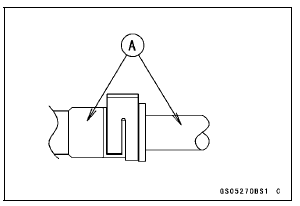
When removing with standard tip screwdriver
- Insert the standard tip screwdriver [A] into the slit on the joint lock [B].
- Turn the driver to disconnect the joint lock.
When removing with fingers
- Open and push up [C] the joint lock with your fingers.
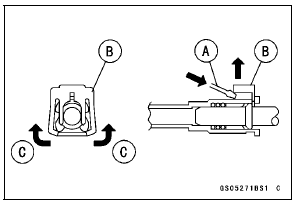
NOTICE
Prying or excessively widening the joint lock ends for fuel hose removal will permanently deform the joint lock, resulting in a loose or incomplete lock that may allow fuel to leak and create the potential for a fire explosion. To prevent fire or explosion from a damaged joint lock, do not pry or excessively widen the joint lock ends when removing the fuel hose. The joint lock has a retaining edge that locks around the housing.
- Pull the fuel hose out of the pipe.
- Cover the delivery pipe with the vinyl bag to keep it clean.
- Remove the vinyl bag on the pipe.
- Check that there are no flaws, burrs, and adhesion of foreign materials on the delivery pipe [A].
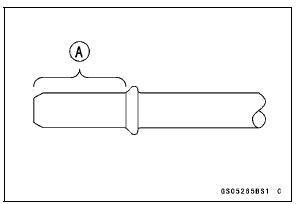
- Replace the fuel hose [A] with a new one.
The fuel hose in Brazil model has yellow paint [B].

- Apply engine oil to the pipe.
- Insert the fuel hose joint [A] securely onto the delivery pipe [B] until the hose joint clicks.
- Push the joint lock [C].
Check the yellow paint of the fuel hose in the throttle body assy side (Brazil model only).

- Push and pull [A] the fuel hose joint [B] back and forth more than two times and make sure it is locked and does not come off.
Leaking fuel can cause a fire or explosion resulting in severe burns. Make sure the fuel hose joint is installed correctly on the delivery pipe and that it doesn’t leak.
If it comes off, reinstall the hose joint.
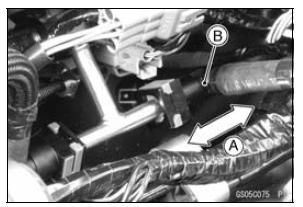
- Insert [A] the fuel hose joint [B] straight onto the delivery pipe until the hose joint clicks.
- Push [C] the joint lock [D].
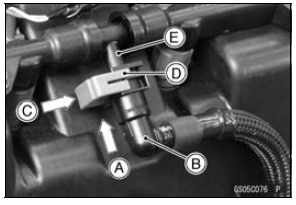
NOTICE
When inserting the fuel hose joint, do not apply strong force to the delivery pipe [E] on the nozzle assy. The pipe made from resin could be damaged.
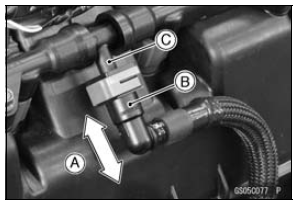
- Push and pull [A] the fuel hose joint [B] back and forth more than two times and make sure it is locked and does not come off.
NOTICE
When pushing and pulling the fuel hose joint, do not apply strong force to the delivery pipe [C] on the nozzle assy. The pipe made from resin could be damaged.
WARNING
Leaking fuel can cause a fire or explosion resulting in severe burns. Make sure the fuel hose joint is installed correctly on the delivery pipe and that it doesn’t leak.
If it comes off, reinstall the hose joint.
- Install the fuel tank (see Fuel Tank Installation in the Fuel System (DFI) chapter).
- Start the engine and check the fuel hose for leaks.
Test yourself
A quick Kawasaki Ninja ZX-10R quiz: every answer comes with an explanation and a link to the manual page.