Automatic Transmission
Automatic Transmission Repair Procedures
In this manual: Automatic Transmission
24steps
~154min
5/5difficulty
2special tools
Done 0 of 24
Removal
- Air cleaner assembly and air duct. (Refer to Engine Mechanical System - "Air Cleaner".)
- Battery and battery tray. (Refer to Engine Electrical System - "Battery".)
- Disconnect the solenoid valve connector (A) and the lock-up switch connector (B).

- Remove the control cable (B) by loosening the nut (C) and bolt (A). Tightening torque: (A) 14.7 ~ 22 N·m (C) 8.8 ~ 13.7 N·m
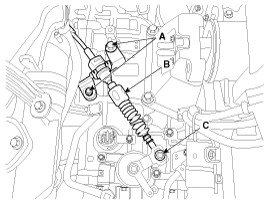
- Remove the wiring bracket mounting bolts (A, B).
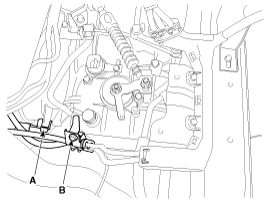
- Remove the clamp (A) of the automatic transmission fluid cooler hose, then disconnect the hose (B).
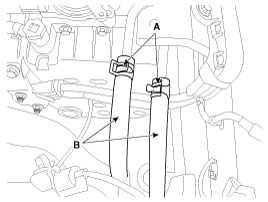
- Remove the wiring bracket mounting bolt (A).
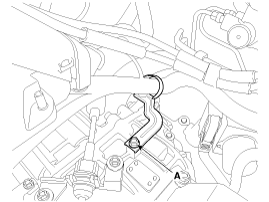
- Remove the ground line after removing the bolt (A).
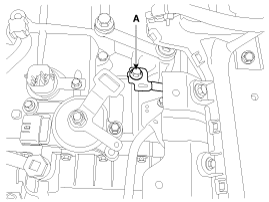
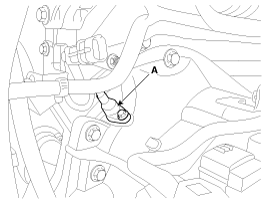
- Remove the crankshaft position sensor (A).
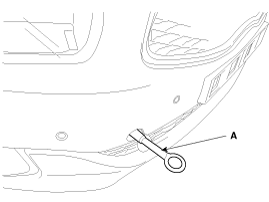
- Install the towing eye (A).
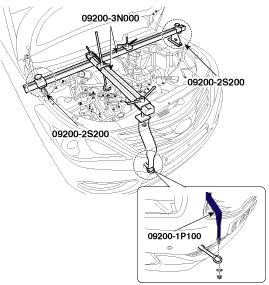
- Assemble the engine mount. (Refer to Special Service Tools - "Engine Mount Bracket Assembly Drawing")
- Install the engine mount.
- Remove the upper automatic transaxle mounting bolts (A, B). Tightening torque: (A) 63.7 ~ 83 N·m (B) 32.4 ~ 49 N·m

- Remove the cover (A).
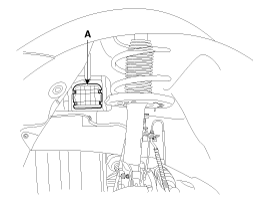
- Remove the automatic transmission bracket mounting bolt (A).
Tightening torque: 88.2 - 108 N·m
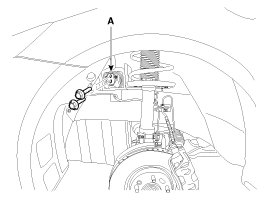
- Remove the automatic transaxle support bracket (A). Tightening torque: Bolt: 58.8 ~ 78 N·m Nut: 78.5 ~ 98 N·m
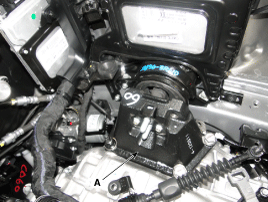
- Raise the vehicle using a jack.
- Remove the lower cover (A).

- Remove the drive shaft assembly. (Refer to Drive Shaft and Axle - "Front Drive Shaft")
- Remove the subframe assembly. (Refer to Suspension System - "Subframe")
- Remove the bellhousing cover (A).
Tightening torque: 9.8 ~ 11.8 N·m
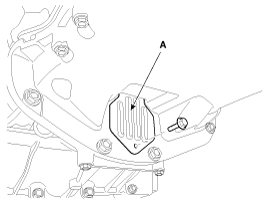
- Remove the torque converter mounting bolts (A, 6 pcs.) by turning the crankshaft.
Tightening torque: 45.1 ~ 52 N·m
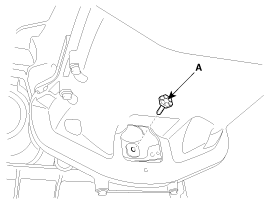
- Remove the starter motor bolt (A).
Tightening torque: 49.0 ~ 64 N·m

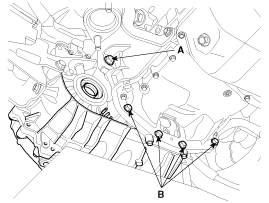
- Remove the automatic transaxle using a jack after loosening the mounting bolts (A, 1 pc.; B, 4 pcs.). Tightening torque: (A) 39.2 ~ 46 N·m (B) 78.5 ~ 98 N·m
Installation
- Install in the reverse order of removal.

- When reinstalling
- Replace the oil seal with a new one using the special tools (09453-3L240, 09231-H1100) if ATF leaks due to oil in the differential and damage to the seal.
- Check the ATF level after adding fluid to the automatic transmission. (Refer to Hydraulic System - "Fluid")
- Erase the diagnostic trouble codes (DTCs) using GDS. (DTCs will not be erased even after the battery negative terminal is disconnected. Therefore, be sure to erase the DTCs using GDS.)
- When replacing with a new automatic transaxle
- The new automatic transaxle is already filled with the specified amount of ATF. For this reason, it is not necessary to fill and check the ATF; however, the residual ATF in the ATF cooler must be removed.
- Install the transaxle after removing residual ATF by blowing air through the ATF cooler hose.
- Erase the diagnostic trouble codes (DTCs) using GDS. (DTCs will not be erased even after the battery negative terminal is disconnected. Therefore, be sure to erase the DTCs using GDS.)
- Reset the automatic transmission adaptive values using GDS.

- Perform the procedure to store the TCM adaptive values. (Refer to "Automatic Transmission Control System - Repair Procedures")
- When replacing with a remanufactured automatic transaxle
- The remanufactured automatic transmission is not filled with the specified amount of ATF. For this reason, add and check the ATF.
- Check the ATF level after adding fluid to the automatic transmission. (Refer to Hydraulic System - "Fluid")
- Erase the diagnostic trouble codes (DTCs) using GDS. (DTCs will not be erased even after the battery negative terminal is disconnected. Therefore, be sure to erase the DTCs using GDS.)
- Reset the automatic transmission adaptive values using GDS.
- Perform the procedure to store the TCM adaptive values. (Refer to "Automatic Transmission Control System - Repair Procedures")
Test yourself
A quick Kia Cadenza VG Owner's Manual quiz: every answer comes with an explanation and a link to the manual page.
Was this page helpful?