Engine Mechanical System
Cylinder Head Cover Repair Procedures
In this manual: Engine Mechanical System
12steps
~72min
3/5difficulty
Done 0 of 12
Removal
[LH]
- Remove the intake manifold. (Refer to Intake and Exhaust Systems — Intake Manifold)
- Remove the high pressure fuel pump. (Refer to Fuel System - "High Pressure Fuel Pump")
- Remove the left ignition coils. (Refer to Engine Electrical System – "Ignition Coil")
- Remove the front engine mount. (Refer to Engine and Transaxle Assembly - "Engine Mounting")
- Remove the left cylinder head cover.
- Remove the left exhaust CVVT oil control valve (OCV) cover (A).
- Remove the left cylinder head cover (B) and gasket.
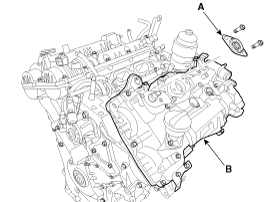
Cover the cylinder head with a clean cloth or vinyl sheet to prevent foreign material from entering.
[RH]
- Remove the expansion tank. (Refer to Intake and Exhaust System - "Expansion Tank")
- Remove the right ignition coils. (Refer to Engine Electrical System – "Ignition Coil")
- Remove the right cylinder head cover.
- Remove the right exhaust CVVT oil control valve (OCV) cover (A).
- Remove the right cylinder head cover (B) and gasket.
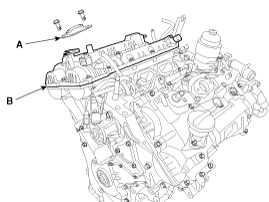
Cover the cylinder head with a clean cloth or vinyl sheet to prevent foreign material from entering.
Installation
[LH]
- Install the left cylinder head cover.
- Install the cylinder head cover under the OCV exhaust cover.
- To prevent engine oil leakage, be sure to install the exhaust OCV cover after installing the cylinder head cover.
- Before assembly, remove the hardened sealant located on the upper mating surface between the timing chain cover and the cylinder head cover.
- After applying TB 1217H (Hyundai Grey RTV) sealant, assemble within 5 minutes.
Bead width: 2.5 mm (0.1 in)
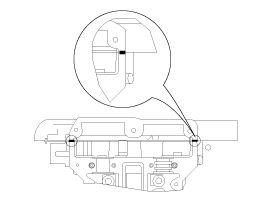
- Do not perform the baking and/or purging test within 30 minutes after installing the cylinder head cover.
- Install the left cylinder head cover bolts as follows. Tightening torque: Step 1: 4.9 ~ 5.9 N·m Step 2: 9.8 ~ 11.8 N·m
Do not reuse the cylinder head cover gasket.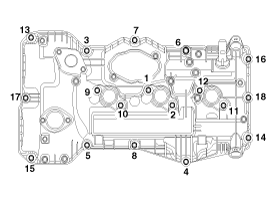
- Install the left exhaust oil control valve (OCV) CVVT cover.
Tightening torque: 9.8 ~ 11.8 N·m
- Remove the exhaust valve OCV cover, then install the cylinder head cover.
- After installing the cylinder head cover, install the OCV exhaust cover. Otherwise, engine oil may leak through the sealing side of the OCV cover.
- If the seal was damaged during removal and installation, replace the exhaust valve OCV cover with a new one.
- Install the remaining parts in the reverse order of removal.
[RH]
- Install the right cylinder head cover.
- Install the cylinder head cover under the OCV exhaust cover.
- To prevent engine oil leakage, be sure to install the exhaust OCV cover after installing the cylinder head cover.
- Before assembly, remove the hardened sealant located on the upper mating surface between the timing chain cover and the cylinder head cover.
- After applying TB 1217H (Hyundai Grey RTV) sealant, assemble within 5 minutes.
Bead width: 2.5 mm (0.1 in)
- Do not perform the baking and/or purging test within 30 minutes after installing the cylinder head cover.
- Install the right cylinder head cover bolts as follows. Tightening torque: Step 1: 4.9 ~ 5.9 N·m Step 2: 9.8 ~ 11.8 N·m
Do not reuse the cylinder head cover gasket.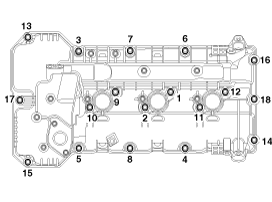
- Install the right exhaust oil control valve (OCV) CVVT cover.
Tightening torque: 9.8 ~ 11.8 N·m
- Remove the exhaust valve OCV cover, then install the cylinder head cover.
- After installing the cylinder head cover, install the OCV exhaust cover. Otherwise, engine oil may leak through the sealing side of the OCV cover.
- If the seal was damaged during removal and installation, replace the exhaust valve OCV cover with a new one.
- Install the remaining parts in the reverse order of removal.
Test yourself
A quick Kia Cadenza VG Owner's Manual quiz: every answer comes with an explanation and a link to the manual page.
Was this page helpful?