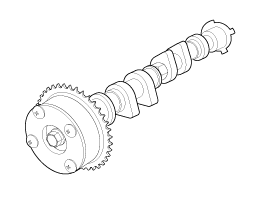
Clamp the camshaft in a vise. Be careful not to damage the cam lobes and journals in the vise.
Make sure the CVVT is locked by turning it clockwise or counterclockwise. It should not rotate.
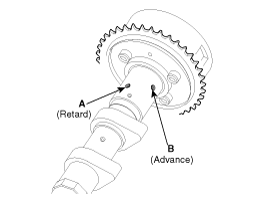
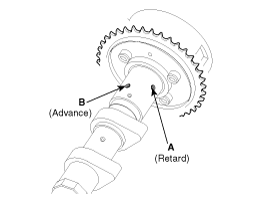
Intake CVVT: Seal one of the two advance holes in the camshaft journal with tape. Exhaust CVVT: Seal one of the two retard holes in the camshaft journal with tape. [Intake][Exhaust]
Intake CVVT: Apply approx. 150 kPa (1.5 kgf/cm², 21 psi) of compressed air to the unsealed supply hole to unlock the lock. Exhaust CVVT: Apply approx. 150 kPa (1.5 kgf/cm², 21 psi) of compressed air to the unsealed retard hole to unlock the lock.
When applying compressed air, cover the oil passages with a cloth to prevent oil from splashing.
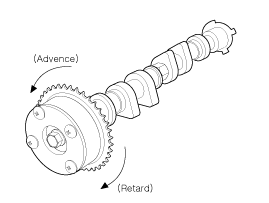
Intake CVVT: While applying compressed air, rotate the CVVT in the advance direction (counterclockwise) within its phase range and make sure the CVVT rotates smoothly. Exhaust CVVT: While applying compressed air, rotate the CVVT in the retard direction (clockwise) and make sure the CVVT rotates smoothly. CVVT Phase Range Intake: 25°±0°30' (from most retarded position to most advanced position). Exhaust: 25°±0°30' (from most advanced position to most retarded position).
Intake CVVT: Rotate the CVVT to the most retarded position (clockwise), then make sure the CVVT is locked. Exhaust CVVT: Rotate the CVVT to the most advanced position (counterclockwise), then make sure the CVVT is locked.
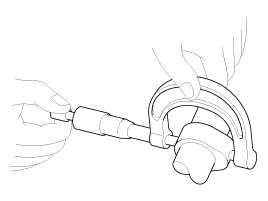
Inspect the camshaft lobes. Using a micrometer, measure the camshaft lobe height. Lobe height [Standard value] Intake: 46.6 mm (1.835 in) Exhaust: 45.8 mm (1.8031 in)If the cam lobe height is less than the standard value, replace the camshaft.
Inspect the camshaft journal oil clearance.
Clean the camshaft bearing caps and journals.
Install the camshafts on the cylinder head.
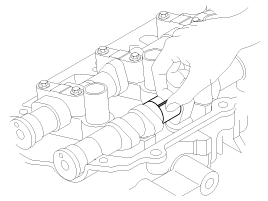
Place a strip of Plastigage on each camshaft journal.
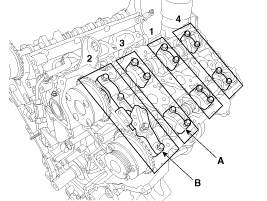
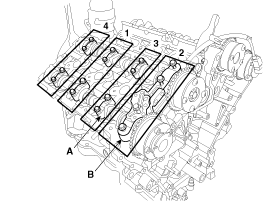
Install the bearing cap (A) and thrust bearing cap (B) to the specified torque. (Refer to Cylinder Head in this group) Tightening torque: Step 1: 5.8 N·m Step 2: 9.8 ~ 11.8 N·m
Do not rotate the camshaft.
Remove the bearing caps.
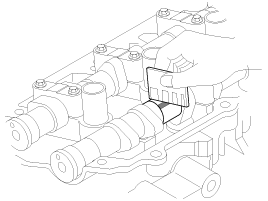
Measure the plastigage at its widest point. Bearing oil clearance [Standard value] Intake: No. 1 journal: 0.020 ~ 0.057 mm (0.0008 ~ 0.0022 in) No. 2, 3, 4 journals: 0.030 ~ 0.067 mm (0.0012 ~ 0.0026 in) Exhaust: No. 1 journal: 0.027 ~ 0.057 mm (0.0010 ~ 0.0022 in) No. 2, 3, 4 journals: 0.030 ~ 0.067 mm (0.0012 ~ 0.0026 in)
If the oil clearance is greater than specified, replace the camshaft.
If the oil clearance is still greater than specified after replacing the camshaft, replace the bearing caps and cylinder head as a set.
Completely remove the plastigage.
Remove the camshafts.
Inspect the camshaft end play.
Install the camshafts.
Install the bearing cap (A) and thrust bearing cap (B) and tighten to the specified torque. Tightening torque: Step 1: 5.8 N·m Step 2: 9.8 N·m
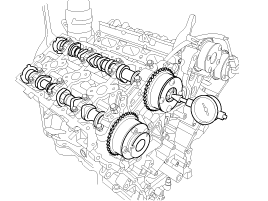
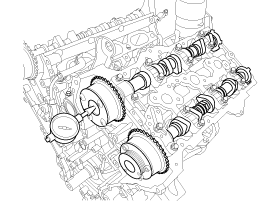
Using a dial indicator, measure the camshaft end play by moving the camshaft back and forth. Camshaft end play [Standard value]: 0.02 ~ 0.18 mm (0.0008 ~ 0.0071 in)
If the end play is greater than specified, replace the camshaft.
If the end play is still greater than specified after replacing the camshaft, replace the bearing caps and the cylinder head assembly.
Remove the camshafts.
Camshaft
Installation
Continuous Variable Valve Timing (CVVT)
Install the CVVT unit.
Tightening torque: 64.7 – 76 N·m
Install the intake camshaft onto the locating pin of the CVVT assembly. Make sure the intake camshaft oil hole is not installed.
While holding the hexagonal part of the camshaft in a vise, install the bolt and the CVVT assembly.
Do not rotate the CVVT assembly when the camshaft is installed on the CVVT assembly locating pin.
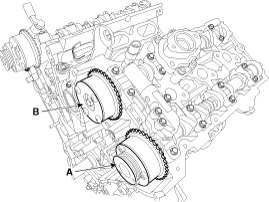
A: Left Exhaust CVVT
B: Left Intake CVVT
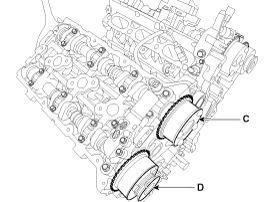
C: Right Intake CVVT
D: Right Exhaust CVVT
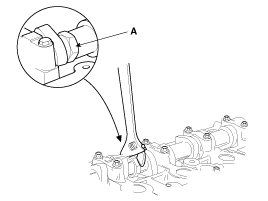
When installing the CVVT assembly bolt, do not allow the camshaft to rotate with a wrench at position A.
Install the timing chain. (Refer to Timing System - Timing Chain)
Camshaft
Apply a thin coat of engine oil to the camshaft journals.
Align the keyway of the rear camshaft with the top surface of the head.
Be careful to identify the right and left banks, and the intake and exhaust sides before assembly.
Left Intake and Exhaust Camshaft
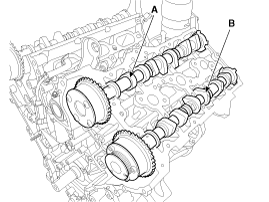
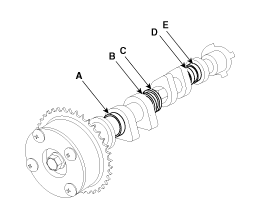
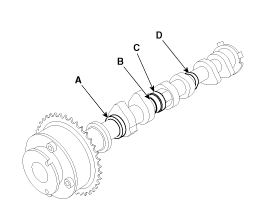
Install the left intake camshaft (A) and exhaust camshaft (B).Left intake camshaftFor camshaft identification, refer to the table below.
Outer diameter
A
-
B
-
C
-
D
-
E
-
The left intake camshaft has no identification ring.
Left exhaust camshaftFor camshaft identification, refer to the table below.
Outer diameter
A
27 mm (1.0630 in)
B
27 mm (1.0630 in)
C
30 mm (1.1811 in)
D
27 mm (1.0630 in)
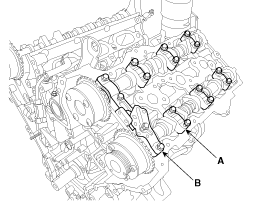
Install the bearing cap (A) and thrust bearing cap (B) and tighten to the specified torque. Tightening torque: Step 1: 5.8 N·m Step 2: 9.8 ~ 11.8 N·m
Be sure to install the thrust bearing cap bolts and bearing cap bolts in the correct locations.
Be careful to identify the right and left banks, and the intake and exhaust sides before assembly.
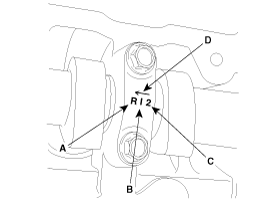
A: L (LH), R (RH) B: I (intake), none (exhaust) C: Journal number D: Front mark
Turn the crankshaft so that the pistons are not in contact with the valves, and position the pistons below 10 mm (0.3937 in.) from the top surface of the cylinder block.
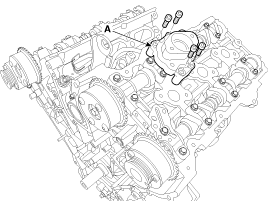
Install the fuel pump bracket (A).
Tightening torque: 18.6 ~ 24 N·m
Install the remaining parts in the reverse order of removal.
Right Intake and Exhaust Camshaft
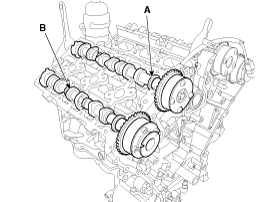
Install the right intake camshaft (A) and exhaust camshaft (B).Right intake camshaftFor camshaft identification, refer to the table below.
Outer diameter
A
30 mm (1.1811 in)
B
27 mm (1.0630 in)
C
30 mm (1.1811 in)
D
30 mm (1.1811 in)
E
30 mm (1.1811 in)
Right exhaust camshaftFor camshaft identification, refer to the table below.
Outer diameter
A
27 mm (1.0630 in)
B
27 mm (1.0630 in)
C
30 mm (1.1811 in)
D
30 mm (1.1811 in)
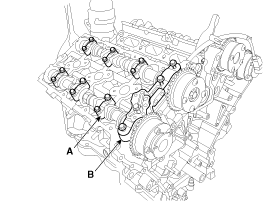
Install the bearing cap (A) and thrust bearing cap (B) and tighten to the specified torque. Tightening torque: Step 1: 5.8 N·m Step 2: 9.8 ~ 11.8 N·m
Be sure to install the thrust bearing cap bolts and bearing cap bolts in the correct locations.
Be careful to identify the right and left banks, and the intake and exhaust sides before assembly.
A: L (LH), R (RH) B: I (intake), none (exhaust) C: Journal number D: Front mark
Turn the crankshaft so that the pistons are not in contact with the valves, and position the pistons below 10 mm (0.3937 in.) from the top surface of the cylinder block.
Install the remaining parts in the reverse order of removal.
?
Test yourself
A quick Kia Cadenza VG Owner's Manual quiz: every answer comes with an explanation and a link to the manual page.