Engine Mechanical System
Exhaust Manifold Repair Procedures
In this manual: Engine Mechanical System
13steps
~78min
3/5difficulty
Done 0 of 13
Removal and Installation
[LH]
- Disconnect the connector of the left front and rear heated oxygen sensor (HO2S). (Refer to Fuel System - "Heated Oxygen Sensor (HO2S)").
- Remove the front muffler. (Refer to Intake and Exhaust System - "Muffler")
- Remove the cooling fan assembly. (Refer to Cooling System - "Cooling Fan")
- Remove the oil level gauge assembly. (Refer to Lubrication System - "Oil Level Gauge and Tube")
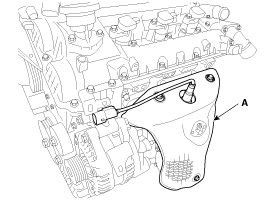
- Remove the left exhaust manifold heat protector (A).
Tightening torque: 9.8 ~ 11.8 N·m
- Remove the left exhaust manifold bracket (A), then remove the left exhaust manifold (B) and gasket. Tightening torque Bolt: 24.5 ~ 35 N·m Manifold nuts: 49.0 ~ 54 N·m
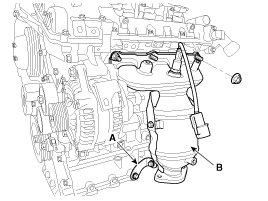
- Install in the reverse order of removal.
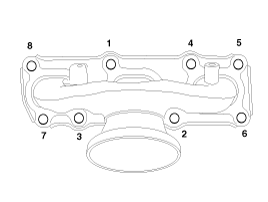
When installing the exhaust manifold, first tighten the nuts to the preliminary torque, then tighten them to the specified torque in the sequence shown.
[RH]
- Disconnect the connector of the right front and rear heated oxygen sensor (HO2S). (Refer to Fuel System - "Heated Oxygen Sensor (HO2S)").
- Remove the expansion tank. (Refer to Intake and Exhaust System - "Expansion Tank")
- Remove the front muffler. (Refer to Intake and Exhaust System - "Muffler")
- Remove the right exhaust manifold heat protector (A).
Tightening torque: 9.8 ~ 11.8 N·m
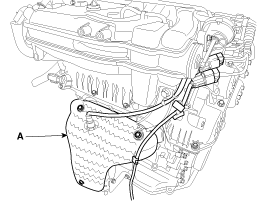
- Remove the right exhaust manifold bracket (A), then remove the right exhaust manifold (B) and gasket. Tightening torque Bolt: 24.5 ~ 35 N·m Manifold nuts: 49.0 ~ 54 N·m
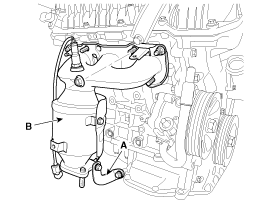
- Install in the reverse order of removal.
When installing the exhaust manifold, first tighten the nuts to the preliminary torque, then tighten them to the specified torque in the sequence shown.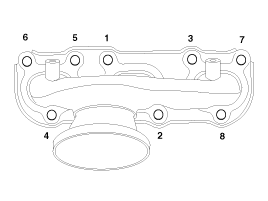
Test yourself
A quick Kia Cadenza VG Owner's Manual quiz: every answer comes with an explanation and a link to the manual page.
Was this page helpful?