Body Electrical System
Troubleshooting
In this manual: Body Electrical System
16steps
~96min
4/5difficulty
Done 0 of 16
Troubleshooting Guide
Troubleshooting (Step by Step)
| Symptom of Malfunction | Probable Cause | Remedy |
| System does not turn on when the power switch is pressed | Radio Power Supply Circuit | P-1 |
| LCD module | P-1 | |
| Panel switch does not work | Steering column switch circuit | R-3 |
| AVN H/U front board assembly | P-1 | |
| Radio Power Supply Circuit | P-1 | |
| No sound from speakers | Radio Power Supply Circuit | P-1 |
| Check the wiring between the speakers and the AVN H/U. | R-6 | |
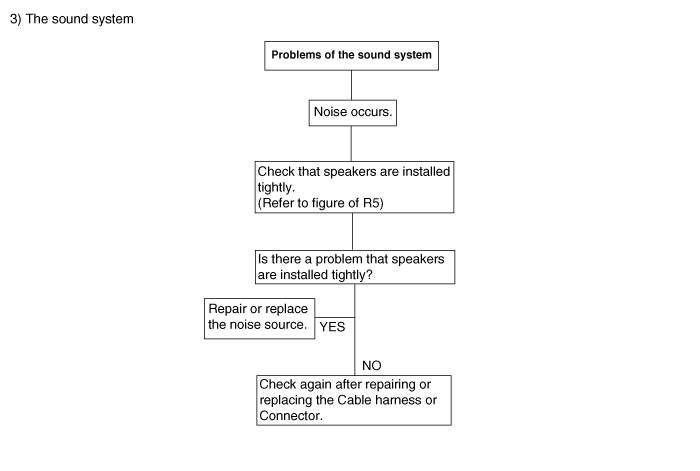
| Noise occurs | Go to "Noise occurs". | R-5 |
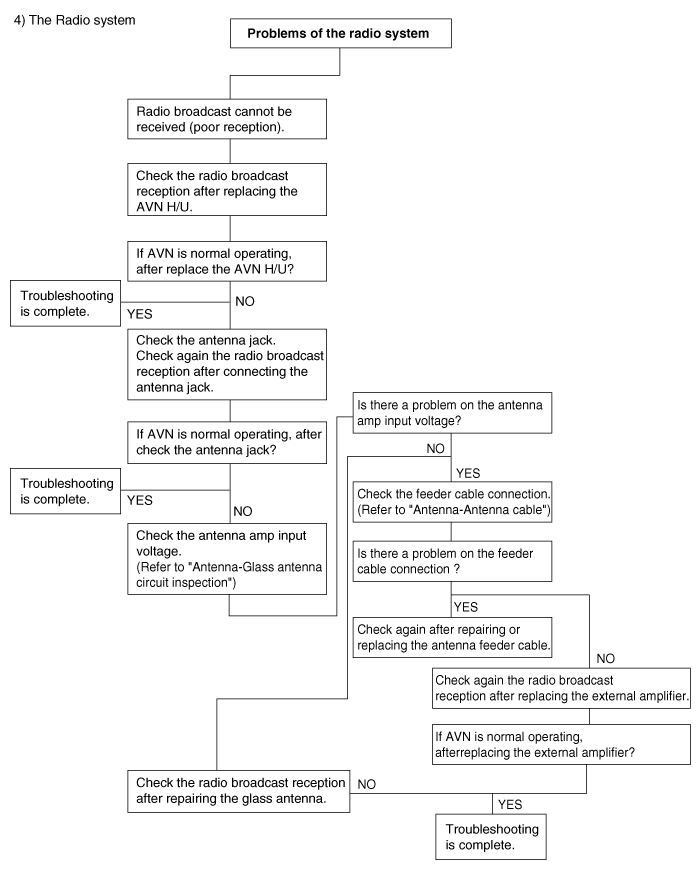
| Radio broadcast is not received (poor reception) | Go to "Radio broadcast cannot be received" (poor reception) |
R-4 |
| Radio lamp does not work when the illumination control switch is ON | Illumination Circuit | R-6 |
| Radio Power Supply Circuit | P-1 | |
| Display does not turn off when the illumination control switch is turned on | Illumination Circuit | R-6 |
| Power does not turn off | AVN H/U | P-1 |
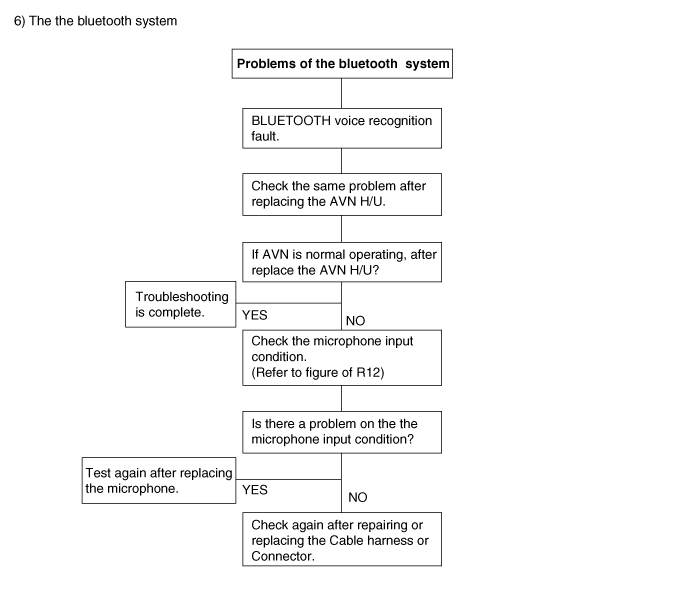
| Bluetooth voice recognition error | AVN H/U | P-1 |
| microphone input | R-7 | |
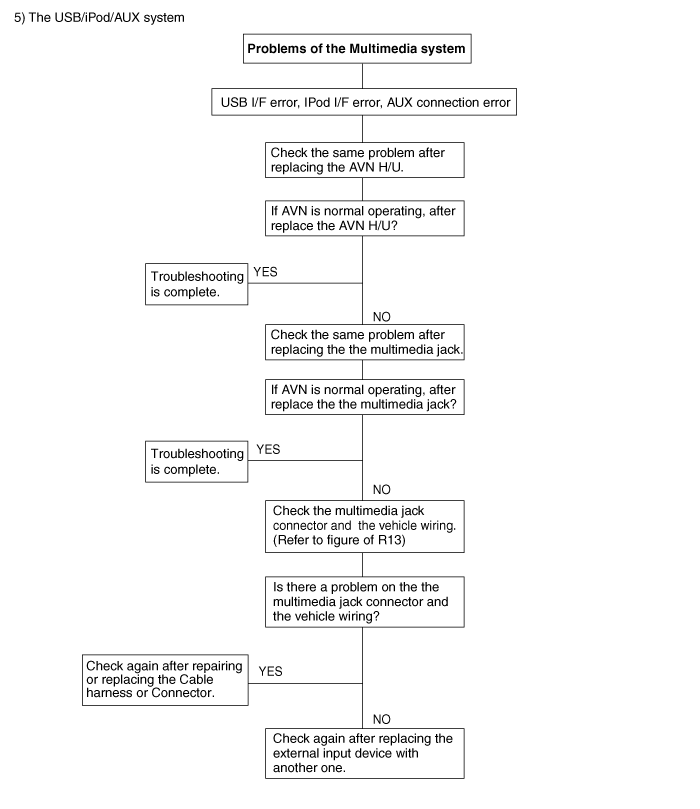
| USB interface error | AVN Head Unit | P-1 |
| USB device error | R-8 | |
| Check the multimedia jack | R-8 | |
| iPod interface error | AVN H/U | P-1 |
| Check the multimedia jack | R-8 | |
| AUX connection error | AVN H/U | P-1 |
| Check the multimedia jack | R-8 |
R-1: Replace the AVN head unit
- Check for the same problem after replacing the AVN H/U.
GOOD ? If the AVN operates normally, replace the AVN H/U.
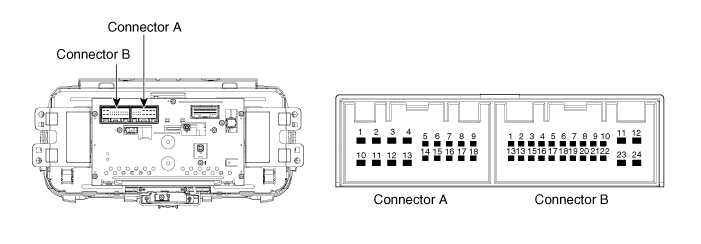
NG ? Check the vehicle wiring. (See Removal procedure, R-2) - Remove the AVN H/U.
- Check the specified terminal condition.
GOOD
Tester connection Condition Specified condition CON-B11/B12 — GROUND (B+) Always 9 - 16 V CON-B18 — GROUND (ACC) Always 9 - 16 V CON-B23-GROUND Always Below 1? CON-B24-GROUND Always Below 1?
NG ? Check again after repairing or replacing the wiring harness or connector. - Check the specifications of the steering wheel remote control switch connector (See Steering Wheel Remote Control Audio System Inspection).
GOOD ? Replace AVN H/U
NG ? Replace steering wheel remote control switch - Check radio reception after replacing AVN H/U.
GOOD ? If the AVN operates normally, replace the AVN H/U.
NG ? Go to step 2 - Check the antenna connector
GOOD ? Check radio reception again after connecting the antenna connector.
NG ? Go to step 3 - Check the antenna amplifier input voltage (See Antenna - Rear Window Antenna Circuit).
GOOD ? Check the antenna amplifier input voltage (See Antenna - Antenna Cable).
NG ? Go to step 4 - Check the antenna feeder cable connection (See Antenna - Antenna Cable).
GOOD ? Check again after repair or replacement of the antenna feeder cable.
NG ? Go to step 5 - Inspect and repair the roof antenna.
| GOOD | ? Securely install the speakers |
| NG | ? Securely install the speakers |
- Noise source description
Noise Conditions Noise type Depressing the accelerator pedal increases the noise, and stopping the engine immediately stops the noise. Alternator noise When the air conditioner or heater is operating Fan motor noise - When accelerating sharply on an unpaved road
- When the ignition switch is ON (IG)
Fuel pump noise - When the horn switch is pressed and released
- When the horn switch is pressed and held
Horn noise Engine running causes a faint noise, and the noise stops immediately when the engine is stopped. Ignition noise Noise occurs in synchronization with turn signal flashing Flashing noise Noise occurs while the windshield washer is operating Washer motor noise Engine running causes noise, but stopping the engine does not eliminate the noise Engine coolant temperature sensor noise When the windshield wiper is operating Wiper blade noise When the brake pedal is depressed Stop lamp switch noise Other Static electricity in the vehicle
| GOOD | ? Remove the AVN H/U. |
| NG | ? Go to step 1 |
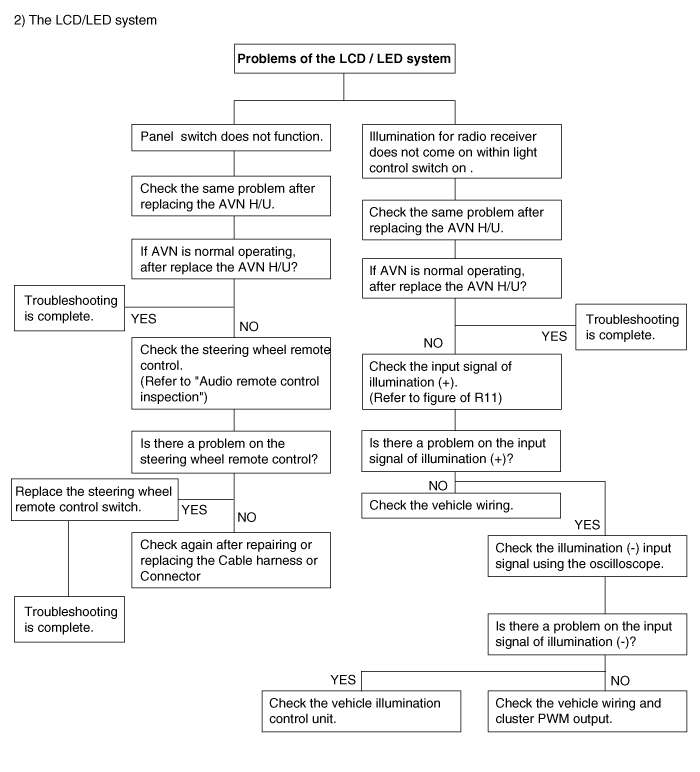
- Check illumination input signal (+)
Tester connection Condition Specified condition CON-A8-GROUND Always 9-16 V
GOOD ? Check the vehicle wiring
NG ? Go to step 2 - Check the illumination input signal (-) using an oscilloscope.
Tester connection Condition Specified condition CON-A17-GROUND Always Check the PWM waveform
GOOD ? Check the vehicle wiring and the cluster PWM output.
NG ? Go to step 3 - Check the vehicle lighting control module.
| Tester connection | Condition | Specified condition |
| CON-B10 - Microphone (+) | Always | Below 1? |
| CON-B22 - Microphone (-) | Always | Below 1? |
| CON-B22-GROUND | Always | Open |
| GOOD | ? Check the vehicle wiring and the microphone |
| NG | ? Go to step 1 |
- Check again after replacing the microphone
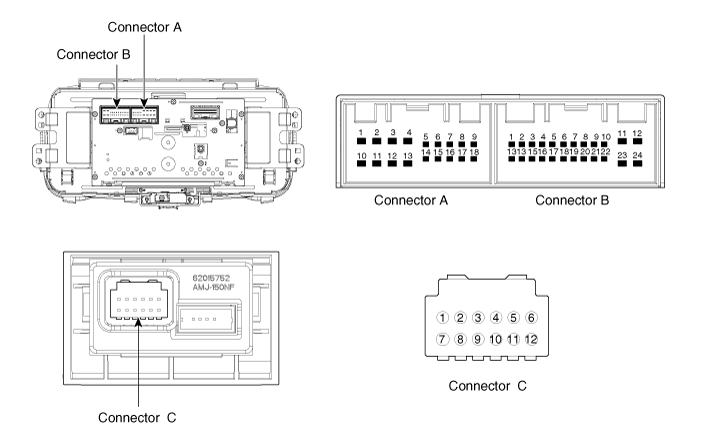
- Test after replacing the multimedia connector
GOOD ? Replace the multimedia connector
NG ? Go to step 2 - Check the vehicle USB cable.
GOOD ? Replace the vehicle USB cable
NG ? Go to step 3 - Check the multimedia connector
Tester connection Condition Specified condition AVN H/U CON-B8 - Multimedia connector CON-C2 Always Below 1? AVN H/U CON-B21 - Multimedia connector CON-C1 Always Below 1? AVN H/U CON-B20 - Multimedia connector CON-C3 Always Below 1? AVN H/U CON-B9 - Multimedia connector CON-C7 Always Below 1?
Troubleshooting (Flow Chart Type)
There are six areas where a problem may occur: power supply system, LCD/LED system, sound system, radio system, USB/iPod/AUX system, and Bluetooth system. Troubleshooting helps narrow down the specific cause of the problem.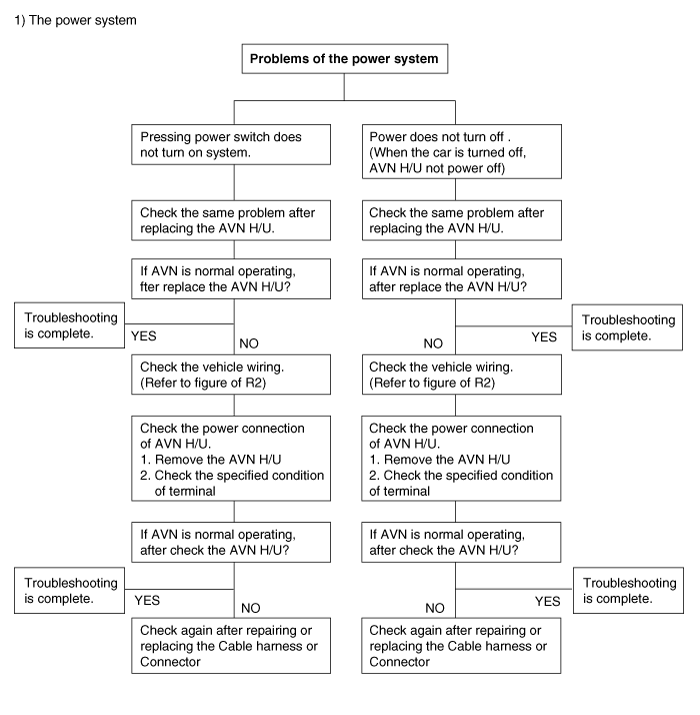
Test yourself
A quick Kia Soul EV Owner's Manual quiz: every answer comes with an explanation and a link to the manual page.
Was this page helpful?