Body

Discharge Headlight System Inspection

~2min read
Discharge headlight inoperative WARNING:
  • Incorrect servicing of the discharge headlight bulb could result in electrical shock. Before servicing the discharge headlight bulb, always refer to the service warnings..

Terminal layout
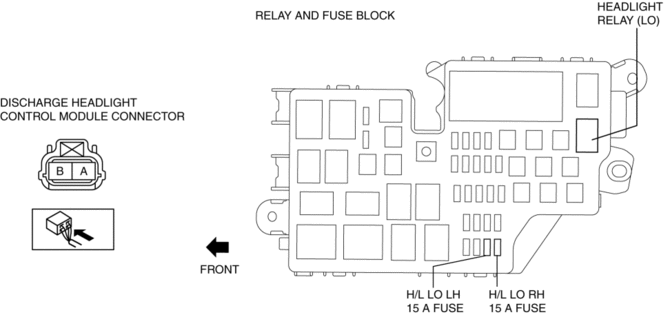

Inspection procedure

STEP

INSPECTION

ACTION

1

INSPECT POWER SUPPLY CIRCUIT OF DISCHARGE HEADLIGHT CONTROL MODULE
  • Disconnect the negative battery cable..

  • Disconnect the discharge headlight control module connector.

  • Connect the negative battery cable..

  • Turn the light switch to the HEAD position.

  • Measure the voltage at discharge headlight control module connector (harness-side) terminal A.

  • Is the voltage approx. 12 V

    ?

Yes

Go to Step 6.

No

Go to the next step.

2

INSPECT FUSE
  • Turn the light switch to the OFF position.

  • Remove the H/L LO RH 15 A fuse or H/L LO LH 15 A fuse.

  • Inspect the fuses.

  • Are the fuses normal?

Yes

Go to the next step.

No

Replace the fuse.

3

INSPECT HEADLIGHT RELAY
  • Remove the headlight relay (LO)..

  • Inspect the headlight relay (LO)..

  • Is the headlight relay (LO) normal?

Yes

Go to the next step.

No

Replace the headlight relay (LO)..

4

INSPECT LIGHT SWITCH
  • Inspect the light switch..

  • Is the light switch normal?

Yes

Go to the next step.

No

Replace the light switch..

5

INSPECT FOR OPEN OR SHORT CIRCUITS IN THE FOLLOWING WIRING HARNESSES BETWEEN BATTERY AND DISCHARGE HEADLIGHT CONTROL MODULE
  • Disconnect the negative battery cable..

  • Inspect for continuity between the following terminals:

    • Positive battery—headlight relay (LO) terminal D

    • H/L LO RH 15 A fuse—discharge headlight control module terminal A

    • H/L LO LH 15 A fuse—discharge headlight control module terminal A

  • Are the wiring harnesses normal?

Yes

Go to the next step.

No

Replace the related wiring harness.

6

INSPECT FOR OPEN OR SHORT CIRCUITS IN THE FOLLOWING WIRING HARNESS BETWEEN DISCHARGE HEADLIGHT CONTROL MODULE AND GROUND
  • Inspect the wiring harness between the discharge headlight control module terminal B and ground for the following:

    • Short to power supply

    • Open circuit

  • Is the wiring harness normal?

Yes

Go to the next step.

No

Replace the related wiring harness.

7

VERIFY WHETHER MALFUNCTION IS IN DISCHARGE HEADLIGHT BULB OR DISCHARGE HEADLIGHT CONTROL MODULE
  • Install any other discharge headlight bulb..

  • Connect the discharge headlight control module connector.

  • Turn the light switch to the HEAD position.

  • Does the headlight (low-beam) illuminate?

Yes

Replace the discharge headlight bulb..

No

Replace the discharge headlight control module..

Test yourself

A quick Mazda 3 quiz: every answer comes with an explanation and a link to the manual page.