Engine Removal/Installation [Skyactiv G 2.0]
A hot engine can cause severe burns. Turn off the engine and wait until it is cool before servicing.
Fuel vapor is hazardous. It can very easily ignite, causing serious injury and damage. Always keep sparks and flames away from fuel.
Fuel line spills and leakage are dangerous. Fuel can ignite and cause serious injuries or death and damage. Fuel can also irritate skin and eyes. To prevent this, always complete the “Fuel Line Safety Procedure”..
Secure the steering wheel using tape or a cable to prevent the steering shaft from rotating after disconnecting the steering shaft. If the steering wheel rotates after the steering shaft and the steering gear and linkage are disconnected, the internal parts of the clock spring could be damaged.
Applying excessive force (force of 100 N {10.2 kgf, 22.5 lbf} or more) to the electric variable valve timing motor/driver may cause a malfunction. When servicing, be careful not to apply excessive force to the electric variable valve timing motor/driver using other parts or tools.
Perform the engine and transaxle component removal/installation from below the vehicle.
1. Remove the battery cover..
2. Disconnect the negative battery cable..
3. Remove the plug hole plate..
4. Remove the air cleaner and air hose as a single unit..
5. Set the wiring harness aside using the following procedure:
a. Remove the bolt, nut and connector shown in the figure.
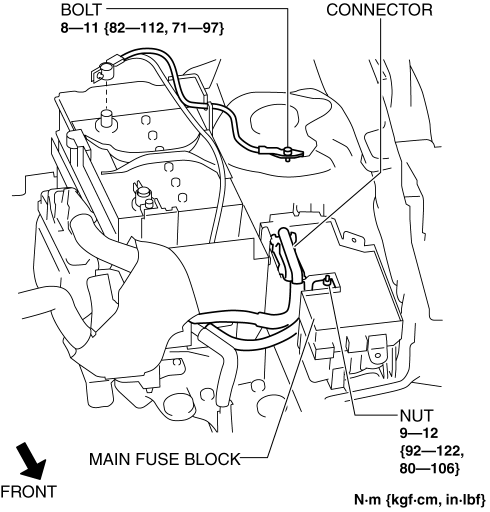
b. Remove the wiring harness clip shown in the figure.
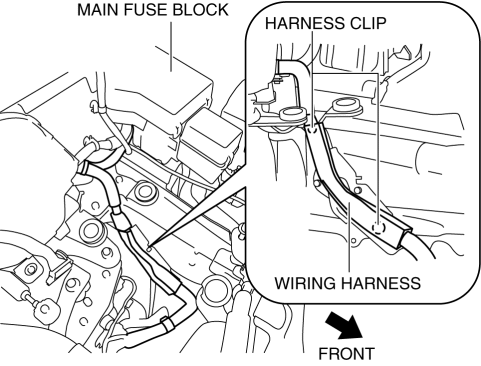
6. Remove the battery tray and PCM component..
7. Remove the aerodynamic under cover No.2 and splash shield as a single unit..
8. Drain the engine coolant..
9. Drain the transaxle oil (MTX) or ATF (ATX)..
10. Remove the front wheels and tires..
11. Disconnect the selector cable. (ATX).
12. Disconnect the shift cable. (MTX).
13. Remove the clutch release cylinder with the pipe still connected. (MTX).
14. Disconnect the brake vacuum hose..
15. Disconnect the evaporative hose..
16. Disconnect the fuel hose..
17. Disconnect the upper radiator hose..
18. Disconnect the heater hose..
19. Disconnect the lower radiator hose..
20. Remove the coolant reserve tank.(See COOLANT RESERVE TANK REMOVAL/INSTALLATION [SKYACTIV-G 2.0].)
21. Remove the generator drive belt..
22. Remove the A/C compressor with the cooler hose still connected and secure it using wire or rope so that it is out of the way..
23. Remove the TWC..
24. Disconnect the drive shafts from the engine side, set the drive shafts out of the way..
25. Disconnect the power steering pipe component and then drain the power steering fluid..
26. Disconnect the ground cable from the wiring harness bracket.
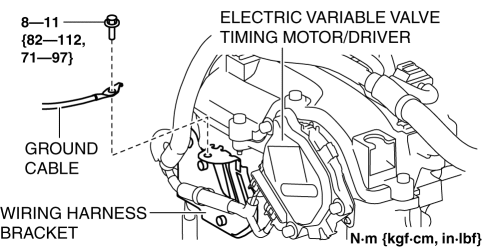
27. Remove in the order indicated in the table.
28. Install in the reverse order of removal.
29. Refill the transaxle oil (MTX) or ATF (ATX)..
30. Refill the engine coolant..
31. Start the engine, and inspect and adjust the following:
Front wheel alignment.
Power steering fluid air bleeding.
Leakage of engine oil, engine coolant, ATF (ATX), transaxle oil (MTX), and fuel.
Runout and contact of pulley and belt.
Ignition timing, idle speed and idle mixture..
Engine-driven accessories operation.
If the engine is overhauled and assembled to the vehicle, perform a road test to verify that there is no abnormal vibration and noise.
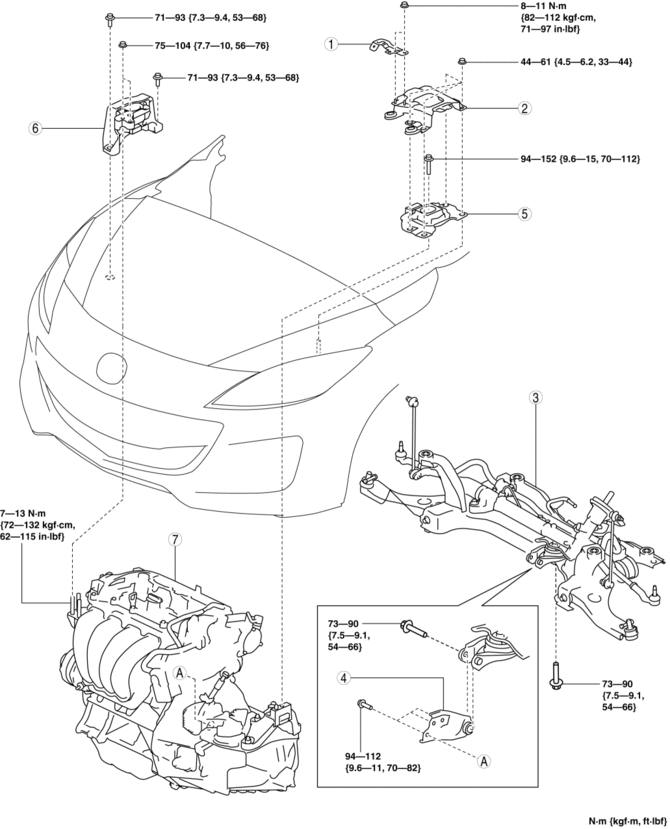
Wiring harness bracket
Battery tray bracket
No.1 engine mount rubber, front crossmember component
(See No.1 Engine Mount Rubber, Front Crossmember Component Removal Note.)
(See Engine Mount Installation Note.)
No.1 engine mount bracket
No.4 engine mount rubber
(See No.3 Engine Mount, No.4 Engine Mount Rubber Removal Note.)
(See Engine Mount Installation Note.)
No.3 engine mount
(See No.3 Engine Mount, No.4 Engine Mount Rubber Removal Note.)
(See Engine Mount Installation Note.)
Engine, transaxle
No.1 Engine Mount Rubber, Front Crossmember Component Removal Note
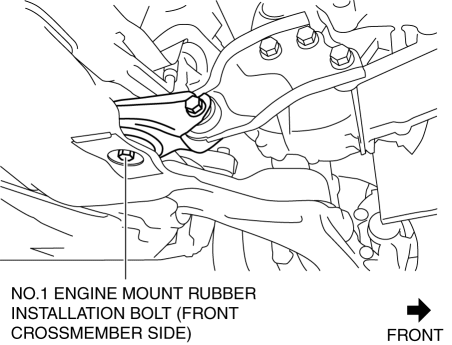
1. Loosen the No.1 engine mount rubber installation bolt (front crossmember side) shown in the figure.
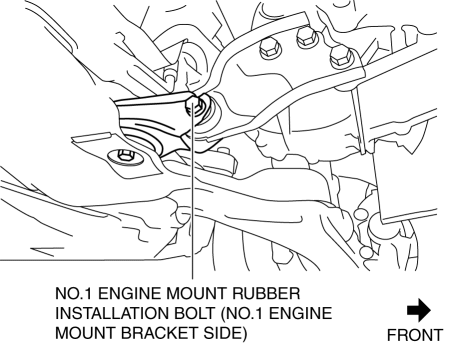
2. Remove the No.1 engine mount rubber installation bolt (No.1 engine mount bracket side) shown in the figure.
3. Remove the No.1 engine mount rubber and the front crossmember component as a single unit..
No.3 Engine Mount, No.4 Engine Mount Rubber Removal Note CAUTION:When supporting the engine and transaxle, insert rubber of appropriate size (approx. 20 mm {0.79 in} thickness) between the engine lifter and the oil pan, transaxle to prevent the deformation of the oil pan and damage of the transaxle.
1. Secure the engine and transaxle using a commercially available engine lifter.
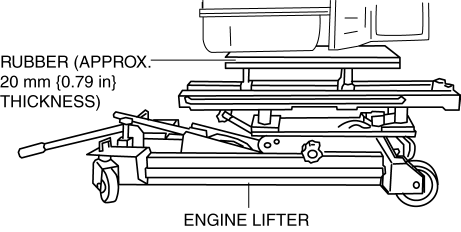
2. Remove the No.4 engine mount rubber.
3. Remove the No.3 engine mount.
Engine Mount Installation Note NOTE:Retighten the No.3 engine mount stud bolts when the No.3 engine mount nuts are loosened
1. Tighten the No.3 engine mount stud bolts.
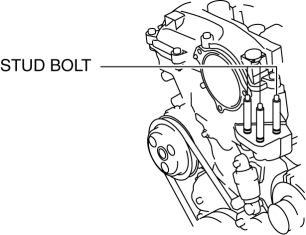
- Tightening torque
7—13 N·m {72—132 kgf·cm, 62—115 in·lbf}
When supporting the engine and transaxle, insert rubber of appropriate size (approx. 20 mm {0.79 in} thickness) between the engine lifter and the oil pan, transaxle to prevent the deformation of the oil pan and damage of the transaxle.
2. Secure the engine and transaxle using a commercially available engine lifter.
3. Temporarily tighten the No.3 engine mount installation bolts and nuts.
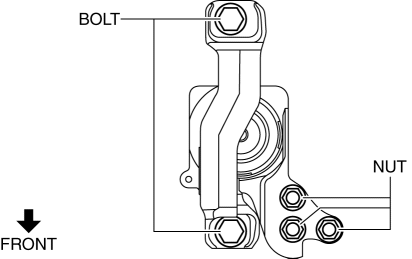
4. Temporarily tighten the No.4 engine mount rubber installation bolt as shown in the figure.
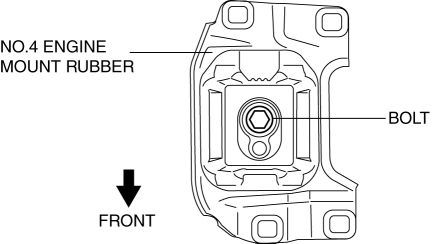
5. Install the No.1 engine mount rubber and the front crossmember component as a single unit..
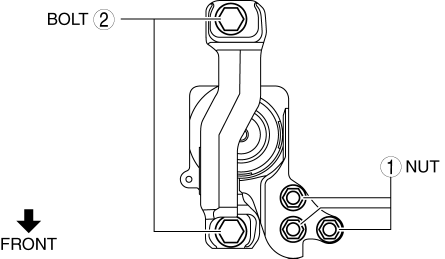
6. Temporarily tighten the No.1 engine mount rubber installation bolts in the order shown in the figure.
CAUTION:Install the bolts while being careful of their length to prevent interference between the steering gear housing and bolt.
- Bolt stem length
Front crossmember side: 62 mm {2.4 in}
No.1 engine mount bracket side: 65 mm {2.6 in}
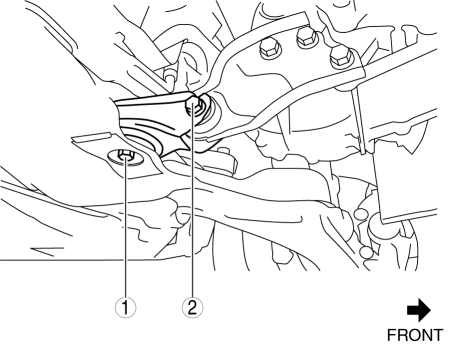
7. Tighten the No.3 engine mount installation bolts and nuts in the order shown in the figure.
No. |
Tightening torque |
1 |
75—104 N·m {7.7—10 kgf·m, 56—76 ft·lbf} |
2 |
71—93 N·m {7.3—9.4 kgf·m, 53—68 ft·lbf} |
8. Tighten the No.4 engine mount rubber installation bolt.
- Tightening torque
94—152 N·m {9.6—15 kgf·m, 70—112 ft·lbf}
9. Tighten the No.1 engine mount rubber installation bolts in the order shown in the figure.
CAUTION:
Tighten the bolts in the order shown in the figure to prevent abnormal noise and vibration after assembly.
- Tightening torque
73—90 N·m {7.5—9.1 kgf·m, 54—66 ft·lbf}
Test yourself
A quick Mazda 3 quiz: every answer comes with an explanation and a link to the manual page.