Manual gearbox
Gear selector controls
In this manual: Manual gearbox
9steps
~54min
2/5difficulty
Done 0 of 9
GEAR SELECTOR HOUSING
REMOVAL
- Place the gear selector lever in neutral.
- Remove the floor console (see the relevant operation in the 'BODYWORK' chapter).
- Unclip (arrows) the control cable (1) and selector cable (2) from the gear selector housing (3) (Fig.4).
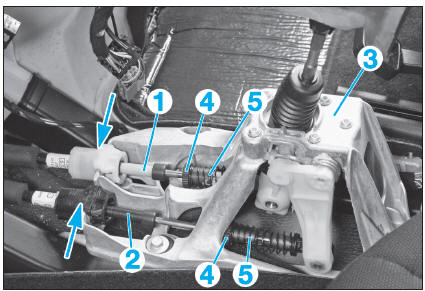
Fig. 4
- Push the locking clips (4) rearward (towards the dashboard) and lock them in this position by turning them to the right.
- Remove the control cable (1) and selector cable (2) from the adjusters (5).
 Pay attention to their fitting position.
- Remove the gear selector housing (3) (3 screws).
INSTALLATION
- To refit, reverse the removal procedure, observing the following points:
- Before refitting the floor console, adjust cables (1) and (2),
- check that the mechanism operates correctly and that the gears engage correctly.
GEAR SELECTOR CONTROL AND SELECTOR CABLES
REMOVAL
- Place the gear selector lever in neutral.
- Remove:
- the front seats.
- the floor console (see the relevant operation in the 'BODYWORK' chapter).
- the left and right front floor coverings.
- Unclip (arrows) the control cable (1) and selector cable (2) from the gear selector housing (3) (Fig.4).
- Push the locking clips (4) rearward (towards the dashboard) and lock them in this position by turning them to the right.
- Remove the control cable (1) and selector cable (2) from the adjusters (5).
Pay attention to their fitting position.- Remove the air filter housing.
- Unclip the sleeve (6) of the control cable (1) and selector cable (2) from the bulkhead (Fig.5).
 Unclip the sleeve (6) carefully, as if it is damaged, cables (1) and (2) must be replaced.
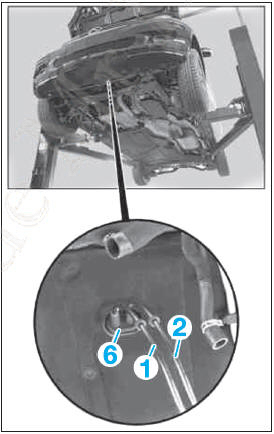
Fig. 5
- Remove cables (1) and (2) together from the bulkhead.
- Unclip the ball studs of the adjusters (5) from the gear selector housing.
INSTALLATION
- To refit, reverse the removal procedure, observing the following points:
- the mark on the sleeve (6) must face upward. It must not be twisted or pinched during installation,
- check that the mechanism operates correctly and that the gears engage correctly.
ADJUSTMENT
- Place the gear selector lever in neutral.
- Push the locking clips (1) rearward (towards the dashboard) and lock them in this position by turning them to the right (Fig.6).
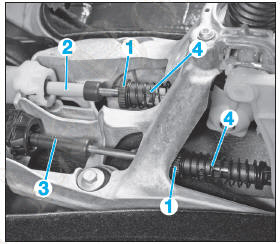
Fig. 6
- Disconnect the control cable (2) and selector cable (3) from the adjusters (4).
- Move the gear selector lever.
Cables (2) and (3) must then not move and must not generate any resistance.- Lock the gear selector lever (5) with the adjusting ring (6) (Fig.7).
The adjusting ring (6) is included when ordering the gear selector housing, or it can be ordered separately as a spare part. The adjusting ring (6) is not included in the cable supply. The adjusting ring (6) must only be used for adjustment.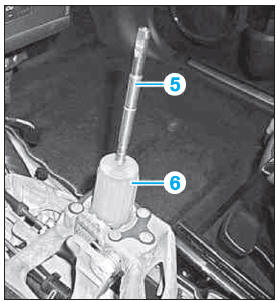 <.
Fig. 7
- Turn the locking clips (1) to the left (Fig.6). Cables (2) and (3) are then locked automatically.
- Remove the adjusting ring (6).
- Check that the mechanism operates correctly and that the gears engage correctly; otherwise, repeat the adjustment.
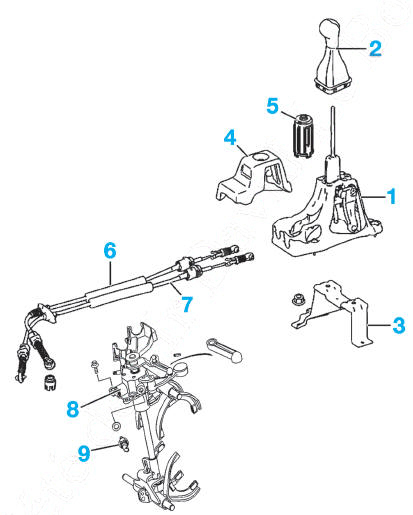
Gear selector controls
- Gear selector housing
- Selector knob
- Holder
- Sound insulation pad
- Adjusting ring
- Control cable
- Selector cable
- Transmission control housing
- Reverse gear switch.
Test yourself
A quick Mercedes-Benz B-Class quiz: every answer comes with an explanation and a link to the manual page.
Was this page helpful?