Steering
Removal and installation of a track rod end / track rod
In this manual: Steering
~2min read
REMOVAL
- Remove the front wheel on the relevant side.
- Loosen the toe adjustment locknut (1) (Fig.11).
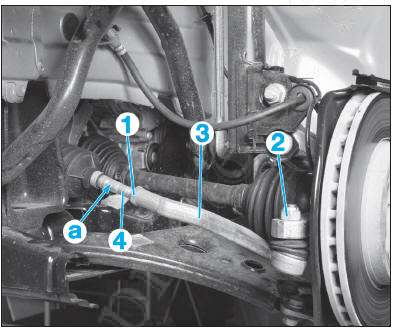
Fig. 11
- Remove nut (2), then use a ball joint puller to extract the track rod end (3) from the steering knuckle.
- Unscrew the track rod end (3) while holding the track rod (4) at (a) using an open-ended spanner.
 Make a mark or count the number of engaged thread turns to make it easier to preset the toe alignment during installation.
INSTALLATION
Refit in the reverse order of removal, observing the following points:
- replace the tie rod end (3), taking into account the marking or the number of thread turns engaged during removal,
- replace the nut (2),
- check and adjust the toe alignment.
TIE ROD
 Track rods are available in two versions. They differ in the taper angle of the joint between the track rod and the rack.
REMOVAL
- Remove the front wheel on the relevant side.
- Remove:
- the tie rod end (see relevant operation),
- the toe adjustment locknut,
- the two steering boot clamps,
- the steering boot.
- Hold the rack (1) at (a) with an open-end wrench and remove the bolt (2) (Fig.12).
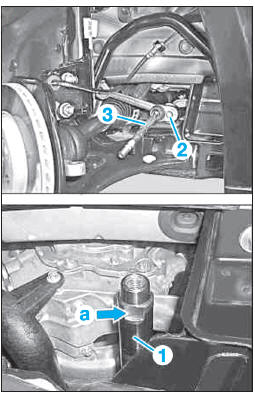
Fig. 12
- Pull the tie rod (3) off the rack (1).
INSTALLATION
Refit in the reverse order of removal, observing the following points:
- The tapered surfaces of the tie rod and the rack must be free of oil and grease. If necessary, clean them,
- replace the bolt (2),
- install and tighten the clamps using a clamp pliers, and replace them,
- check and adjust the toe alignment.
Test yourself
A quick Mercedes-Benz B-Class quiz: every answer comes with an explanation and a link to the manual page.
Was this page helpful?