Rear
Exploded View
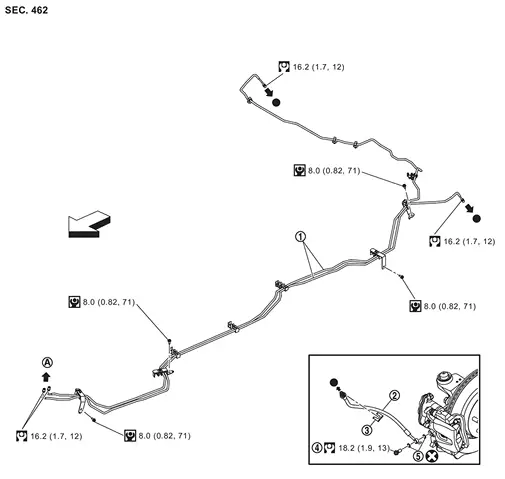
 |
Brake tube |  |
Brake hose |  |
Lock plate |
 |
Union bolt |  |
Copper washer | ||
 |
To front brake tube. Refer to Exploded View. | ||||
| : vehicle front | |||||
 |
: N·m (kg-m, ft-lb) | ||||
 |
: N·m (kg-m, in-lb) | ||||
 |
: Always replace after every disassembly. | ||||
 |
: Indicates that the part is connected at points with same symbol in actual vehicle. | ||||
Hydraulic Piping
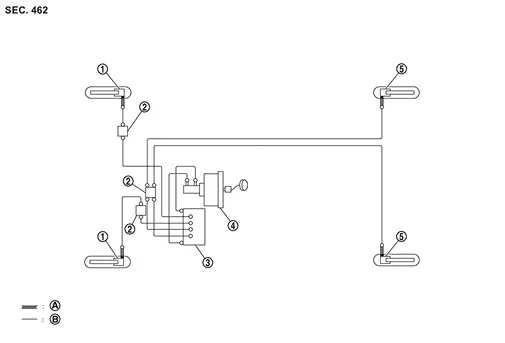
|
Front disc brake | |
Connector | |
ABS actuator and electric unit (control unit) |
|
Electrical brake control unit | |
Rear disc brake | ||
|
Brake hose |  |
Brake tube | ||
 |
: Flare nut | ||||
 |
: Union bolt | ||||
Removal and Installation
REMOVAL
Remove tires. Refer to ROAD WHEEL TIRE : Removal & Installation.
Perform the advance preparation "(Air release) Accumulator pressure release" using CONSULT. Refer to Work Procedure.
Drain brake fluid. Refer to Draining.
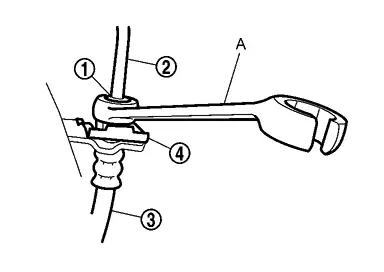
Loosen the flare nut with a flare nut wrench (A) and separate the brake tube from the brake hose . And then remove the lock plate .
Remove the union bolt and copper washers , and remove the brake hose from the brake caliper assembly.

INSTALLATION
Assemble the union bolt and the copper washers to the brake hose .
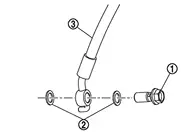
Align the brake hose L-pin with the brake caliper assembly hole , and tighten the union bolt to the specified torque. Refer to Exploded View.
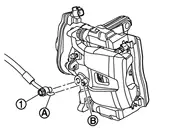
Install the brake hose to the brake tube, temporarily tighten the flare nut by hand until it does not rotate further, and fix the brake hose to the brake hose bracket with the lock plate.
Tighten the flare nut to the specified torque with a flare nut torque wrench (A). Refer to Exploded View.
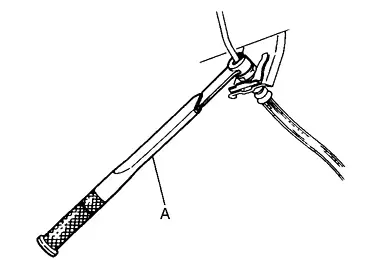
Install the brake tube to the brake hose, temporarily tighten the flare nut by hand until it does not rotate further, and fix the brake hose to brake hose brackets with the lock plate.
Tighten the flare nut to the specified torque with a flare nut torque wrench (A). Refer to Exploded View.
Install the brake hose to the brake tube, temporarily tighten the flare nut by hand until it does not rotate further, and fix the brake hose with the lock plate.
Tighten the flare nut to the specified torque with a flare nut torque wrench (A). Refer to Exploded View.
Refill with new brake fluid and perform the air bleeding. Refer to Work Procedure.
Install tires. Refer to ROAD WHEEL TIRE : Removal & Installation.
Perform inspection after installation. Refer to Inspection.
Inspection
INSPECTION AFTER INSTALLATION
Check the brake hoses and tubes for the following: no scratches; no twist and deformation; no looseness at connections.
*: Fuel, engine coolant and lubricant are quantity to specified. Spare tire, jack, hand tools and mats are brought out of vehicle.
Depress the brake pedal with a force of 785 N (80 kg, 176 lb) and hold down the pedal for approximately 5 seconds with the engine running. Check for any fluid leakage.