Transaxle & transmissioN CVT: RE0F11A

Additional service when replacing transaxle assembly

In this manual: Transaxle & transmissioN CVT: RE0F11A
Foreword — 1General information — 45Engine Mechanical MR16DDT — 61Engine Mechanical HR16DE — 52Engine Mechanical K9K — 46Engine Lubrication System MR16DDT — 18Engine Lubrication System HR16DE — 14Engine Lubrication System K9K — 11Engine Cooling System MR16DDT — 28Engine Cooling System HR16DE — 29Engine Cooling System K9K — 24Engine Control System MR16DDT — 163Engine Control System HR16DE — 115Engine Control System K9K — 129Fuel System MR16DDT — 13Fuel system HR16DE — 11Fuel system K9K — 12Exhaust system MR16DDT — 7Exhaust system HR16DE — 10Exhaust system K9K — 7Starting system — 24Accelerator control system — 6Clutch — 25Driveline transfer: TY21B — 77Driveline rear propeller Shaft: 3Fφ16-ETJ75 — 12Driveline rear final drive: RTVS — 31Transaxle & transmission 5MT: RS5F92R — 31Transaxle & transmission 6MT: RS6F94R — 30Transaxle & transmission CVT: RE0F10B — 93Transaxle & transmissioN CVT: RE0F11A — 103Front Axle MR16DDT — 18Front Axle HR16DE — 17Front Axle K9K — 17Rear Axle 2WD — 6Rear Axle 4WD — 13Front Suspension — 21Rear Suspension 2WD — 13Rear Suspension 4WD — 17Road Wheels & Tires — 6Brake System LHD — 24Brake System RHD — 24Parking Brake System — 8Brake Control System without ESP — 44Brake Control System with ESP — 63Steering System — 14Steering Control System — 27Seat Belt — 8SRS Airbag — 24SRS Airbag Control System — 93Ventilation System — 11Heater & Air Conditioning System HR16DE — 28Heater & Air Conditioning System MR16DDT — 28Heater & Air Conditioning Control System Type 1 — 49Heater & Air Conditioning Control System Type 2 — 51Heater & Air Conditioning Control System Type 3 — 32Heater & Air Conditioning Control System Type 4 — 40Heater & Air Conditioning Control System Type 5 — 21Interior — 16Instrument Panel — 10Seat — 18Door & Lock Type 1 — 83Door & Lock type 2 — 80Door & Lock type 3 — 65Door & Lock type 4 — 60Security Control System with intelligent key system — 82Security Control System without intelligent key system — 41Glass & Window System — 15Power Window Control System — 28Body Repair — 13Exterior — 20Mirrors — 26Exterior Lighting System Halogen type — 51Interior Lighting System — 24Wiper & Washer — 45Defogger — 31Horn — 4Power Outlet — 4Body Control System With intelligent key system — 21Body Control System Without intelligent key system — 23LAN system can fundamental — 6LAN system can — 31LAN System can system (type 1) — 1LAN System can system (type 2) — 1LAN System can system (type 3) — 1LAN System can system (type 4) — 1LAN System can system (type 5) — 1LAN System can system (type 6) — 1LAN System can system (type 7) — 2LAN System can system (type 8) — 1LAN System can system (type 9) — 1LAN System can system (type 10) — 1LAN System can system (type 11) — 1Power Control System IPDM E/R (with I-key) — 14Power Control System IPDM E/R (without I-key) — 14Power Control System Power distribution system — 25Charging System — 22Power Supply, Ground & Circuit Elements — 20Meter, Warning Lamp & Indicator — 33Warning Chime System — 22Audio, Visual & Navigation System Audio without navigation — 30Audio, Visual & Navigation System Audio with navigation — 33Audio, Visual & Navigation System NISSAN dynamic control system — 22Cruise Control System — 1Drive Mode System — 10Maintenance — 14
~3min read

Description

Perform the following work after the transaxle assembly is replaced.

Erasing the calibration data • The TCM acquires calibration data (individual characteristic value) of each solenoid that is stored in the ROM assembly (in the control valve). This enables the TCM to perform accurate control. For this reason, after the transaxle assembly is replaced, it is necessary to erase the calibration data that is stored in the TCM and load new calibration data.

Erasing the learned value data • TCM learns indicated pressure for appropriate control of the transaxle assembly and records the learned values. For this reason, the leaned values stored in TCM must be erased after replacing a transaxle assembly.

Erasing CVT fluid degradation level data • TCM records the degradation level of the CVT fluid calculated from the vehicle driving status. Therefore, if the transaxle assembly is replaced, it is necessary to erase the CVT fluid degradation level data recorded by TCM.

Procedure

1.INITIALIZE TCM

1. Set parking brake.With CONSULT-III


1. Set parking brake. 2. Turn ignition switch ON. 3. Select “Work Support” in “TRANSMISSION”. 4. Select “ERASE MEMORY DATA”.

5. While maintaining the conditions below, touch “Start”.

- Vehicle stop status
- With engine stopped
- Selector lever: “R” position - Accelerator pedal: Depressed

NOTE

:
Select “Start” and complete within approximately 20 seconds.

Is “COMPLETED” displayed? YES >> GO TO 2.

NO >> Turn the ignition switch OFF and wait for a minimum of 10 seconds then perform the work again.

2.CHECK AFTER TCM IS INITIALIZED

1. Turn ignition switch OFF with the selector lever in “R” position and waitWith CONSULT-III


1. Turn ignition switch OFF with the selector lever in “R” position and wait for 10 seconds or more.

2. Turn ignition switch ON with the selector lever in “R” position.

CAUTION:
Never start the engine.
3. Select “Special function” in “TRANSMISSION”. 4. Select “CALIB DATA”.

5. Check that indicated value of “CALIB DATA” is equal to the value shown in the following table.
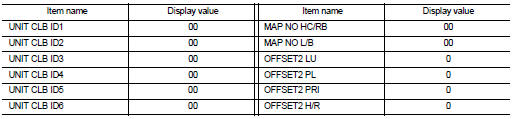

Is the indicated value of “CALIB DATA” equal to the value shown in the table?

Is the indicated value of “CALIB DATA” equal to the value shown in the table? YES >> GO TO 3.

NO >> GO TO 1.

3.LOADING OF CALIBRATION DATA 1. Shift the selector lever to the “P” position.

2. Check that “P” is displayed on shift position indicator on combination meter.

NOTE

:
Displayed approximately 4 – 5 seconds after the selector lever is moved to the “P” position.

Does shift position indicator display “P”? YES >> GO TO 5.

NO >> GO TO 4.

4.DETECTION OF MALFUNCTION ITEMS Check the following items: • Harness between the TCM and the ROM assembly inside the transaxle assembly is open or shorted.

• Disconnected, loose, bent, collapsed, or otherwise abnormal connector housing terminals Is the inspection result normal? YES >> GO TO 1.

NO >> Repair or replace the malfunctioning parts.

5.ERASE THE CVT FLUID DEGRADATION LEVEL DATA

1. Select “WORK SUPPORT” in “TRANSMISSION”.With CONSULT-III


1. Select “WORK SUPPORT” in “TRANSMISSION”. 2. Select “CONFORM CVTF DETERIORTN”.

3. Touch “Clear”.

>> WORK END