Front transverse driveshafts
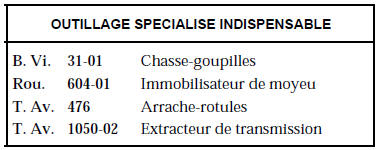
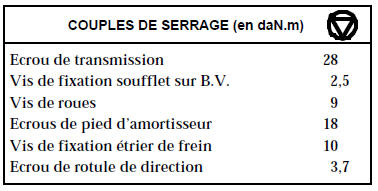
REMOVAL
Vehicle on a two-post lift.
Drain the gearbox oil.
Remove:
- the brake assembly (hang it from the body),
- the driveshaft nut: tool Rou. 604-01.
Left side:
Remove the three bolts on the gearbox.
Right side:
Remove the pin: tool B. Vi. 31-01.
Both sides:
Remove:
- the steering tie rod ball joint nut and extract the pin: tool T. Av. 476,
- the upper strut bottom bolt.
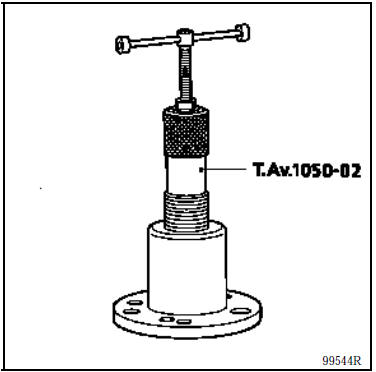
Push the driveshaft out: tool T. Av. 1050-02.
Remove the lower strut bottom bolt and extract the driveshaft.
INSTALLATION
Left side:
Insert the driveshaft as horizontally as possible.
Right side:
Apply MOLYKOTE BR2 grease to the splines of the gearbox-side joint.
Insert the driveshaft and check its position using bent pin B. Vi. 31-01.
Fit two new roll pins: B. Vi. 31-01. Seal the pin holes with RHODORSEAL 5661.
Both sides:
Insert the driveshaft stub into the hub; it must slide in freely.
Then proceed in the reverse order of removal, observing the tightening torques.
Refill the gearbox oil.
Press the brake pedal several times to bring the piston into contact with the pads.
Left-hand driveshaft
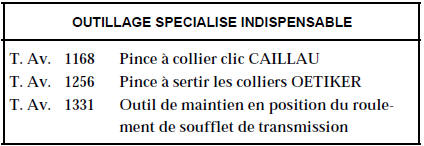
REPLACING THE GEARBOX-SIDE BOOT
JOINT GI 69
- Tripod joint
- Rubber boot
- Bearing guide
- Retaining housing
- Deflector
- Circlip
- Driveshaft
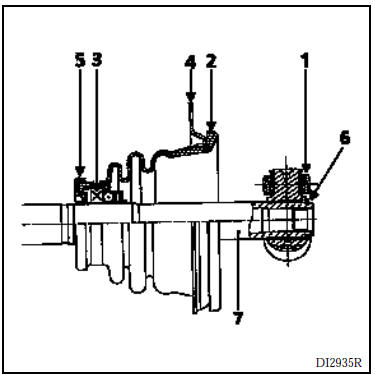
REMOVAL
Remove the circlip.
Using a press, remove the tripod joint with a puller.
NOTE: mark the position of the tripod joint before removing it.
Remove the boot, bearing and deflector assembly in the same way as the tripod joint.
INSTALLATION
To be correctly positioned on the shaft, the bearing must be pressed on to obtain dimension L = 118 ± 0.2 mm between the rear face of the bearing and the end of the shaft.
This dimension is obtained using tool T. Av. 1331 when its end is level with the shaft.
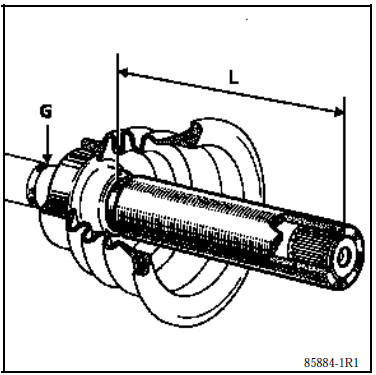
NOTE: to avoid distorting the bearing, which has a lip seal and therefore a risk of leaks, do not press it on with a hammer; use a press for progressive pressure.
Hold the driveshaft in the press on groove (G) using a puller.
Press the tripod joint back into the position marked during removal and refit the retaining circlip.
REPLACING THE WHEEL-SIDE BOOT
JOINT GE 86
- Stub axle cup
- Retaining star
- Tripod joint
- Tulip shaft
- Thermoplastic boot
- Clamps
- Spring
- Pusher
- Wheel chock
- ABS tone wheel
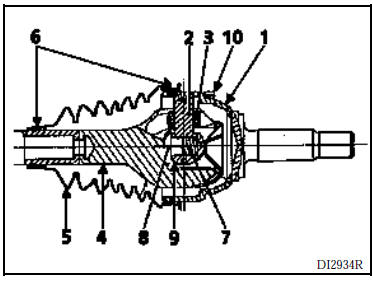
REMOVAL
Crimp the two clamps (6), taking care not to damage the grooves of the stub axle bowl.
Remove as much grease as possible.
To replace the thermoplastic boot, the parts on the gearbox side (seal GI 69) must be removed (see method described previously).
Remove the boot and replace it with a new boot.
Distribute the specified amount of grease into the boot and the stub axle bowl.
NOTE: it is essential to observe the grease quantity specified in the ingredients.
Position the two boot lips in the grooves of the stub axle bowl.
Adjust the amount of air in the boot.
Fit the clamps and tighten them.
Right-hand driveshaft
REPLACING THE GEARBOX-SIDE BOOT
JOINT RC 462
- Tulip sleeve
- Tripod joint
- Circlip
- Boot
- Clamps
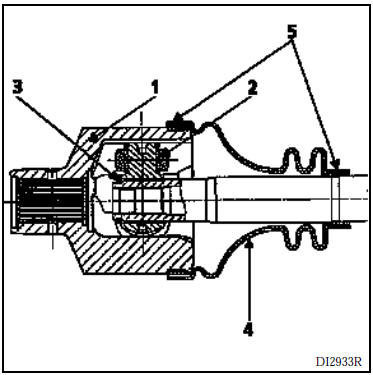
REMOVAL
Cut the two clamps (5), taking care not to damage the groove of the tulip sleeve.
Remove as much grease as possible.
Remove the tulip sleeve.
Remove the circlip.
CAUTION: never use thinner to clean the components.
Using a press, pull out the tripod, bearing against a puller.
NOTE: mark the position of the tripod before removing it
INSTALLATION
Lightly lubricate the driveshaft to make it easier to fit the boot (position the small diameter of the boot on the driveshaft groove).
Refit the tripod in the position marked during removal and refit the circlip.
Make three crimp points at 120° by upsetting the metal of the splines onto the driveshaft.
Slide the tulip sleeve onto the tripod.
Distribute the grease between the boot and the tulip sleeve.
Correctly position the boot in its grooves.
Insert a non-cutting rod with a rounded end between the boot and the tulip sleeve, to adjust the amount of air inside the joint.
Lengthen or shorten the joint until dimension A = 190 mm is obtained (dimension measured between the end of the boot and the face of the smallest diameter of the tulip sleeve).
In this position, remove the rod.
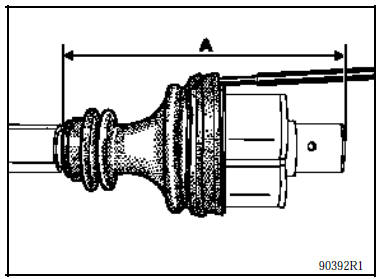
Refit the clamps using the recommended tools.
REPLACING THE WHEEL-SIDE BOOT
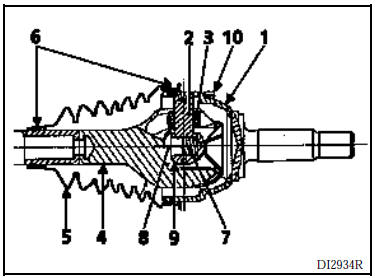
JOINT GE 86
- Stub axle cup
- Retaining star
- Tripod joint
- Tulip shaft
- Thermoplastic boot
- Clamps
- Spring
- Pusher
- Wheel chock
- ABS tone wheel
REMOVAL
Crimp the two clamps (6), taking care not to damage the grooves of the stub axle bowl.
Remove as much grease as possible.
To replace the thermoplastic boot, the parts on the gearbox side (seal RC 462) must be removed (see method described previously).
NOTE: some right-hand driveshafts are fitted with a vibration damper; if the thermoplastic boot is damaged, replace the complete driveshaft.
Remove the boot and replace it with a new boot.
Distribute the specified amount of grease into the boot and the stub axle bowl.
NOTE: it is essential to observe the grease quantity specified in the ingredients.
Position the two boot lips in the grooves of the stub axle bowl.
Adjust the amount of air in the boot.
Fit the clamps and tighten them.
Test yourself
A quick Renault Kangoo quiz: every answer comes with an explanation and a link to the manual page.