Engine and peripherals
Catalytic converter
In this manual: Engine and peripherals
~7min read
F9Q
Tightening torques |
|
| turbocharger exhaust manifold nuts | 2.6 daN.m |
| exhaust flange studs | 0.7 daN.m |
| exhaust flange nuts | 2.1 daN.m |
| catalytic converter bracket fixing bolts and nuts, flywheel end | 2.1 daN.m |
| catalytic converter bracket nut, timing end | 3 daN.m |
| catalytic converter bracket fixing bolt, timing end | 5 daN.m |
| catalytic converter bracket fixing bolts and nuts, flywheel end | 2.1 daN.m |
| torque rod bolt on the engine | 18 daN.m |
| torque rod bolt on the subframe | 10.5 daN.m |
| exhaust line support fixing bolt to the body | 2.1 daN.m |

REMOVAL
- Position the vehicle on a two-post lift.
- Disconnect the battery.
- Remove:
- the front right wheel,
- the engine undertray.
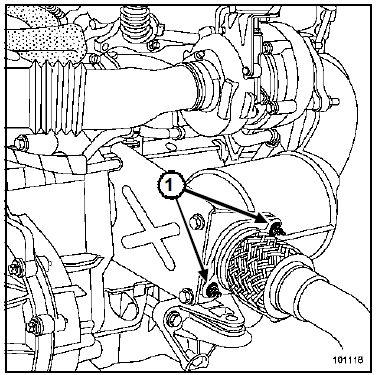
- Remove the two exhaust flange nuts (1).
- Remove the fixing bolt (4) of the exhaust line rubber mounting to the body.
- Remove:
- the fixing bolt (5) of the silencer rubber mounting.
- Move the exhaust line rearward.
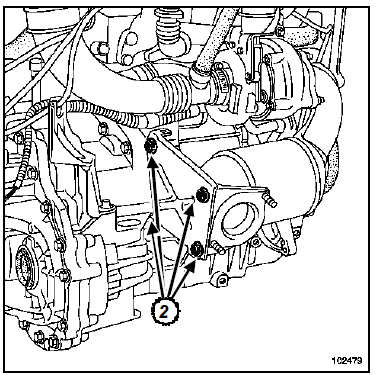
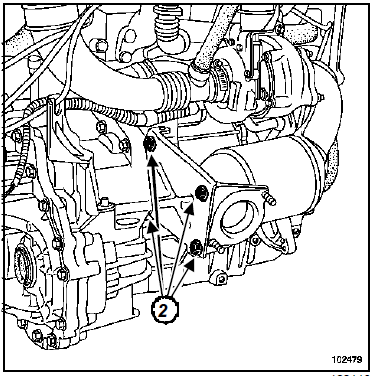
- Remove the four fixing bolts (2) of the catalytic converter bracket.
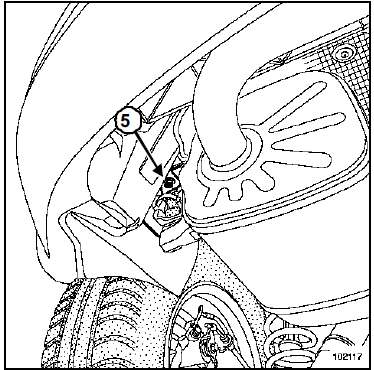
- Remove:
- the fixings (6) of the catalytic converter bracket,
- the catalytic converter bracket.
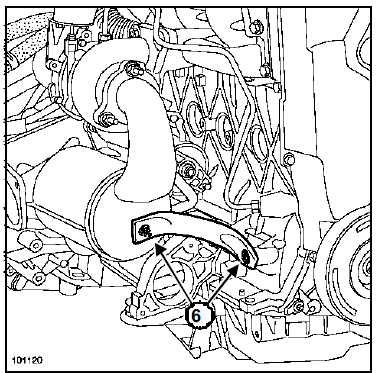
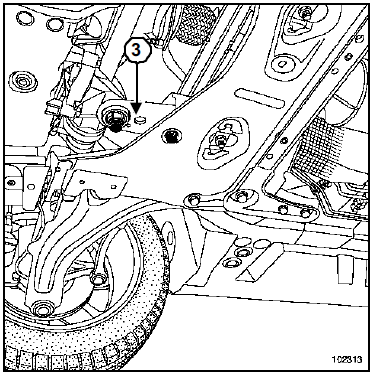
- Remove the torque reaction rod (3).
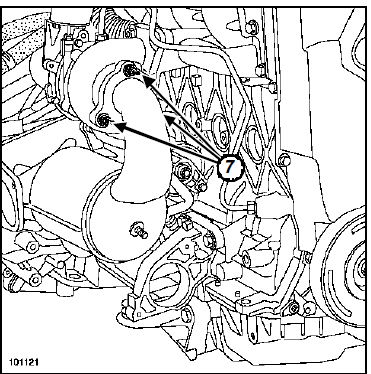
- Remove:
- the engine lifting lug,
- the three fixing nuts (7) of the catalytic converter on the turbocharger,
- the catalytic converter from underneath the vehicle.
INSTALLATION
- Strictly observe the fitting order of the catalytic converter brackets.
WARNING Always replace the gaskets with new ones.
- Refit and torque the catalytic converter fixing nuts on the turbocharger (2.6 daN.m).
- Tighten to the following torques:
- the exhaust flange studs (0.7 daN.m),
- the exhaust flange nuts (2.1 daN.m),
- the catalytic converter bracket fixing bolts and nuts, flywheel end (2.1 daN.m).
- Refit the catalytic converter brackets, observing the order carefully.
Refitting the timing end bracket
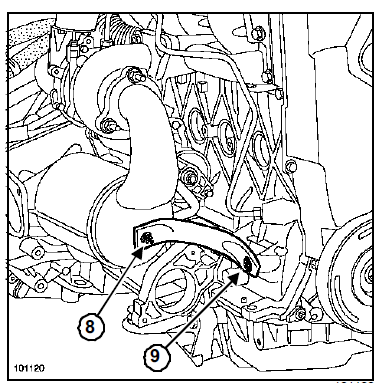
- Refit:
- fit the bracket by hand-tightening (without locking) the nut (8) and the bolt (9),
- Tighten in the following order and to the following torques:
catalytic converter bracket nut, timing end (3 daN.m) (8),
catalytic converter bracket fixing bolt, timing end (5 daN.m) (9).
Refitting the flywheel end bracket
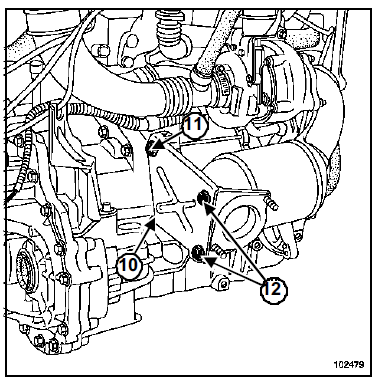
- Refit the fixing bolts of the relevant bracket by hand, in the tightening order.
- Tighten in the following order and to the following torques:
- catalytic converter bracket fixing bolts and nuts, flywheel end (2.1 daN.m),
- the torque rod bolt on the engine (18 daN.m),
- the torque reaction rod bolt to the subframe (10.5 daN.m).
- the exhaust line support fixing bolt to the body (2.1 daN.m),
- Refit in the reverse order of removal.
- Check that all the heat shields of the exhaust line are present and correctly fixed.
- Check that there is no contact with the underbody.
- Connect the battery; carry out the necessary re-learns (see Electrical Equipment chapter).
- Do not reuse a used sleeve.
- The sleeve clamping bolt and nut assembly must be oriented so as to avoid any contact with the underbody.
- Replace any damaged heat shield without fail.
K9K
Tightening torques |
|
| turbocharger exhaust manifold nuts | 2.6 daN.m |
| exhaust flange studs | 0.7 daN.m |
| exhaust flange nuts | 2.1 daN.m |
| catalytic converter bracket fixing bolts and nuts, flywheel end | 2.1 daN.m |
| side bracket fixing bolt on the catalytic converter | 2.5 daN.m |
| side support bracket mounting screw on the engine | 4.4 daN.m |
| fixing bolt of the exhaust gas recirculation solenoid valve heat shield | 1.2 daN.m |
| exhaust line support fixing bolt to the body | 2.1 daN.m |

REMOVAL
- Position the vehicle on a two-post lift.
- Disconnect the battery.
- Remove the undershield.
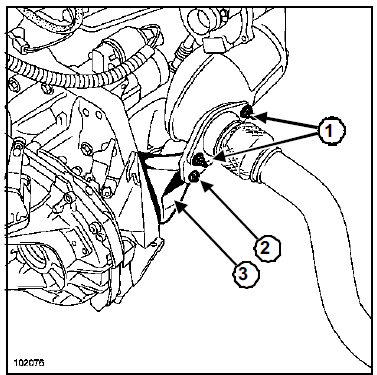
- Remove:
- the exhaust flange fixings (1),
- the bracket fixing (2) on the catalytic converter,
- Loosen the other bracket fixings on the gearbox,
- Remove the bracket (3).
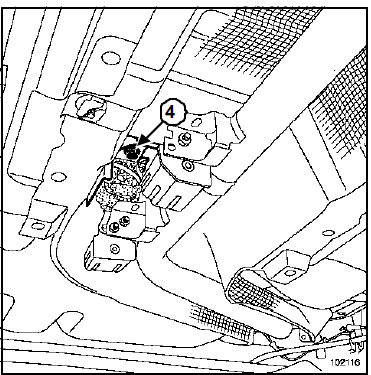
- Remove the fixing bolt (4) of the exhaust line rubber mounting to the body.
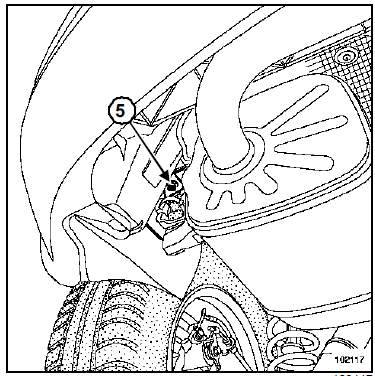
- Remove the fixing bolt (5) of the silencer rubber mounting.
- Move the exhaust line rearward.
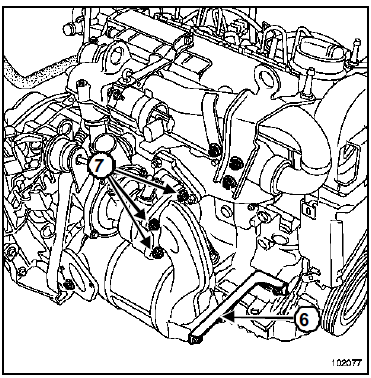
- Remove:
- the catalytic converter bracket (6),
- the four fixing nuts (7) of the catalytic converter on the turbocharger,
- the catalytic converter.
INSTALLATION
- Refit:
- the catalytic converter,
- the sleeve (Exhaust chapter, Exhaust general information, page 19B-1).
- Bring the catalytic converter fixing bolts close.
- Refit in the reverse order of removal.
Always replace:
- the exhaust flange gasket,
- all plastic air intake hoses disconnected,
- Tighten to the following torques:
- Catalytic converter mounting nuts to the turbocharger (2.6 daN.m),
- the exhaust flange studs (0.7 daN.m),
- the exhaust flange nuts (2.1 daN.m),
- catalytic converter bracket fixing bolts and nuts, flywheel end (2.1 daN.m),
- Side stand mounting bolt to the catalytic converter (2.5 daN.m),
- the side stand mounting bolts on the engine (4.4 daN.m),
- EGR solenoid valve heat shield mounting bolts (1.2 daN.m),
- Exhaust line bracket mounting bolt to the body (2.1 daN.m).
- Refit the engine undertray.
- Check that there is no contact with the underbody.
- Connect the battery; carry out the necessary re-learns (see Electrical Equipment chapter).
- Do not reuse a used sleeve.
- The sleeve clamping bolt and nut assembly must be oriented so as to avoid any contact with the underbody.
- Replace any damaged heat shield without fail.
F4R or K4J or K4M
Essential special tools |
|
| Tool 1495-01 | 24 mm socket for removing / refitting oxygen sensors - 1/2" square drive and 24 mm external hex |
Tightening torques |
|
| oxygen sensor | 4.5 daN.m |
| exhaust flange studs) | 0.7 daN.m |
| exhaust flange nuts) | 2.1 daN.m |

REMOVAL
- Position the vehicle on a two-post lift.
- Disconnect the battery.
- Remove:
- the engine undershield,
- the oxygen sensor.
- Cut the exhaust line (Exhaust chapter, Exhaust general information, page 19B-1) (Exhaust chapter, Exhaust general information, page 19B-4)
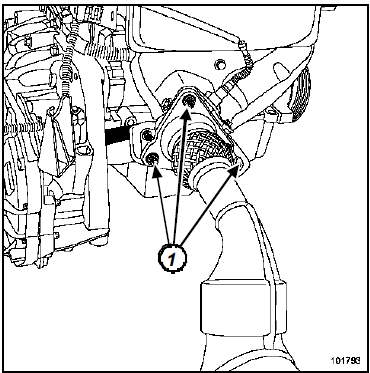
- Remove:
- exhaust flange mounting nuts (1),
- the catalytic converter.
INSTALLATION
- Refit the oxygen sensor.
- Tighten the oxygen sensor to torque (4.5 daN.m) using tool (Mot. 1495-01),
- Refit and tighten the exhaust flange studs to torque (0.7 daN.m),
- Replace the exhaust flange gasket.
- Refit:
- the catalytic converter,
- the sleeve (Exhaust chapter, Exhaust general information, page 19B-1).
- Refit the catalytic converter mounting nuts.
- Tighten the exhaust flange nuts to torque (2.1 daN.m)
- Tighten the coupling while relieving the exhaust line to ensure correct alignment.
- Reconnect the oxygen sensor.
- Check that all heat shields on the exhaust line are present and correctly secured.
- Refit the engine undertray.
- Check that there is no contact with the underbody.
- Connect the battery; carry out the necessary re-learns (see Electrical Equipment chapter).
- Do not reuse a used sleeve.
- The sleeve clamping bolt and nut assembly must be oriented so as to avoid any contact with the underbody.
- Replace any damaged heat shield without fail.
- After each catalytic converter replacement, carry out a road test.
Test yourself
A quick Renault Megane quiz: every answer comes with an explanation and a link to the manual page.
Was this page helpful?