Engine Mechanical System
Engine Mount Repair Procedures
In this manual: Engine Mechanical System
18steps
~108min
4/5difficulty
Done 0 of 18
Removal and Installation
Roller Installation- Roller carrier mounting bolts and roller carrier bracket (A). Tightening torque Bolt (B): 107.9 ~ 128 N·m Bolt (C): 49.0 ~ 64 N·m

- Remove the roller rod support bracket (A).
Tightening torque: 49.0 ~ 69 N·m

- Install in the reverse order of removal.
- Remove the engine room cover.
- Remove the coolant reservoir. (Refer to Cooling System - "Reservoir")
- Place a jack against the edge of the upper oil pan to support the engine.
Install a rubber block between the jack and the oil pan.
- Remove the engine mount support bracket (A).
Tightening torque: 88.3 ~ 108 N·m

- Install in the reverse order of removal.
- Remove the engine mounting bracket (A).
Tightening torque 68.6 ~ 88 N·m
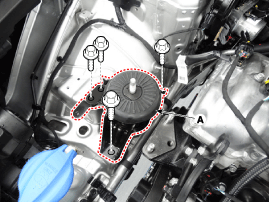
- Remove the air cleaner assembly. (Refer to Air Intake and Exhaust System - "Air Cleaner").
- Remove the battery and tray. (Refer to Engine Electrical System — "Battery")
- Remove the ECM. (Refer to Fuel System - Engine Control Module)
- Remove the engine room cover. (Refer to "Engine Room Under Cover" - "Engine Room Under Cover")
- Install the jack to the edge of the transaxle.
- Remove the service cover (A).

- Remove the transmission mounting bolts (A).
Tightening Torque: 107.9 ~ 128 N·m

- Remove the transaxle mounting bracket (A).
Tightening torque: 68.6 - 88 N·m N·m

- Install in the reverse order of removal.
Test yourself
A quick Hyundai Sonata LF quiz: every answer comes with an explanation and a link to the manual page.
Was this page helpful?