Body Electrical System
Lumbar Support Repair Procedures
In this manual: Body Electrical System
17steps
~102min
4/5difficulty
Done 0 of 17
Removal
- Disconnect the negative (-) battery terminal.
- Remove the front seat assembly. (Refer to Body - "Front Seat Assembly")
- Remove the seatback. (Refer to Body - "Front Seatback Cover")
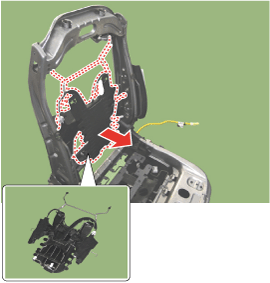
- Disconnect the lumbar support motor connector (A).

- Remove the lumbar support assembly by disconnecting the mounting clip (A).

Installation
- Install the lumbar support assembly.
- Install the seatback trim.
- Install the front seat assembly.

- Make sure the connectors are connected correctly.
- Check the rear lumbar support system.
Inspection
Diagnosis with GDS- The body electrical system can be quickly diagnosed for faulty parts using the Global Diagnostic System (GDS). The GDS provides the following information.
- Self-Diagnosis: Diagnostic Trouble Code (DTC) check and display
- Current Data: Check the system input/output status.
- Actuator Test: Checking System Operating Status
- Additional Functions: Other controls such as system option and zero point adjustment.
- Select "Vehicle Model" and the system to be checked to inspect the vehicle with the tester.
- Select "Power Seat Module (PSM)" to check the power seat module (PSM).
- Select the "Current Data" menu to check the current input/output status. Input/output for sensors related to the power seat module (PSM) can be checked.
- If you force-check the power door lock operation, select "Activation Check".
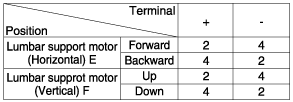
- Disconnect the connectors for each motor. [Lumbar Support Motor]

- Connect the battery directly to the motor terminals and check that the motors operate smoothly.
- Reverse the connections and check that the motor rotates in the opposite direction.
- If there are any abnormalities, replace the motors.
Test yourself
A quick Hyundai Sonata LF quiz: every answer comes with an explanation and a link to the manual page.
Was this page helpful?