Installation
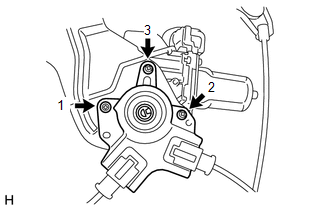
1. INSTALL BACK DOOR POWER WINDOW REGULATOR MOTOR ASSEMBLY
(a) Using a T25 "TORX" socket wrench, install the back power window regulator motor assembly with the 3 screws. HINT:
Torque: 5,5 N·m {56 kgf·cm, 49 in·lbf} |
 |
2. INSTALL BACK DOOR POWER WINDOW REGULATOR SUB-ASSEMBLY

3. INSTALL OUTER BACK DOOR GLASS WEATHERSTRIP ASSEMBLY
4. INSTALL BACK DOOR GLASS
5. INSTALL BACK DOOR GLASS RUN
6. INSTALL NO. 1 BACK WINDOW WIPER MOTOR BRACKET
7. INSTALL REAR WIPER MOTOR AND BRACKET ASSEMBLY
8. INSTALL REAR WIPER ARM
9. INSTALL REAR SPOILER SUB-ASSEMBLY
10. INSTALL REAR NO. 1 SPOILER COVER
11. INSTALL BACK DOOR OUTSIDE MOULDING LH
12. INSTALL BACK DOOR OUTSIDE MOULDING RH
HINT:
Use the same procedure as described for the LH side.
13. INSTALL BACK DOOR SERVICE HOLE COVER LH
14. INSTALL BACK DOOR SERVICE HOLE COVER RH
15. INSTALL NO. 2 BACK DOOR SERVICE HOLE COVER
16. INSTALL MULTIPLEX NETWORK DOOR ECU
17. INSTALL REAR NO. 2 SPEAKER ASSEMBLY
18. INSTALL BACK DOOR TRIM PANEL ASSEMBLY
19. INSTALL ASSIST STRAP ASSEMBLY
20. INSTALL ASSIST STRAP HOLE COVER
21. CONNECT CABLE TO NEGATIVE BATTERY TERMINAL
NOTICE:
When disconnecting the cable, some systems need to be initialized after the cable is reconnected (See page ).
Test yourself
A quick Toyota 4Runner quiz: every answer comes with an explanation and a link to the manual page.