On-vehicle Inspection
1. INSPECT VOLTAGE INVERTER ASSEMBLY
HINT:
Remove interior parts so that the voltage inverter can be seen.
(a) Disconnect the voltage inverter connector. |
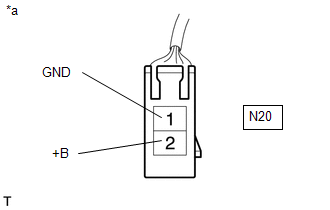 |
(b) Measure the voltage according to the value(s) in the table below.
Standard Voltage:
Tester Connection | Switch Condition | Specified Condition |
|---|---|---|
N20-1 (GND) - N20-2 (+B) |
Engine switch on (IG) |
11 to 14 V |
N20-1 (GND) - Body ground |
Always |
Below 1 V |
If the result is not as specified, repair or replace the harness or connector.
Text in Illustration*a |
Front view of wire harness connector (to Voltage Inverter Assembly) |
(c) Reconnect the voltage inverter connector. |
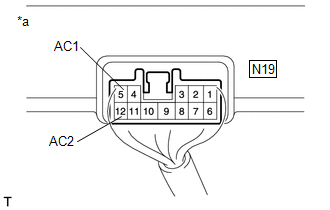 |
(d) Measure the voltage according to the value(s) in the table below.
Standard Voltage:
Tester Connection | Switch Condition | Specified Condition |
|---|---|---|
N19-5 (AC1) - N19-11 (AC2) |
Engine switch on (IG), main switch on |
AC 120 V |
If the result is not as specified, replace the voltage inverter assembly.
Text in Illustration*a |
Component with harness connected (Voltage Inverter Assembly) |
Test yourself
A quick Toyota 4Runner quiz: every answer comes with an explanation and a link to the manual page.