Steering Pad Switch
Components
COMPONENTS
ILLUSTRATION
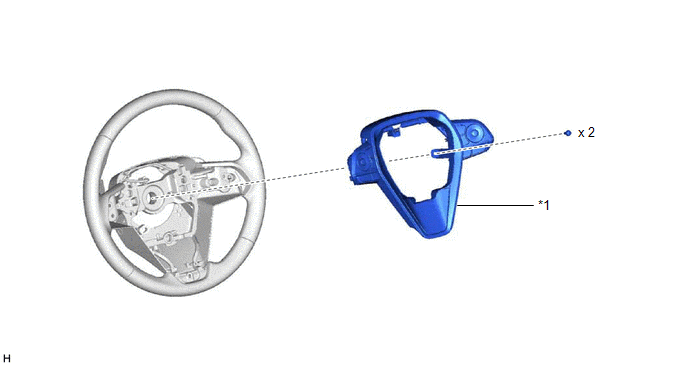
*1 |
STEERING PAD SWITCH ASSEMBLY |
- |
- |
Inspection
INSPECTION
PROCEDURE
1. INSPECT STEERING PAD SWITCH ASSEMBLY
(a) Measure the resistance according to the value(s) in the table below.
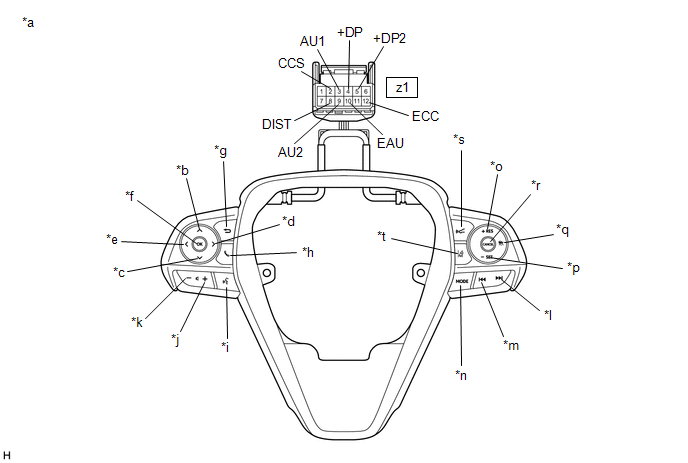
*a |
Component without harness connected (Steering Pad Switch Assembly) |
*b |
Up |
*c |
Down |
*d |
Right |
*e |
Left |
*f |
OK |
*g |
Back |
*h |
On/off Hook |
*i |
Voice |
*j |
Volume+ |
*k |
Volume- |
*l |
Seek+ |
*m |
Seek- |
*n |
MODE |
*o |
+RES |
*p |
-SET |
*q |
Cruise Control Main |
*r |
CANCEL |
*s |
Distance Control |
*t |
Lane Departure Alert |
Standard Resistance:
Tester Connection | Condition | Specified Condition |
|---|---|---|
z1-3 (AU1) - z1-10 (EAU) |
No switch pushed |
95 to 105 kΩ |
Seek+ switch pushed |
Below 2.5 Ω |
|
Seek- switch pushed |
313 to 345 Ω |
|
Volume+ switch pushed |
950 to 1050 Ω |
|
Volume- switch pushed |
2955 to 3265 Ω |
|
z1-9 (AU2) - z1-10 (EAU) |
No switch pushed |
95 to 105 kΩ |
MODE switch pushed |
Below 2.5 Ω |
|
On/off hook switch pushed |
950 to 1050 Ω |
|
Voice switch pushed |
2955 to 3265 Ω |
|
z1-5 (+DP2) - z1-10 (EAU) |
No switch pushed |
95 to 105 kΩ |
Left switch pushed |
Below 2.5 Ω |
|
Up switch pushed |
313 to 345 Ω |
|
Down switch pushed |
950 to 1050 Ω |
|
Right switch pushed |
2955 to 3265 Ω |
|
z1-4 (+DP) - z1-10 (EAU) |
No switch pushed |
95 to 105 kΩ |
OK switch pushed |
Below 2.5 Ω |
|
Back switch pushed |
313 to 345 Ω |
|
z1-8 (DIST) - z1-12 (ECC) |
No switch pushed |
1 MΩ or higher |
Distance control switch pushed |
Below 2.5 Ω |
|
Lane departure alert switch pushed |
228 to 252 Ω |
|
z1-2 (CCS) - z1-12 (ECC) |
No switch pushed |
1 MΩ or higher |
Cruise control main switch pushed |
Below 2.5 Ω |
|
CANCEL switch pushed |
228 to 252 Ω |
|
+RES switch pushed |
599 to 661 Ω |
|
-SET switch pushed |
1463 to 1617 Ω |
HINT:
If the result is not as specified, replace the steering pad switch assembly.
(b) Check the illumination.
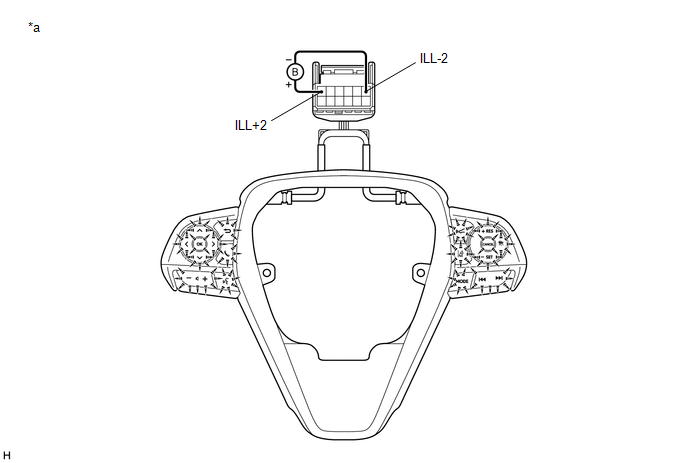
*a |
Component without harness connected (Steering Pad Switch Assembly) |
- |
- |
(1) Connect a positive (+) lead from the auxiliary battery to terminal 1 (ILL+2) and a negative (-) lead to terminal 6 (ILL-2) of the steering pad switch assembly connector.
(2) Check that the steering pad switch assembly illumination illuminates.
OK:
The steering pad switch assembly illumination illuminates.
HINT:
If the result is not as specified, replace the steering pad switch assembly.
Installation
INSTALLATION
PROCEDURE
1. INSTALL STEERING PAD SWITCH ASSEMBLY
(a) Engage the 4 claws and 3 pins to install the steering pad switch assembly.
(b) Install the 2 screws.
(c) Connect the steering pad switch connector to the spiral cable with sensor sub-assembly.
2. INSTALL HORN BUTTON ASSEMBLY
Click here 
Removal
REMOVAL
The necessary procedures (adjustment, calibration, initialization or registration) that must be performed after parts are removed and installed, or replaced during steering pad switch assembly removal/installation are shown below.
Necessary Procedures After Parts Removed/Installed/Replaced (for Gasoline Model)Replaced Part or Performed Procedure | Necessary Procedure | Effect/Inoperative Function when Necessary Procedure not Performed | Link |
|---|---|---|---|
| *: When performing learning using the Techstream. Click here |
|||
Disconnect cable from negative auxiliary battery terminal |
Perform steering sensor zero point calibration |
Lane Departure Alert System (w/ Steering Control) |
 |
Pre-collision System |
|||
Intelligent Clearance Sonar System* |
|||
Lighting System (for Gasoline Model with Cornering Light) |
|||
Memorize steering angle neutral point |
Parking Assist Monitor System |
|
|
Panoramic View Monitor System |
|
||
Replaced Part or Performed Procedure | Necessary Procedure | Effect/Inoperative Function when Necessary Procedure not Performed | Link |
|---|---|---|---|
| *: When performing learning using the Techstream. Click here |
|||
Disconnect cable from negative auxiliary battery terminal |
Perform steering sensor zero point calibration |
Lane Departure Alert System (w/ Steering Control) |
|
Pre-collision System |
|||
Intelligent Clearance Sonar System* |
|||
Lighting System (for HV Model with Cornering Light) |
|||
Memorize steering angle neutral point |
Parking Assist Monitor System |
|
|
Panoramic View Monitor System |
|
||
PROCEDURE
1. REMOVE HORN BUTTON ASSEMBLY
Click here
2. REMOVE STEERING PAD SWITCH ASSEMBLY
(a) Disconnect the steering pad switch connector from the spiral cable with sensor sub-assembly.
(b) Remove the 2 screws. |
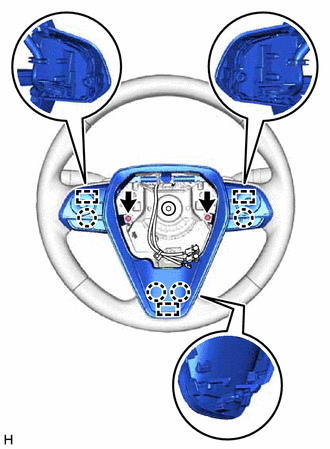 |
(c) Disengage the 4 claws and 3 pins to remove the steering pad switch assembly.