Steering Column Assembly(for Manual Tilt And Manual Telescopic Steering Column)
Components
COMPONENTS
ILLUSTRATION
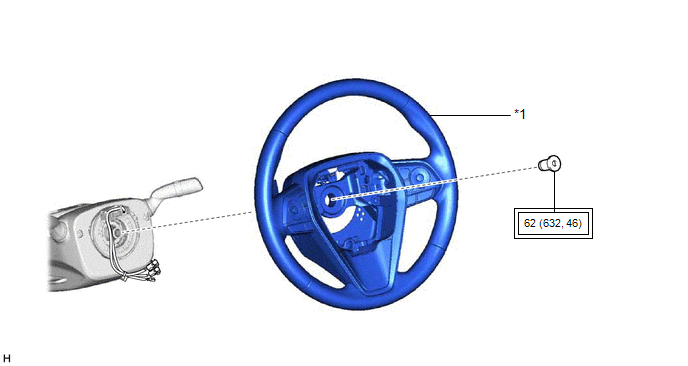
*1 |
STEERING WHEEL ASSEMBLY |
- |
- |
 |
Tightening torque for "Major areas involving basic vehicle performance such as moving/turning/stopping": N*m (kgf*cm, ft.*lbf) |
- |
- |
ILLUSTRATION
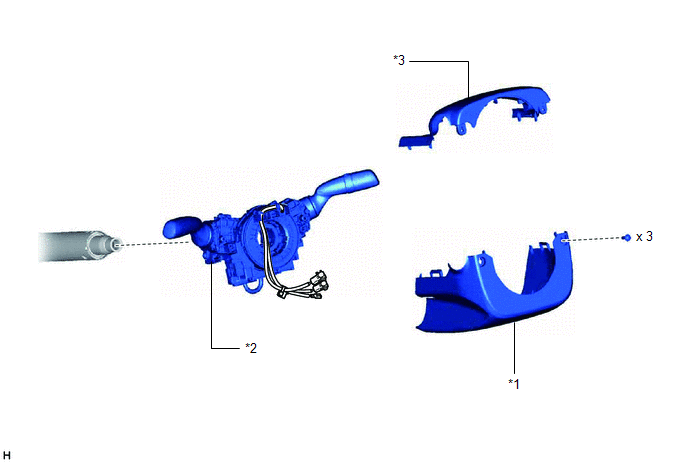
*1 |
LOWER STEERING COLUMN COVER |
*2 |
TURN SIGNAL SWITCH ASSEMBLY WITH SPIRAL CABLE SUB-ASSEMBLY |
*3 |
UPPER STEERING COLUMN COVER |
- |
- |
ILLUSTRATION
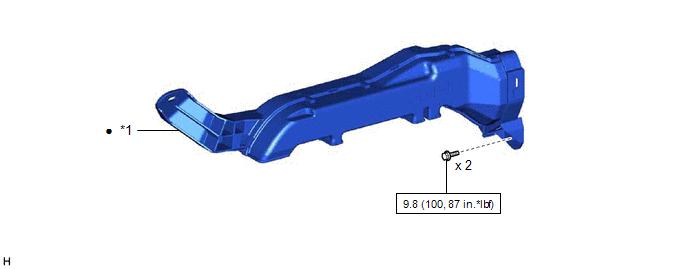
*1 |
NO. 1 AIR DUCT |
- |
- |
 |
N*m (kgf*cm, ft.*lbf): Specified torque |
● |
Non-reusable part |
ILLUSTRATION
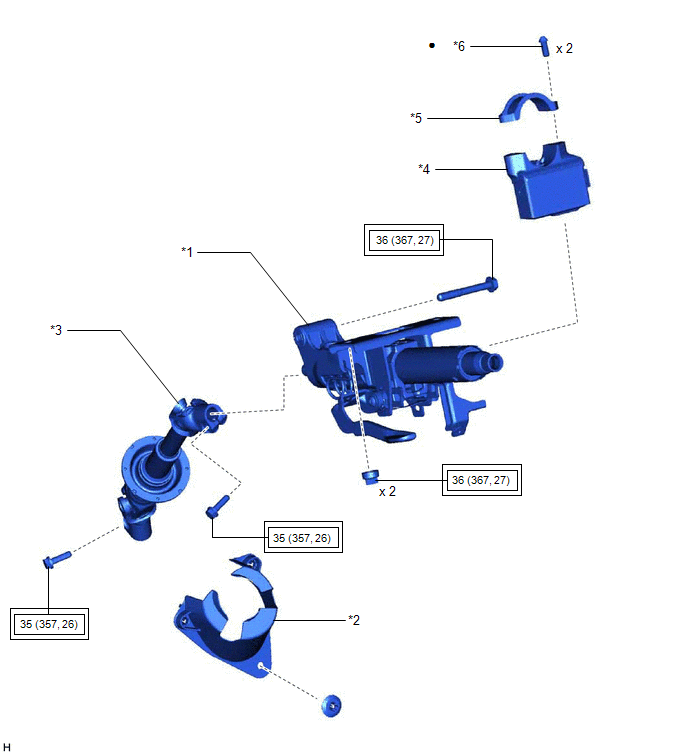
*1 |
STEERING COLUMN ASSEMBLY |
*2 |
STEERING COLUMN HOLE COVER |
*3 |
STEERING INTERMEDIATE SHAFT ASSEMBLY |
*4 |
STEERING LOCK ACTUATOR ASSEMBLY |
*5 |
UPPER STEERING COLUMN CLAMP |
*6 |
STEERING LOCK SET BOLT |
|
Tightening torque for "Major areas involving basic vehicle performance such as moving/turning/stopping": N*m (kgf*cm, ft.*lbf) |
● |
Non-reusable part |
Disassembly
DISASSEMBLY
NOTICE:
Before replacing the steering lock actuator assembly, refer to Registration.
for Gasoline Model: Click here 
for HV Model: Click here
PROCEDURE
1. REMOVE STEERING LOCK ACTUATOR ASSEMBLY
(a) Secure the steering column assembly in a vise between aluminum plates.
NOTICE:
Do not overtighten the vise.
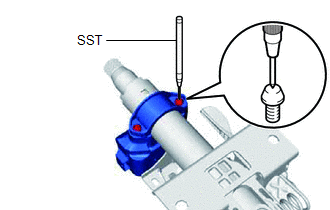
(b) Using SST, strike a punch mark for drilling in the center of the steering lock set bolt. SST: 09622-00010 NOTICE: When striking the punch mark, in order to prevent impact force from being applied to the steering lock actuator assembly, do not use a normal center punch. |
 |
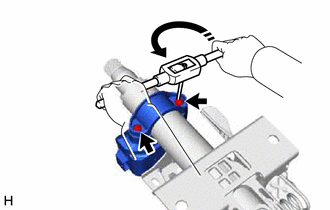
(c) Using a drill, drill a hole in the 2 steering lock set bolts and insert a screw extractor.
(d) Using the screw extractor, remove the 2 steering lock set bolts, upper steering column clamp and steering lock actuator assembly. |
 |
Inspection
INSPECTION
PROCEDURE
1. INSPECT STEERING COLUMN ASSEMBLY
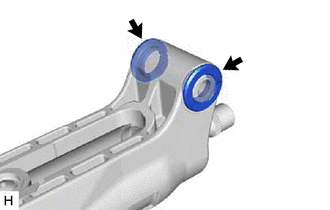
(a) Check that the 2 bushings are securely installed to the steering column assembly. HINT: If the bushings are deformed, missing or damaged, replace the steering column assembly with a new one. |
 |
Installation
INSTALLATION
PROCEDURE
1. ALIGN FRONT WHEELS FACING STRAIGHT AHEAD
2. INSTALL STEERING COLUMN ASSEMBLY
NOTICE:
Make sure that the wire harness is not interfering with the steering column assembly.
(a) Install the steering column assembly with the bolt and 2 nuts.
Torque:
36 N·m {367 kgf·cm, 27 ft·lbf}
NOTICE:
- After the column is installed, check the tilt operation.
- If a large amount of force is required to operate the tilt mechanism or abnormal noise occurs, loosen the nuts and move the bracket forward or backward until the tilt operation works smoothly.
Tighten the nuts and check the tilt operation again.
(b) Connect each connector and engage each wire harness clamp to the steering column assembly.
3. INSTALL STEERING INTERMEDIATE SHAFT ASSEMBLY
(a) Align the matchmarks on the steering intermediate shaft assembly and steering column assembly.
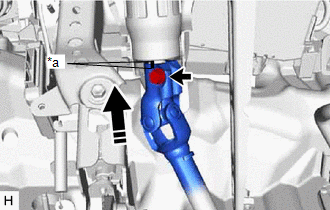
*a |
Matchmark |
 |
Install in this direction |
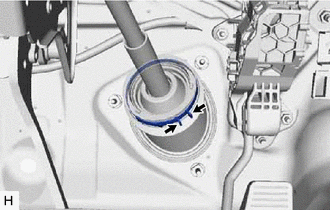
(b) Install the steering intermediate shaft assembly to the steering column assembly.
(c) Install the bolt.
Torque:
35 N·m {357 kgf·cm, 26 ft·lbf}
(d) Tighten the clamp. |
 |
4. INSTALL STEERING COLUMN HOLE COVER
(a) Install the steering column hole cover with the 2 clips. |
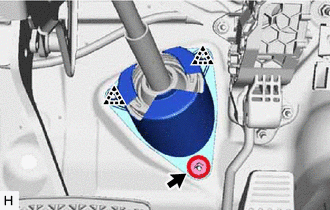 |
(b) Install the clip.
(c) Return the floor carpet.
5. CONNECT STEERING INTERMEDIATE SHAFT ASSEMBLY (for Gasoline Model)
Click here 
6. CONNECT STEERING INTERMEDIATE SHAFT ASSEMBLY (for HV Model)
Click here
7. INSTALL FRONT WHEEL LH
Click here
8. INSTALL NO. 1 AIR DUCT
(a) Engage the 3 claws to install a new No. 1 air duct. |
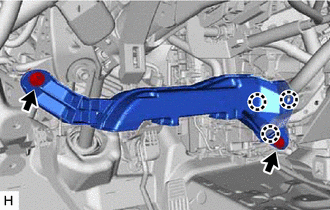 |
(b) Install the 2 bolts.
Torque:
9,8 N·m {100 kgf·cm, 87 in·lbf}
9. INSTALL LOWER NO. 1 INSTRUMENT PANEL AIRBAG ASSEMBLY
Click here
10. INSTALL TURN SIGNAL SWITCH ASSEMBLY WITH SPIRAL CABLE SUB-ASSEMBLY
NOTICE:
- Do not remove/install the spiral cable with sensor sub-assembly with the auxiliary battery connected and the engine switch (for Gasoline Model) or power switch (for HV Model) on (IG).
- Do not rotate the spiral cable with sensor sub-assembly without the steering wheel assembly installed, with the auxiliary battery connected and the engine switch (for Gasoline Model) or power switch (for HV Model) on (IG).
- Ensure that the steering wheel assembly is installed and aligned straight when inspecting the steering sensor.
(a) Using pliers, expand the clamp. |
|
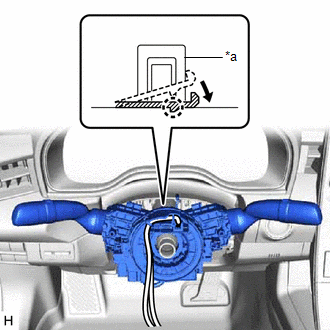
(b) While holding the clamp expanded, install the turn signal switch assembly with spiral cable sub-assembly to the steering column assembly and engage the claw.
(c) Return the clamp to its original position.
(d) Connect the connectors to the turn signal switch assembly with spiral cable sub-assembly.
11. INSTALL UPPER STEERING COLUMN COVER
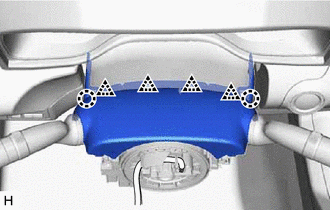
(a) Engage the 2 claws and 4 clips to connect the upper steering column cover. |
 |
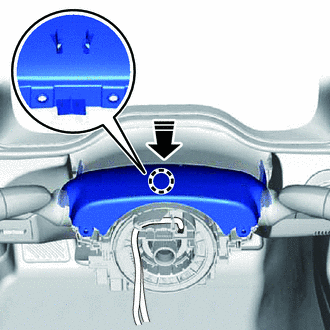
(b) Engage the claw to install the upper steering column cover.
|
Install in this direction |
12. INSTALL LOWER STEERING COLUMN COVER
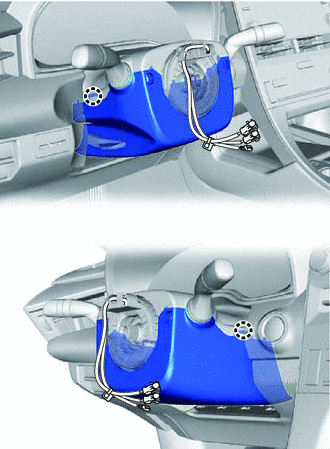
(a) Engage the 2 claws to install the lower steering column cover. |
 |
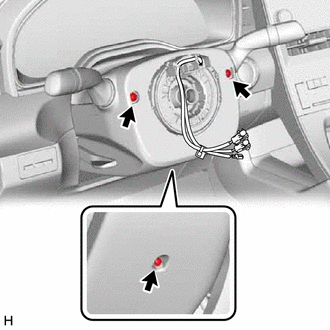
(b) Install the 3 screws. |
 |
13. ALIGN FRONT WHEELS FACING STRAIGHT AHEAD
14. INSPECT AND ADJUST SPIRAL CABLE WITH SENSOR SUB-ASSEMBLY
Click here
15. INSTALL STEERING WHEEL ASSEMBLY
Click here
16. CHECK STEERING WHEEL CENTER POINT
17. INSTALL HORN BUTTON ASSEMBLY
Click here
18. PERFORM INITIALIZATION AND CALIBRATION (for Gasoline Model)
for Parking Assist Monitor System Initialization: Click here
for Parking Assist Monitor System Calibration: Click here
for Panoramic View Monitor System Initialization: Click here
for Panoramic View Monitor System Calibration: Click here
for Intelligent Clearance Sonar System Calibration: Click here
19. PERFORM INITIALIZATION AND CALIBRATION (for HV Model)
for Parking Assist Monitor System Initialization: Click here
for Parking Assist Monitor System Calibration: Click here
for Panoramic View Monitor System Initialization: Click here
for Panoramic View Monitor System Calibration: Click here
for Intelligent Clearance Sonar System Calibration: Click here
Reassembly
REASSEMBLY
PROCEDURE
1. INSTALL STEERING LOCK ACTUATOR ASSEMBLY
NOTICE:
When replacing the steering lock actuator assembly, perform registration.
(a) Secure the steering column assembly in a vise between aluminum plates.
NOTICE:
Do not overtighten the vise.
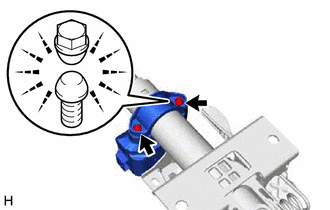
(b) Temporarily install the steering lock actuator assembly and upper steering column clamp with 2 new steering lock set bolts.
(c) Tighten the 2 steering lock set bolts until the bolt head breaks off. |
 |
Removal
REMOVAL
The necessary procedures (adjustment, calibration, initialization or registration) that must be performed after parts are removed and installed, or replaced during steering column assembly removal/installation are shown below.
Necessary Procedures After Parts Removed/Installed/Replaced (for Gasoline Model)Replaced Part or Performed Procedure | Necessary Procedure | Effect/Inoperative Function when Necessary Procedure not Performed | Link |
|---|---|---|---|
| *: When performing learning using the Techstream. Click here |
|||
Removal/installation of the turn signal switch assembly with spiral cable sub-assembly |
Steering angle zero point learning (Initialize intelligent clearance sonar system) |
|
 |
|
Parking Assist Monitor System |
|
|
Steering angle zero point learning (Initialize panoramic view monitor system) |
Panoramic View Monitor System |
|
|
Steering lock ECU (steering lock actuator or upper bracket assembly) |
Code registration (Smart Key System (for Start Function)) |
|
|
Disconnect cable from negative auxiliary battery terminal |
Perform steering sensor zero point calibration |
Lane Departure Alert System (w/ Steering Control) |
|
Pre-collision System |
|||
Intelligent Clearance Sonar System* |
|||
Lighting System (for Gasoline Model with Cornering Light) |
|||
Memorize steering angle neutral point |
Parking Assist Monitor System |
|
|
Panoramic View Monitor System |
|
||
Replaced Part or Performed Procedure | Necessary Procedure | Effect/Inoperative Function when Necessary Procedure not Performed | Link |
|---|---|---|---|
| *: When performing learning using the Techstream. Click here |
|||
Removal/installation of the turn signal switch assembly with spiral cable sub-assembly |
Steering angle zero point learning (Initialize intelligent clearance sonar system) |
|
|
|
Parking Assist Monitor System |
|
|
Steering angle zero point learning (Initialize panoramic view monitor system) |
Panoramic View Monitor System |
|
|
Steering lock ECU (steering lock actuator or upper bracket assembly) |
Code registration (Smart key System (for Start Function)) |
|
|
Disconnect cable from negative auxiliary battery terminal |
Perform steering sensor zero point calibration |
Lane Departure Alert System (w/ Steering Control) |
|
Pre-collision System |
|||
Intelligent Clearance Sonar System* |
|||
Lighting System (for HV Model with Cornering Light) |
|||
Memorize steering angle neutral point |
Parking Assist Monitor System |
|
|
Panoramic View Monitor System |
|
||
PROCEDURE
1. PRECAUTION
Click here
2. ALIGN FRONT WHEELS FACING STRAIGHT AHEAD
3. REMOVE HORN BUTTON ASSEMBLY
Click here
4. REMOVE STEERING WHEEL ASSEMBLY
Click here
5. REMOVE LOWER STEERING COLUMN COVER
NOTICE:
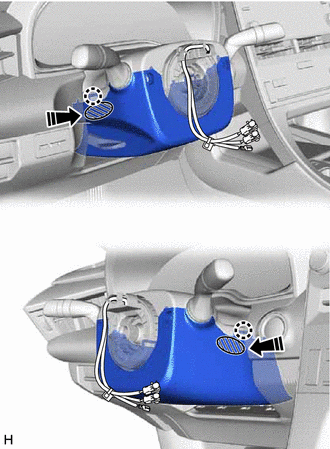
Removing the lower steering column cover in the incorrect order will cause the parts to break.
(a) Release the tilt and telescopic lever and fully extend and lower the steering column assembly.
(b) Lock the tilt and telescopic lever.
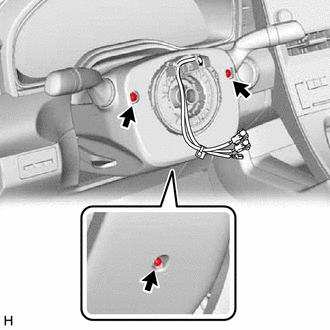
(c) Remove the 3 screws. |
 |
 |
Push Area |
 |
Push in this direction |
(d) While pressing the push area shown in the illustration to disengage the 2 claws, slightly lower the lower steering column cover.
6. REMOVE UPPER STEERING COLUMN COVER
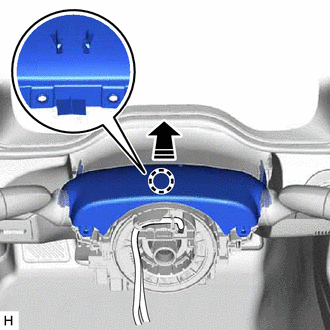
(a) Disengage the claw and separate the upper steering column cover.
|
Separate in this direction |
(b) Disengage the 2 claws and 4 clips to remove the upper steering column cover. |
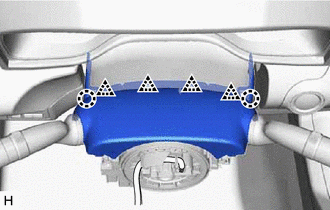 |
7. REMOVE TURN SIGNAL SWITCH ASSEMBLY WITH SPIRAL CABLE SUB-ASSEMBLY
NOTICE:
- Do not remove/install the spiral cable with sensor sub-assembly with the auxiliary battery connected and the engine switch (for Gasoline Model) or power switch (for HV Model) on (IG).
- Do not rotate the spiral cable with sensor sub-assembly without the steering wheel assembly installed, with the auxiliary battery connected and the engine switch (for Gasoline Model) or power switch (for HV Model) on (IG).
- Ensure that the steering wheel assembly is installed and aligned straight when inspecting the steering sensor.
(a) Disconnect each connector from the turn signal switch assembly with spiral cable sub-assembly.
(b) Using pliers, expand the clamp. |
|
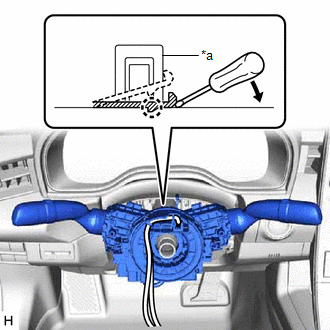
(c) While holding the clamp expanded, raise the claw using a screwdriver to disengage it, and then remove the turn signal switch assembly with spiral cable sub-assembly from the steering column assembly.
8. REMOVE LOWER NO. 1 INSTRUMENT PANEL AIRBAG ASSEMBLY
Click here
9. REMOVE NO. 1 AIR DUCT
(a) Remove the 2 bolts.
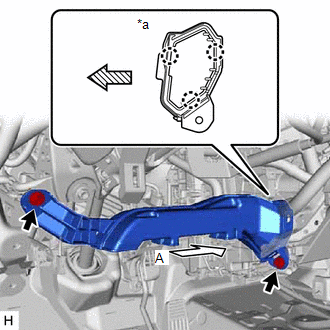
*a |
View A |
 |
Front |
(b) Disengage the 3 claws to remove the No. 1 air duct.
NOTICE:
Be careful not to deform or damage the lower heater case of the air conditioner unit assembly when removing the No. 1 air duct.
10. REMOVE FRONT WHEEL LH
Click here
11. SEPARATE STEERING INTERMEDIATE SHAFT ASSEMBLY (for Gasoline Model)
Click here
12. SEPARATE STEERING INTERMEDIATE SHAFT ASSEMBLY (for HV Model)
Click here
13. REMOVE STEERING COLUMN HOLE COVER
(a) Turn back the floor carpet.
(b) Remove the clip. |
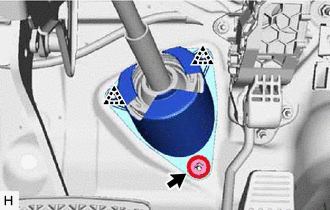 |
(c) Disengage the 2 clips to remove the steering column hole cover.
14. REMOVE STEERING INTERMEDIATE SHAFT ASSEMBLY
(a) Using a screwdriver, loosen the clamp as shown in the illustration. |
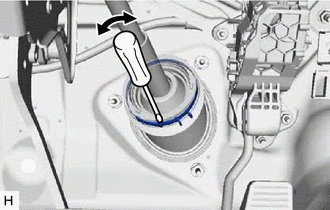 |
(b) Remove the bolt and slide the steering intermediate shaft assembly.
NOTICE:
Do not remove the steering intermediate shaft assembly from the steering column assembly.
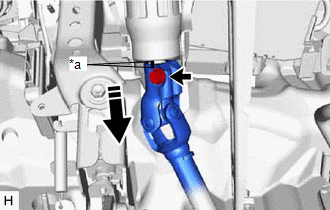
*a |
Matchmark |
|
Slide in this direction |
(c) Put matchmarks on the steering intermediate shaft assembly and steering column assembly.
(d) Remove the steering intermediate shaft assembly from the steering column assembly.
15. REMOVE STEERING COLUMN ASSEMBLY
(a) Disconnect each connector and disengage each wire harness clamp from the steering column assembly.
(b) Remove the bolt, 2 nuts and steering column assembly. |
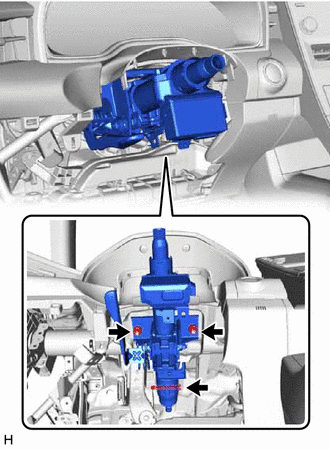 |