Removal
REMOVAL
PRECAUTION / NOTICE / HINT
The procedures required (adjustment, calibration, initialization or registration) that must be performed after parts have been removed, installed, or replaced during brake actuator assembly removal/installation are shown below.
Procedure Required After Replacing / Removing / Installing PartsReplacement part or procedure | Required Procedure | Effect/Inoperative function when procedure not performed | Link |
|---|---|---|---|
Disconnect the cable from the negative (-) battery terminal. |
Memorize Steering Angle Neutral Point |
Lane Departure Alert System (with Steering Control) |
 |
Pre-Collision System |
|||
Initialize Back Door Lock |
Door Lock Control System |
|
|
Brake Actuator Assembly Replacement |
Operate the electric parking brake switch assembly. |
The parking brake warning light (red) flashes when the ignition switch is first turned ON. |
|
|
|
|
PROCEDURE
1. PRECAUTIONS
NOTICE:
After turning the ignition switch OFF, a waiting time may be required before disconnecting the cable from the negative (-) battery terminal. Therefore, be sure to read the precautions for disconnecting the cable from the negative (-) battery terminal before performing the work.
Click here
2. DISCONNECT THE CABLE FROM THE NEGATIVE BATTERY TERMINAL
Click here
NOTICE:
When the cable has been disconnected, some systems must be reset after the cable is reconnected.
Click here
3. REMOVE FRONT WIPER MOTOR AND LINK ASSEMBLY
Click here
4. REMOVE NO. 1 HEATER DUCT SPLASH SHIELD SEAL
Click here
5. REMOVE LEFT WATERPROOF PROTECTIVE PLATE
Click here
6. REMOVE LEFT COWL SIDE BRACE
Click here
7. REMOVE RIGHT COWL SIDE BRACE
Click here
8. REMOVE COWL TOP OUTER PANEL SUB-ASSEMBLY
Click here
9. REMOVE BATTERY
Click here
10. DRAIN BRAKE FLUID
NOTICE:
If brake fluid leaks onto a painted surface, wipe it off immediately.
11. REMOVE BRAKE ACTUATOR WITH BRACKET
(a) Release the lock lever and disconnect the connector from the brake actuator assembly.
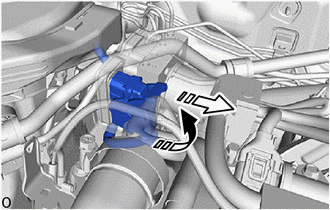
 |
Release lock lever |
 |
Disconnect connector |
NOTICE:
Take care to prevent brake fluid from entering the connector.
(b) Use labels or make notes to remember the correct locations when reconnecting the brake tubes. |
|
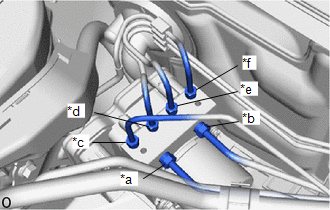
(c) Using a 10 mm and 12 mm flare nut wrench, disconnect the 6 brake tubes from the brake actuator assembly. |
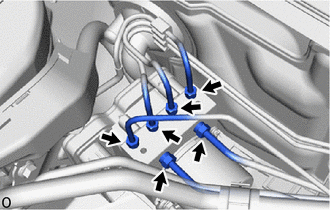 |
(d) Remove the bolt, 2 nuts and the brake actuator with bracket from the vehicle. NOTICE:
HINT: Remove the brake actuator with bracket, taking care to avoid the brake tubes. |
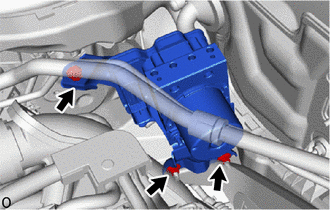 |
12. REMOVE BRAKE ACTUATOR ASSEMBLY
(a) Loosen the 2 nuts. |
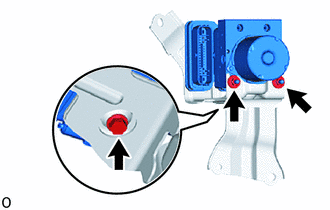 |
(b) Remove the bolt and brake actuator assembly from the brake actuator bracket assembly.
NOTICE:
- Do not hold the brake actuator assembly by the connector.
- Take care to prevent brake fluid from entering the connector.
- Do not drop the brake actuator assembly when carrying it.
13. REMOVE NO. 1 BRAKE ACTUATOR HOUSING CLAMP
(a) Remove the brake actuator housing clamp from the No. 1 brake actuator support cushion. |
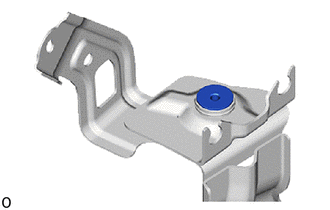 |
14. REMOVE BRAKE ACTUATOR SUPPORT CUSHION
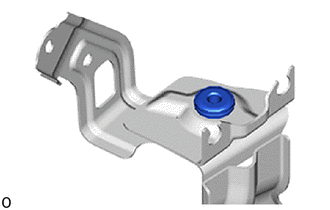
(a) Remove the brake actuator bolt cushion from the brake actuator bracket assembly.