Removal
REMOVAL
PRECAUTION / NOTICE / HINT
The procedures required (adjustment, calibration, initialization or registration) after parts have been removed, installed or replaced during removal/installation of the brake master cylinder sub-assembly are shown below.
Procedure Required After Replacing / Removing / Installing PartsReplacement part or procedure | Necessary Procedures | Effects / Inoperative Function When Necessary Procedure Not Performed | Link |
|---|---|---|---|
Disconnect the cable from the negative (-) battery terminal. |
Memorize Steering Angle Neutral Point |
Lane Departure Alert System (with Steering Control) |
 |
Pre-Collision System |
|||
Initialize Back Door Lock |
Door Lock Control System |
|
NOTICE:
Be sure to release the vacuum from the brake booster assembly before removing the master cylinder sub-assembly from the brake booster assembly.
PROCEDURE
1. REMOVE FRONT WIPER MOTOR AND LINK ASSEMBLY
Click here
2. REMOVE NO. 1 HEATER AIR DUCT SPLASH SHIELD SEAL
Click here
3. REMOVE LH WATER PROTECTION PLATE
Click here
4. REMOVE LH COWL BODY MOUNTING REINFORCEMENT
Click here
5. REMOVE RH COWL BODY MOUNTING REINFORCEMENT
Click here
6. REMOVE COWL TOP OUTER PANEL SUB-ASSEMBLY
Click here
7. REMOVE BATTERY
Click here
8. DRAIN BRAKE FLUID
NOTICE:
If brake fluid leaks onto a painted surface, wipe it off immediately.
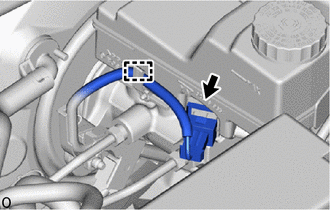
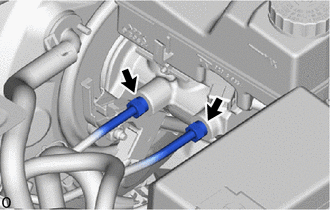
9. REMOVE BRAKE MASTER CYLINDER SUB-ASSEMBLY
(a) Release the clip and disconnect the connector from the reservoir level switch. |
 |
(b) Using a flare nut wrench, disconnect the 2 brake lines from the brake master cylinder sub-assembly. NOTICE:
|
 |
(c) Using a 13 mm socket wrench, remove the nut and detach the wire harness clamp. |
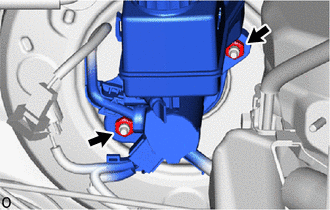 |
(d) Using a 13 mm socket wrench, remove the nut and the brake master cylinder sub-assembly from the brake booster assembly.
NOTICE:
- Handle the brake master cylinder sub-assembly with care. Do not drop it or subject it to impact. Do not reuse a brake master cylinder sub-assembly that has been dropped.
- Do not hold the brake master cylinder of the sub-assembly by the piston. Hold the brake master cylinder sub-assembly by its body or the brake master cylinder reservoir assembly when transporting it.
- Do not pull out the master cylinder piston.
- Do not hit or pinch the master cylinder piston, and do not allow it to be damaged in any way.
- When installing the brake master cylinder sub-assembly on the brake booster assembly, or when removing it from the brake booster assembly, keep the brake master cylinder sub-assembly horizontal or with its tip pointing down (master cylinder piston facing up) to prevent the master cylinder piston from falling out.
- Prevent foreign matter from entering the master cylinder piston. If any foreign matter reaches the master cylinder piston, remove it using a piece of cloth, then apply an even coat of lithium soap based glycol grease around the entire circumference (sliding part) of the master cylinder piston.
- Do not use any other type of grease or fluid.
- Be sure to release the vacuum from the brake booster assembly before removing the brake master cylinder sub-assembly from the brake booster assembly.
(e) Remove the O-ring from the brake master cylinder sub-assembly.