Installation
INSTALLATION
PRECAUTION / NOTICE / HINT
HINT:
- Repeat the same procedure for the right side and the left side.
- The following procedure applies to the left side.
PROCEDURE
1. INSTALL FRONT DOOR INSIDE LOCK CABLE ASSEMBLY
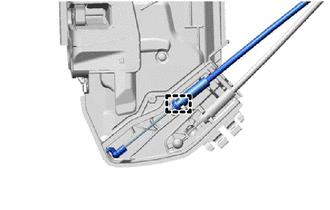
(a) without Double Lock System:
(1) Engage the guide to install the front door inside lock cable assembly onto the front door lock assembly with motor. |
 |
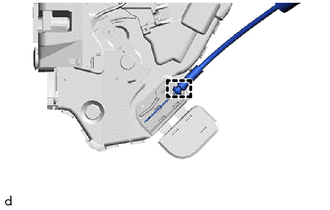
(b) with Double Lock System:
(1) Engage the guide to install the front door inside lock cable assembly onto the front door lock assembly with motor. |
 |
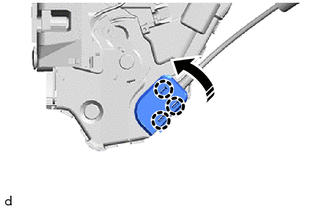
(2) Engage the claws as shown in the illustration.
 |
Install in this direction |
2. INSTALL FRONT DOOR LOCK REMOTE CONTROL CABLE ASSEMBLY
(a) without Double Lock System:
(1) Engage the guide to install the front door lock remote control cable assembly onto the front door lock assembly with motor. |
|
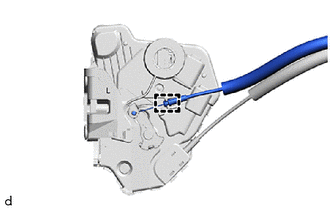
(b) with Double Lock System:
(1) Engage the guide to install the front door lock remote control cable assembly onto the front door lock assembly with motor. |
 |
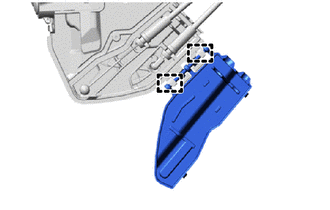
3. INSTALL FRONT DOOR LOCK COVER SUB-ASSEMBLY (without double lock system)
(a) Engage the guides to install the front door lock cover sub-assembly onto the front door lock assembly with motor. |
 |
(b) Engage the claws as shown in the illustration.
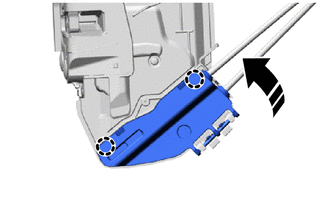
|
Install in this direction |
4. INSTALL FRONT DOOR LOCK ASSEMBLY WITH MOTOR
NOTICE:
- If reusing a removed front door lock assembly with motor, replace the door lock wire harness seal with a new one.
- Do not allow grease or dust to adhere to the door lock wire harness gasket installation surface.
- Reusing a door lock wire harness seal or using a damaged door lock wire harness seal may allow water to enter. This may cause a malfunction of the front door lock assembly with motor.
(a) Apply MP grease to the sliding parts of the front door lock assembly with motor.
(b) If reusing the front door lock assembly with motor (without double lock system):
(1) Install a new door lock wire harness seal onto the front door lock assembly with motor.
(c) If reusing the front door lock assembly with motor (with double lock system):
(1) Install a new door lock wire harness seal onto the front door lock assembly with motor.
(d) Connect the front door lock open rod as shown in the illustration.
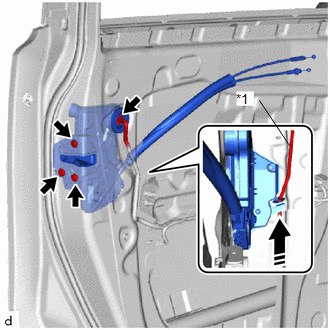
*1 |
Front door unlock rod |
|
Install in this direction |
HINT:
Make sure the front door open rod is properly connected to the front door lock assembly with motor.
(e) Using a TORX T30 socket wrench, install the front door lock assembly with motor with 3 screws.
Torque:
5.5 N·m {56 kgf·cm, 49 in·lbf}
(f) Connect the connector.
5. INSTALL FRONT DOOR OUTSIDE HANDLE COVER (for driver side)
Click here
6. INSTALL FRONT DOOR REAR LOWER FRAME SUB-ASSEMBLY
Click here
7. INSTALL FRONT DOOR GLASS RUN
Click here
8. INSTALL UPPER DOOR FRAME GARNISH
Click here
9. INSTALL FRONT DOOR WINDOW GLASS SUB-ASSEMBLY
Click here
10. INSTALL FRONT DOOR SERVICE HOLE COVER
Click here
11. INSTALL FRONT DOOR BELT WEATHERSTRIP
Click here
12. INSTALL FRONT DOOR GLASS INNER WEATHERSTRIP
Click here
13. INSTALL FRONT DOOR TRIM PANEL SUB-ASSEMBLY
Click here
14. INSTALL POWER WINDOW SWITCH ASSEMBLY WITH FRONT ARMREST BASE UPPER PANEL (for front passenger side)
Click here
15. INSTALL MULTIPLEX NETWORK MAIN SWITCH ASSEMBLY WITH FRONT ARMREST BASE UPPER PANEL (for driver side)
Click here
16. INSTALL FRONT DOOR INSIDE HANDLE BEZEL CLIP
Click here
17. CONNECT CABLE TO NEGATIVE BATTERY TERMINAL
Click here
NOTICE:
When the cable has been disconnected, some systems must be reset after the cable is reconnected.
Click here
18. INITIALIZE POWER WINDOW CONTROL SYSTEM
Click here
19. CHECK POWER WINDOW OPERATION
Click here