Exterior/interior trim
Roof drip side finish moulding center LH
In this manual: Exterior/interior trim
5steps
~30min
2/5difficulty
Done 0 of 5
REPLACEMENT
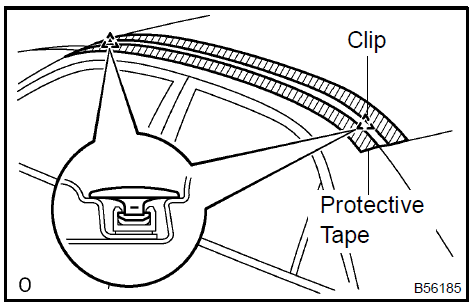 Remove roof drip side finish moulding center LH 2. INSTALL ROOF DRIP SIDE FINISH MOULDING CLIP No.1
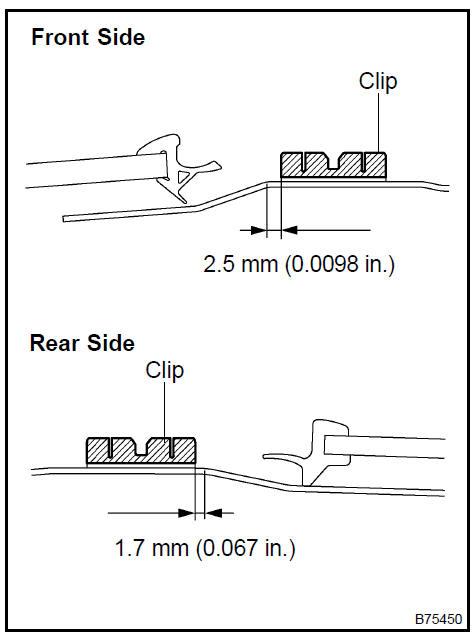 Install roof drip side finish moulding clip No.1
HINT:
- Use the same procedures for the RH side and LH side.
- The procedures listed below are for the LH side.
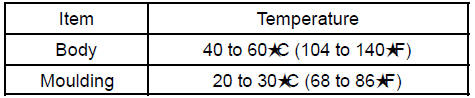
- When replacing the moulding, heat the body and moulding using a heat light. Heating temperature:
- Put protective tape around the edges of the moulding.
- Using a moulding remover, disengage the moulding’s front and rear end clips from the vehicle. Remove the moulding.
- Do not remove the clips from vehicle body.
- If the clips are damaged or removed accidentally, replace them.
Remove roof drip side finish moulding center LH 2. INSTALL ROOF DRIP SIDE FINISH MOULDING CLIP No.1
HINT: Use the following steps a. to c. replacing the clips with the clips. If not replacing the clips, they are not required.
- Remove the tape that remains on the mounting surface of the body, and then clean the surface with white gasoline.
- Heat the clip installation surfaces of the body and moulding.
- Install new clips in the positions shown in the illustration.
Press−fit the clips by hand.
HINT:
- Minimum hardening time: 30 minutes
- Time needed for complete hardening: 24 hours
Install roof drip side finish moulding clip No.1Test yourself
A quick Toyota Camry quiz: every answer comes with an explanation and a link to the manual page.
Was this page helpful?