Brake System
Brake Pedal Inspection and Adjustment - Pedal Height
In this manual: Brake System
~1min read
- · Pull back the carpet under the pedal and measure the pedal height. Measure the distance from the top rubber pad of the pedal to the panel under the pedal.
- · If the pedal height does not meet the specifications, adjust it as follows. Remove the lower steering column cover by removing its mounting screws. Disconnect the hood release lever (2 screws) and disconnect the wiring from the instrument panel light rheostat. Remove the lower instrument panel cover. Remove the air duct to access the upper part of the pedal.
- · Disconnect the wiring from the stop light switch, then loosen the lock nut and unscrew the switch. Loosen the lock nut of the pedal height adjusting bolt and turn the bolt until the correct pedal height is obtained (Fig. 13.5.1). Tighten the lock nut.
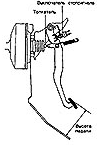 Fig. 13.5.1. Brake pedal height adjustment components
- · Install the stop light switch and its lock nut. Screw the switch in until it contacts the pedal.
- · Back the stop light switch off by one turn and measure the distance from the switch to the pedal pad. Turn the switch until the required distance is obtained, then tighten the lock nut in this position. Reconnect the switch wiring.
- · Make sure the stop light comes on when the brake pedal is lightly depressed and goes off when the pedal is released.
- · After setting the pedal height and adjusting the stop light switch, check the brake pedal free play as follows.
Test yourself
A quick Toyota Carina quiz: every answer comes with an explanation and a link to the manual page.
Was this page helpful?