Inspection procedure
:
- if dtcs besides misfire are memorized simultaneously, first perform the troubleshooting for them.
- Read freeze frame data using the hand-held tester or the obd ii scan tool. Freeze frame data records the engine conditions when a malfunction is detected. When troubleshooting, it is useful for determining whether the vehicle was running or stopped, the engine was warmed up or not, the air–fuel ratio was lean or rich, etc. At the time of the malfunction.
- If the misfire does not occur when the vehicle is brought to the workshop, the misfire can be confirmed by reproducing the condition of the freeze frame data. After finishing the repair, confirm that there is no misfire (see confirmation driving pattern).
- When either of short ft #1 or long ft #1 in the freeze frame data is over the range of ±20 %, there is a possibility that the air–fuel ratio is inclining either to rich (–20 % or less) or lean (+20 % or more).
When coolant temp in the freeze frame data is less than 80°c (176°f), there is a possibility of misfire only during engine warm up.
- If the misfire cannot be reproduced, the reason may be because of the driving the vehicle with lack of fuel, the use of improper fuel, a stain on the ignition plug, etc.
- Be sure to check the value on the misfire counter after the repair.
- Connect the hand–held tester or the obd ii scan tool to the dlc3.
- turn the ignition switch on and push the hand–held tester or the obd ii scan tool main switch on.
- select the item ”diagnosis / enhanced obd ii / dtc info / current codes”.
- read the dtcs.
Result:

: if any other codes besides p0300, p0301, p0302, p0303 or p0304 are output, perform the troubleshooting for those dtcs first.


- Check the connection conditions of the wire harness and connector.
- check the vacuum hose piping for disconnection and break.




- Connect the hand–held tester or the obd ii scan tool to the dlc3.
- turn the ignition switch on and push the hand–held tester or the obd ii scan tool main switch on.
- start the engine.
- select the item ”diagnosis / enhanced obd ii / data list / all / cyl#1 – cyl#4”.
- read the number of misfire on the hand–held tester or the obd ii scan tool.
: when a misfire is not reproduced, be sure to branch below based on the stored dtc.
Result:


- Remove the ignition coil assembly.
- remove the spark plug.
- check the spark plug type.
Recommended spark plug:

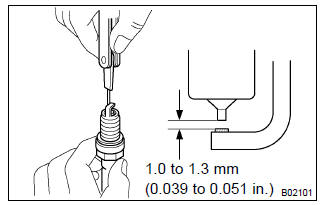
- Check the spark plug electrode gap.
: if adjusting the gap of a new spark plug, bend only the base of the ground electrode. Do not touch the tip. Never attempt to adjust the gap on a used plug.
- check the electrode for carbon deposits.
- perform a spark test.
: absolutely disconnect the each injector connectors.
Notice: do not crank the engine for more than 5 seconds at a time.
- Install the spark plug to the ignition coil, and connect the ignition coil connector.
- Disconnect the injector connector.
- Ground the spark plug.
- Check if spark occurs while the engine is being cranked.
Standard: spark jumps across electrode gap.
- reinstall the spark plug.
- reinstall the ignition coil assy.


- Change to the normal spark plug.
- perform a spark test.
: absolutely disconnect each injector connector.
Notice: do not crank the engine for more than 5 seconds at a time.
- Install the spark plug to the ignition coil, and connect the ignition coil connector.
- Disconnect the injector connector.
- Ground the spark plug.
- Check if spark occurs while the engine is being cranked.
Standard: spark jumps across electrode gap.


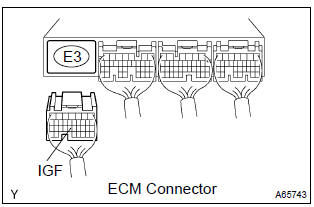
- Check the harness and connector between the ignition coil and ecm (igf terminal) connectors
- disconnect the i2, i3, i4 or i5 ignition coil and igniter connector.
- Disconnect the ecm e3 connector.
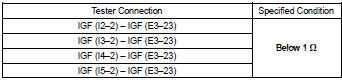
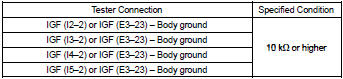
- Check the resistance between the wire harness side connectors.
Standard (check for open):
Standard (check for short):
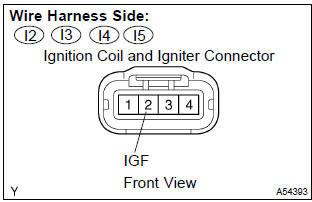
- Reconnect the ecm connector.
- Reconnect the ignition coil and igniter connector.
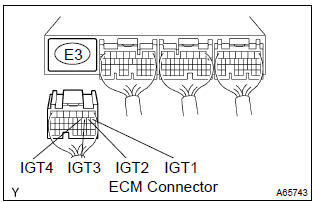
- check the harness and connector between the ignition coil and ecm (igt terminal) connectors
- disconnect the i2, i3, i4 or i5 ignition coil and igniter connector.
- Disconnect the ecm e3 connector.
- Check the resistance between the wire harness side connectors.
Standard (check for open):
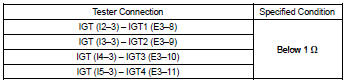
Standard (check for short):
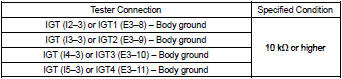
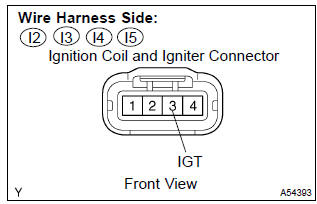
- Reconnect the ecm connector.
- Reconnect the ignition coil and igniter connector.


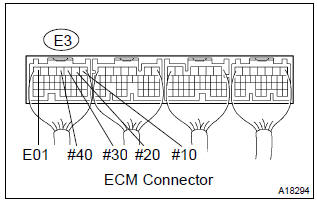
- Turn the ignition switch on.
- measure the voltage between the terminals of the e3 ecm connector.
Standard:
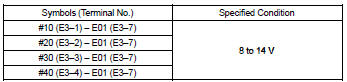




10 Check harness and connector of misfiring cylinder(injector – ecm, injector – ignition switch)
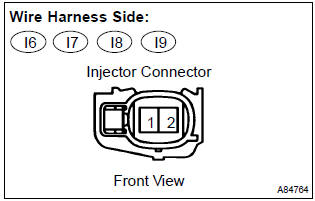
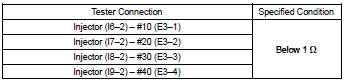
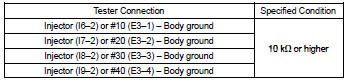
- Check the harness and connector between the injector connector and ecm connector.
- Disconnect the i6, i7, i8 or i9 injector connector.
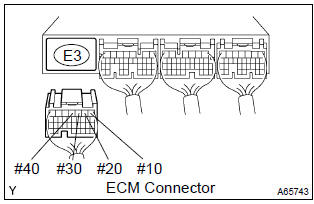
- Disconnect the e3 ecm connector.
- Measure the resistance between the wire harness side connectors.
Standard (check for open):
Standard (check for short):
- Reconnect the ecm connector.
- Reconnect the iinjector connector.
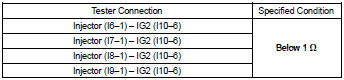
- check the harness and connector between the injector connector and ignition switch connector.
- Disconnect the i6, i7, i8 or i9 injector connector.
- Disconnect the i10 ignition switch connector.
- Measure the resistance between the wire harness side connectors.
Standard (check for open):
Standard (check for short):
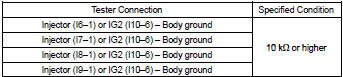
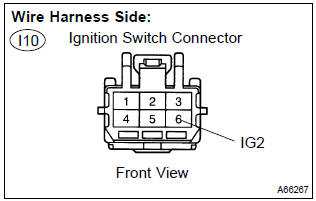
- Reconnect the ignition switch connector.
- Reconnect the injector connector.






:
- if the result of step 4 is ”1 or 2 cylinders” proceed to a.
- If the result of step 4 is ”more than 3 cylinders” proceed to b.




- Connect the hand–held tester or the obd ii scan tool to the dlc3.
- turn the ignition switch on.
- check the intake air temperature.
- Select the item ”diagnosis / enhanced obd ii / data list / all / intake air” and read its value displayed on the hand–held tester or the obd ii scan tool.
- check the air flow rate.
- Select the item ”diagnosis / enhanced obd ii / data list / all / maf” and read its value displayed on the hand–held tester or the obd ii scan tool.
Standard:



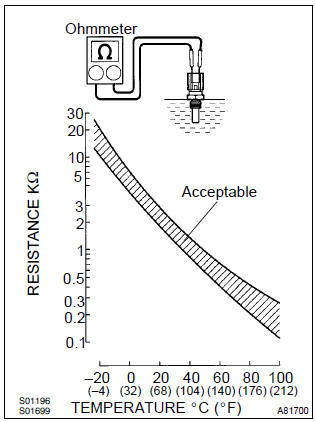
- Remove the engine coolant temperature sensor.
- measure the resistance between the terminals of the engine coolant temperature sensor.
Standard:

: if you checking the engine coolant temperature sensor in water, be careful not to allow water to go into the terminals.
After checking, dry the sensor.
Hint: alternate procedure: connect an ohmmeter to the installed engine coolant temperature sensor and read the resistance. Use an infrared thermometer to measure the engine temperature in the immediate vicinity of the sensor. Compare these values to the resistance/temperature graph. Change the engine temperature (warm up or allow to cool down) and repeat the test.


:
- if the result of step 4 is ”1 or 2 cylinders” proceed to a.
- If the result of step 4 is ”more than 3 cylinders” proceed to b.


Test yourself
A quick Toyota Corolla quiz: every answer comes with an explanation and a link to the manual page.