Reassembly
HINT:
- Thoroughly clean all parts to be assembled.
- Before installing the parts, apply new engine oil to all sliding and rotating surfaces.
- Replace all gaskets, O-rings and oil seals with new parts.
1. ASSEMBLE PISTON AND CONNECTING ROD
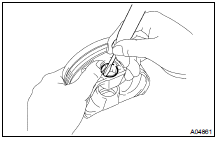
(a) Using a small screwdriver, install a new snap ring on one side of the piston pin hole.

(b) Gradually heat the piston to about 60C (140F).
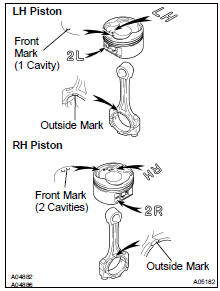
(d) Position the piston front mark to the outside mark on the connecting rod as shown in the diagram.
NOTICE: The installation directions of the piston and connecting rod are different for the LH and RH banks. The LH piston is marked with "LH" and "2L", the RH piston with "RH" and "2R".
(e) Align the piston pin holes of the piston and connecting rod, and push in the piston pin with your thumb.
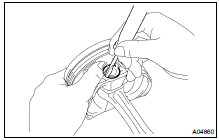
(f) Using a small screwdriver, install a new snap ring on the other side of the piston pin hole.
2. INSTALL PISTON RINGS
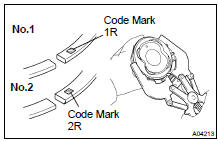
(b) Using a piston ring expander, install the 2 compression rings with the code mark facing upward.
Code mark:

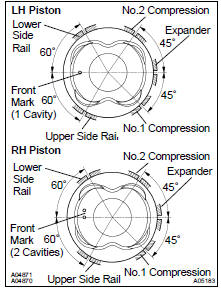
(c) Position the piston rings so that the ring ends are as shown.
NOTICE: Do not align the ring ends.
3. INSTALL BEARINGS
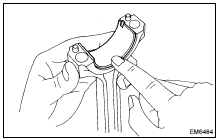
(b) Install the bearings in the connecting rod and the connecting rod cap.
4. INSTALL MAIN BEARINGS

HINT:
- Main bearings come in widths of 19.5 mm (0.768 in.) and 22.5 mm (0.886 in.). Install the 22.5 mm (0.886 in.) bearings in the No.1 and No.5 cylinder block journal positions with the main bearing cap. Install the 19.5 mm (0.768 in.) bearings in the other positions.
- Upper bearings have an oil groove and an oil holes; lower bearings do not.
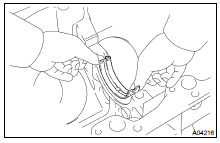
(a) Align the bearing claw with the claw groove of the cylinder block, and push in the 5 upper bearings.
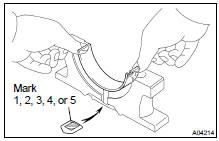
(b) Align the bearing claw with the claw groove of the main bearing cap, and push in the 5 lower bearings.
HINT: A number is marked on each main bearing cap to indicate the installation position
5. INSTALL UPPER THRUST WASHERS
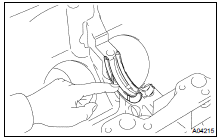
Install the 2 thrust washers under the No.3 journal position of the cylinder block with the oil grooves facing outward.
6. PLACE CRANKSHAFT ON CYLINDER BLOCK
7. PLACE MAIN BEARING CAPS AND LOWER THRUST WASHERS ON CYLINDER BLOCK
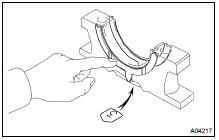
(a) Install the 2 thrust washers on the No.3 bearing cap with the grooves facing outward.
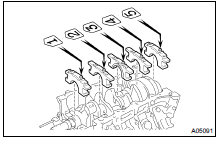
(b) Install the 5 main bearing caps in their proper locations.
8. INSTALL MAIN BEARING CAP BOLTS
HINT:
- The main bearing cap bolts are tightened in 2 steps (steps (b) and (d)).
- If any one of the main bearing cap bolts is broken or deformed, replace it.
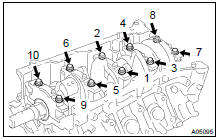
(b) Install and evenly tighten the 10 main bearing cap bolts a little at a time for several times as in the sequence shown.
Torque: 27 N·m
If any one of the main bearing cap bolts does not meet the torque specification, replace the main bearing cap bolt.
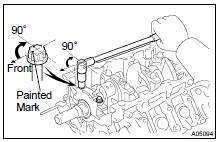
(f) Check that the crankshaft turns smoothly.
9. CHECK CRANKSHAFT THRUST CLEARANCE ( EM-88 )
10. INSTALL PISTON AND CONNECTING ROD ASSEMBLES
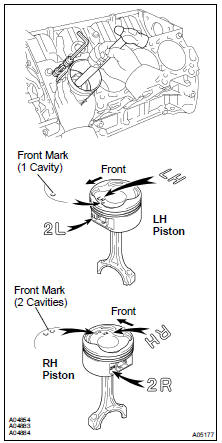
Using a piston ring compressor, push the correctly numbered piston and connecting rod assemblies into each cylinder with the front mark of the piston facing forward.
NOTICE: The shape of the piston varies for the LH and RH banks. The LH piston is marked with "LH" and "2R", the RH piston with "RH" and "2R".
11. PLACE CONNECTING ROD CAP ON CONNECTING ROD
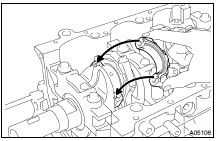
(b) Align the pin groove of the connecting rod cap with the pins of the connecting rod, and install the connecting rod cap.

(c) Check that the outside mark of the connecting rod cap is facing in correct direction.
12. INSTALL CONNECTING ROD CAP BOLTS
HINT:
- The connecting rod cap bolts are tightened in 2 steps (steps (b) and (d)).
- If any one of the connecting rod cap bolts is broken or deformed, replace it.
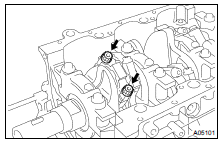
(b) Install and alternately tighten the 2 connecting rod cap bolts a little at a time for several times.
Torque: 24 N·m
If any one of the connecting rod cap bolts does not meet the torque specification, replace the connecting rod cap bolts.

(f) Check that the crankshaft turns smoothly.
13. CHECK CONNECTING ROD THRUST CLEARANCE ( EM-88 )
14. INSTALL REAR OIL SEAL RETAINER
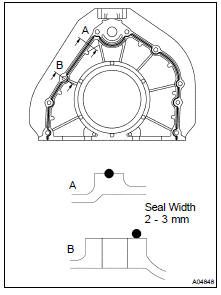
(a) Remove any old packing (FIPG) material, and be careful not to drop any oil on the contact surfaces of the oil seal retainer and the cylinder block.
- Using a razor blade and a gasket scraper, remove old FIPG from the seal surface.
- Clean all the components to remove the redundant FIPG completely.
- Clean sealing surfaces with solvent so that any residue does not remain on the seal.
(b) Apply seal packing to the oil seal retainer as shown in the illustration.
Seal packing: Part No. 08826-00080 or equivalent
- Install a nozzle that is cut to a 2 - 3 mm (0.08 - 0.12 in.) opening.
- Parts must be assembled within 5 minutes after the seal packing application. Otherwise the material must be removed and the seal packing have to be reapplied.
- Immediately remove the nozzle from the tube and reinstall the cap.
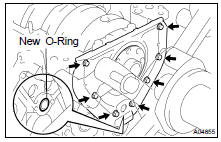
(d) Install the oil seal retainer with the 7 bolts.
Torque: 8 N·m
15. INSTALL ENGINE COOLANT DRAIN UNIONS
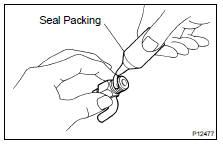
(a) Apply seal packing to 2 or 3 threads from the end of the drain unions.
Seal packing: Part No. 08826-00100 or equivalent
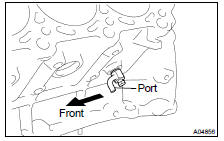
(b) Install the 2 drain unions.
Torque: 49 N·m
HINT: After applying the specified torque, rotate the drain union clockwise until the drain port is facing forward.
16. INSTALL OIL PUMP ( LU-15 )
17. INSTALL OIL STRAINER ( LU-15 )
18. INSTALL NO.1 OIL PAN ( LU-15 )
19. INSTALL OIL PAN BAFFLE PLATE ( LU-15 )
20. INSTALL NO.2 OIL PAN ( LU-15 )
21. INSTALL WATER PUMP ( CO-8 )
22. INSTALL ENGINE MOUNTING BRACKETS
Install the mounting bracket with the 4 bolts. Install the 2 mounting brackets.
Torque: 36 N·m
23. INSTALL ENGINE WIRE TO LH SIDE OF CYLINDER BLOCK
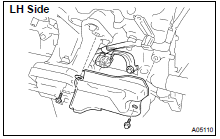
(b) Install the engine wire cover with the 2 bolts.
24. INSTALL ENGINE WIRE TO RH SIDE OF CYLINDER BLOCK
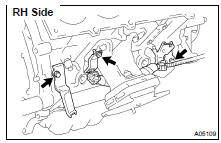
Install the 2 brackets on the engine wire with the 2 bolts.
25. INSTALL OIL COOLER PIPE BRACKET FOR A/T
Install the bracket with the bolt.
26. INSTALL KNOCK SENSORS ( SF-55 )
27. INSTALL STARTER ( ST-17 )
28. INSTALL WATER BYPASS PIPE
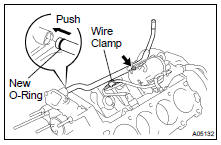
(d) Install the water bypass pipe with the bolt.
Torque: 18 N·m
(e) Install the wire clamp to the bracket of the water bypass pipe.
29. INSTALL CYLINDER HEADS ( EM-59 )
30. INSTALL TIMING BELT AND PULLEYS ( EM-22 )
31. DISCONNECT ENGINE FROM ENGINE STAND
Test yourself
A quick Toyota Land Cruiser quiz: every answer comes with an explanation and a link to the manual page.