Caution:Wait at least 90 seconds after disconnecting the cable from the negative (-) battery terminal to prevent airbag and seat belt pretensioner activation.
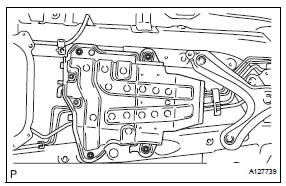
Remove canister
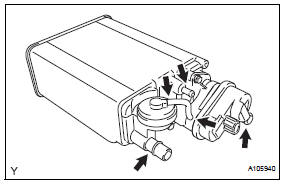
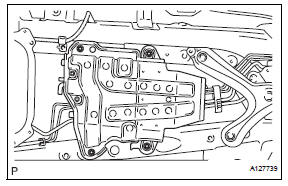
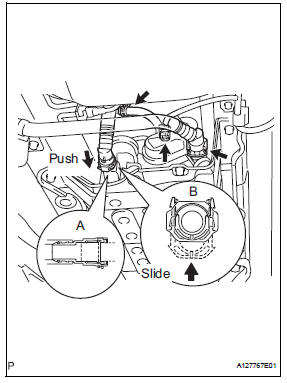
Disconnect the 2 tubes, hose and connector.
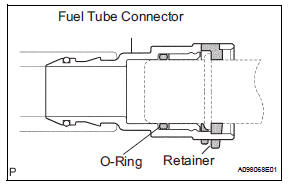
Using a screwdriver, pry up the retainer.
Hint:
Do not remove the retainer.
Disconnect the purge line hose.
Disconnect the air inlet line tube from the canister.
Disconnect the vent line tube from the canister (leak detection pump).
Disconnect the connector from the canister (leak detection pump).
Notice:
Remove any dirt or foreign objects on the fuel tube connector before performing this work.
Do not allow any scratches or foreign objects on the parts when disconnecting as the fuel tube connector has the o-ring that seals the pipe.
Perform this work by hand. Do not use any tools.
Do not forcibly bend, twist or turn the nylon tube.
Protect the disconnected part by covering it with a plastic bag after disconnecting the fuel tank vent hose.
If the fuel tube connector and pipe are stuck, push and pull to release them.
Remove the 4 bolts, clip and canister.
Inspection
Inspect canister
Visually check the canister for cracks or damage.
If cracks or damage is found, replace the canister.
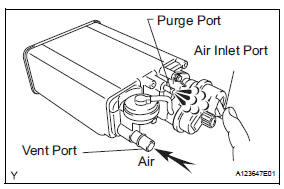
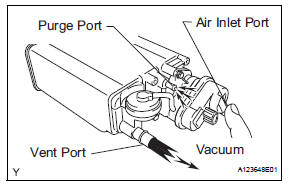
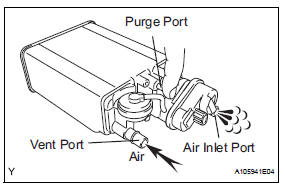
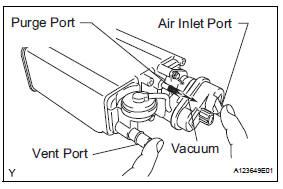
While holding the purge port closed, blow air 0.39 Kpa (4.0 Kgf/cm2, 3 mmhg) into the vent port, and check that air flows from the air inlet port.
If the result is not as specified, replace the canister.
While holding the air inlet port closed, blow air 0.39 Kpa (4.0 Kgf/cm2, 3 mmhg) into the vent port, and check that air flows from the purge port.
If the result is not as specified, replace the canister.
While holding the air inlet port closed, apply vacuum 3.43 Kpa (35.0 Kgf/cm2, 25.7 Mmhg) to the vent port, and check that air is sucked into the purge port.
Check the air tightness.
If the result is not as specified, replace the canister.
While holding the vent and air inlet ports closed, apply vacuum 3.43 Kpa (35.0 Kgf/cm2, 25.7 Mmhg) to the purge port, and check that the vacuum is maintained for 1 minute.
Check the diaphragm.
If the result is not as specified, replace the canister.
Remove the air hose between ports a and b.
While holding the vent, purge and air inlet ports closed, apply vacuum 1.42 Kpa (14.5 Kgf/cm2, 10.6 Mmhg) to port a, and check that air is not sucked into port b.
While holding the vent, purge and air inlet ports Closed, apply vacuum 1.42 Kpa (14.5 Kgf/cm2, 10.6 Mmhg) to port a, and measure how long it takes for the vacuum to drop.
Vacuum drop time: 10 seconds or more
If the result is not as specified, replace the canister.
Check the leak detection pump.
Check that air flows from port a to port b and c.
If the result is not as specified, replace the canister.
Connect the positive (+) lead of the battery to terminal 7 and the negative (-) lead to terminal 6.
Check that the valve is closed.
If the result is not as specified, replace the canister.
Install the canister pump module.
Installation
Install canister
install the canister with the 4 bolts and clip.
torque: 20 n*m (204 kgf*cm, 15 ft.*lbf)
Connect the air inlet line tube to the canister (leak detection pump).
Install the vent line tube.
Connect the pipe to the fuel tube connector, as shown in a in the illustration. Then push up the retainer to lock the claws, as shown in b in the illustration.
Notice:
Check that there are no scratches or foreign objects around the connected part of the fuel tube connector and pipe before performing this work.
After connecting the fuel tank vent tube, check that the fuel tank vent tube is securely connected by pulling the fuel tube connector and pipe.
Connect the purge line hose.
Hint:
Install the hose to the canister, and then attach the retainer.
Connect the connector to the canister (leak detection pump).
Connect cable to negative battery terminal
?
Test yourself
A quick Toyota RAV4 quiz: every answer comes with an explanation and a link to the manual page.