Skid control sensor (for 2wd)
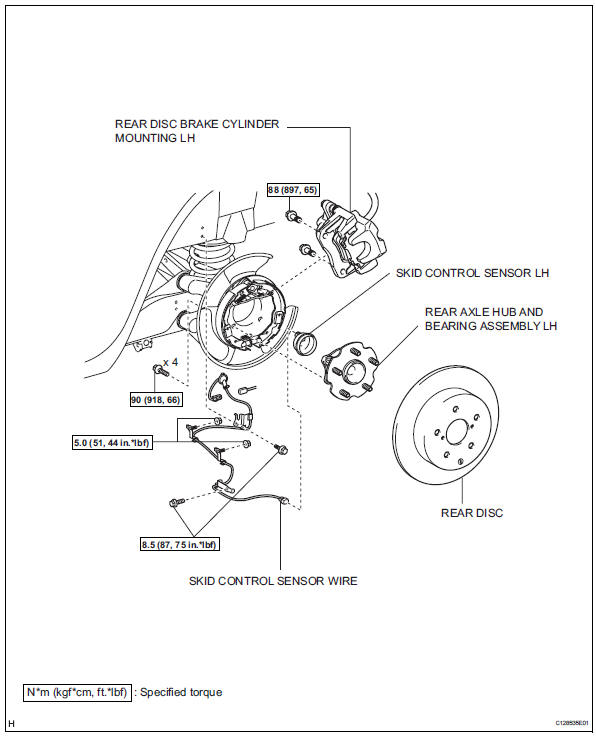
Removal Hint:
- Use the same procedures for the lh side and rh side.
- The procedures listed below are for the lh side.
- Disconnect cable from negative battery terminal
- Remove rear wheel
- Remove deck trim side panel assembly lh
- Remove the deck trim side panel lh (see page ir- 26).
Refer to the procedures from the removal of the rear door scuff plate lh up until the removal of the deck trim side panel lh.
- Remove skid control sensor wire
- Disconnect the skid control sensor wire connector.
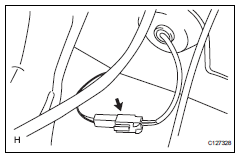
- Disconnect the grommet of the skid control sensor wire from the hole of the wheel house.
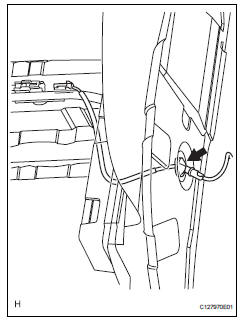
- Remove the bolt (labeled a) and sensor clamp (labeled b) from the side member.
- Remove the 2 nuts (labeled c) and sensor clamps (labeled d) from the upper arm.

- Remove the bolt (labeled e) and sensor clamp (labeled f) from the carrier.
- Disconnect the skid control sensor wire connector (labeled g) from the speed sensor.
- Remove rear disc brake cylinder mounting lh (see page br-55)
- Remove rear disc (see page br-57)
- Remove rear axle hub and bearing assembly lh

- Remove the rear axle hub and bearing lh (see page ah-16).
- Remove skid control sensor lh
- Mount the front axle hub in a soft jaw vise.
Replace the hub and bearing if it is dropped or receives a strong shock.
- Using a pin punch and hammer, tap out the 2 pins and remove the 2 attachments from sst.
- Using sst and the 2 bolts (diameter: 12 mm; pitch: 1.5 Mm), remove the skid control sensor from the hub and bearing.

Sst 09520-00031 (09520-00040), 09521-00020, 09950-00020 Notice:
- If the sensor rotor is damaged, replace the axle hub.
- Do not scratch the contacting surface of the hub and bearing and skid control sensor.
- Inspect skid control sensor
- Check the speed sensor. If any of the following occurs, replace the speed sensor with a new one.
- The surface of the speed sensor is cracked, dented, or chipped.
- The speed sensor has been dropped.
- Inspect skid control sensor wire
- Check the sensor wire. If any of the following occurs, replace the sensor wire with a new one.
- Use the same procedures for the lh side and rh side.
- The procedures listed below are for the lh side.
- Install skid control sensor lh
- Clean the contact surfaces of the axle hub and speed sensor.
Make sure the sensor rotor is clean.
- Place the speed sensor on the axle hub so that the connector position is as high as possible when the axle hub is installed to the vehicle.
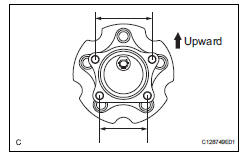
- Using sst and a press, press the speed sensor into the hub and bearing.

Notice:
- Do not tap the speed sensor directly with a hammer.
- Check that the speed sensor detection part is clean.
- Press in the speed sensor straight and slowly.
- Install rear axle hub and bearing assembly lh
- Install the rear axle hub and bearing lh (see page ah-18).
- Install rear disc (see page br-58)
- Install rear disc brake cylinder mounting lh (see page br-60)
- Install skid control sensor wire
To prevent interference with other parts, do not twist the sensor wire's painted line areas when installing it.
- Connect the skid control sensor wire connector (labeled a) to the speed sensor.
- Install the sensor clamp (labeled b) with the bolt (labeled c).
Do not twist the sensor wire when installing the clamp.
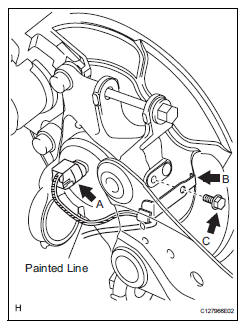
- Install the 2 sensor clamps (labeled d) with the 2 nuts (labeled e).
Do not twist the sensor wire when installing the clamps.
- Install the sensor clamp (labeled f) with the bolt (labeled g).
Do not twist the sensor wire when installing the clamp.
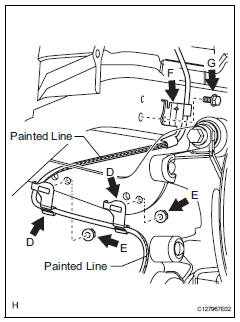
- Insert the connector and grommet to the inside of the vehicle through the hole in the wheel house.
Make sure the grommet's band clamp remains on the outside of the vehicle.
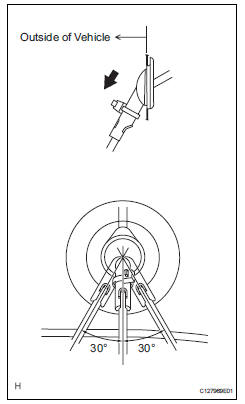
- Hold the grommet and pull it from the inside of the vehicle to the outside of the vehicle. Then fix it in place so that it is not tilted.
- When pulling out the grommet, do not grip the sensor wire.
- Fix the grommet in place within the range shown in the illustration.
- connect the skid control sensor wire connector.
- Install deck trim side panel assembly lh
- Install the deck trim side panel lh (see page ir-49).
Refer to the procedures from the installation of the deck trim side panel lh up until the installation of the rear door scuff plate lh.
- Install rear wheel
- Connect cable to negative battery terminal
- Check speed sensor signal
- Check the speed sensor signal (see page bc-28).
Test yourself
A quick Toyota RAV4 quiz: every answer comes with an explanation and a link to the manual page.