Seat Position Airbag Sensor Circuit Malfunction
DTC B1153/25 Seat Position Airbag Sensor Circuit Malfunction
DESCRIPTION
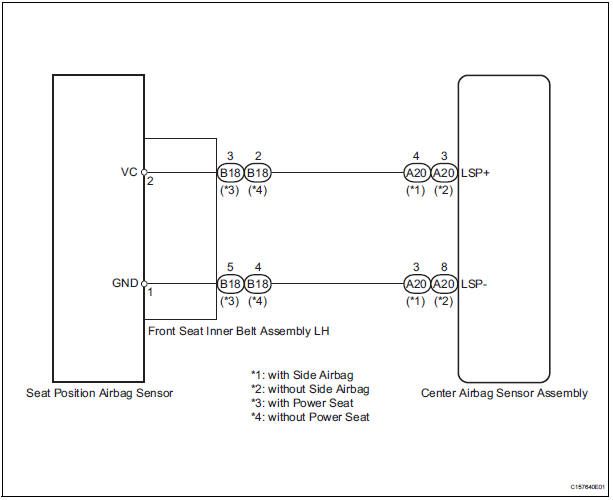
The seat position airbag sensor circuit consists of the center airbag sensor assembly and the seat position airbag sensor.
DTC B1153/25 is recorded when a malfunction is detected in the seat position airbag sensor circuit.

WIRING DIAGRAM
INSPECTION PROCEDURE
1 CHECK DTC
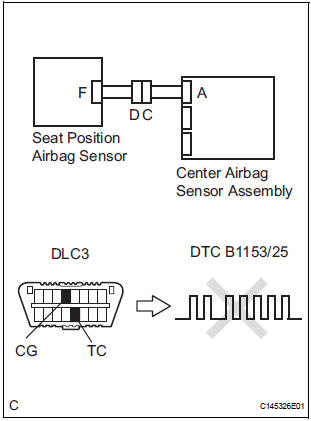
- Turn the ignition switch to the ON position, and wait for at least 60 seconds.
- Clear the DTCs stored in memory.
- Turn the ignition switch to the LOCK position.
- Turn the ignition switch to the ON position, and wait for at least 60 seconds.
- Check the DTCs.
OK: DTC B1153/25 is not output.
HINT: Codes other than code B1153/25 may be output at this time, but they are not related to this check.
USE SIMULATION METHOD TO CHECK
2 CHECK CONNECTION OF CONNECTORS
- Turn the ignition switch to the LOCK position.
- Disconnect the negative (-) terminal cable from the battery, and wait for at least 90 seconds.
- Check that the connectors are properly connected to the center airbag sensor assembly, the seat position airbag sensor and front seat inner belt assembly LH.
OK: The connectors are connected.
3 CHECK CONNECTORS
- Disconnect the connectors from the center airbag sensor assembly, the seat position airbag sensor and front seat inner belt assembly LH.
- Check that the connectors are not damaged
OK: The connectors are not deformed or damaged.
4 CHECK SEAT POSITION AIRBAG SENSOR CIRCUIT (OPEN)

- Connect the connectors that link the front seat inner belt assembly LH and floor wire.
- with Side airbag: Using a service wire, connect A20-4 (LSP+) and A20-3 (LSP-) of connector "B".
NOTICE: Do not forcibly insert a service wire into the terminals of the connector when connecting.
Standard resistance

5 CHECK SEAT POSITION AIRBAG SENSOR CIRCUIT (SHORT TO B+)
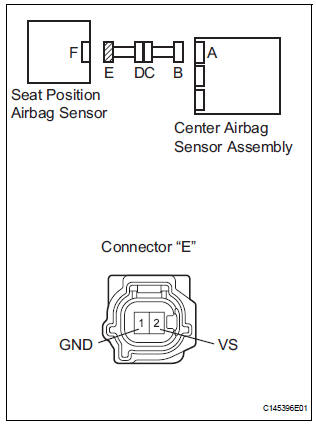
- Disconnect the service wire from connector "B".
- Connect the negative (-) terminal cable to the battery, and wait for at least 2 seconds.
- Turn the ignition switch to the ON position.
- Measure the voltage according to the value(s) in the table below.
Standard voltage

6 CHECK SEAT POSITION AIRBAG SENSOR CIRCUIT (SHORT TO GROUND)

- Turn the ignition switch to the LOCK position.
- Disconnect the negative (-) terminal cable from the battery, and wait for at least 90 seconds.
- Measure the resistance according to the value(s) in the table below.
Standard resistance

7 CHECK SEAT POSITION AIRBAG SENSOR CIRCUIT (SHORT)
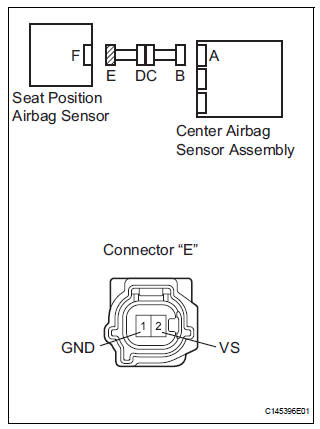
- Measure the resistance according to the value(s) in the table below.
Standard resistance

8 CHECK SEAT POSITION AIRBAG SENSOR
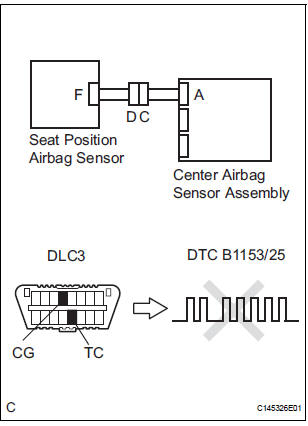
- Connect the connectors to the seat position airbag sensor and the center airbag sensor assembly.
- Connect the negative (-) terminal cable to the battery, and wait for at least 2 seconds.
- Turn the ignition switch to the ON position, and wait for at least 60 seconds.
- Clear the DTCs stored in memory.
- Turn the ignition switch to the LOCK position.
- Turn the ignition switch to the ON position, and wait for at least 60 seconds.
- Check the DTCs.
OK: DTC B1153/25 is not output.
HINT: Codes other than code B1153/25 may be output at this time, but they are not related to this check.
USE SIMULATION METHOD TO CHECK
9 REPLACE SEAT POSITION AIRBAG SENSOR
- Turn the ignition switch to the LOCK position.
- Disconnect the negative (-) terminal cable from the battery, and wait for at least 90 seconds.
- Replace the seat position airbag sensor.
HINT: Perform the inspection using parts from a normal vehicle if possible.
10 CHECK CENTER AIRBAG SENSOR ASSEMBLY
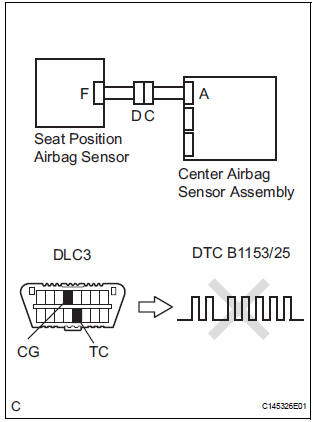
- Connect the negative (-) terminal cable to the battery, and wait for at least 2 seconds.
- Turn the ignition switch to the ON position, and wait for at least 60 seconds.
- Clear the DTCs stored in memory.
- Turn the ignition switch to the LOCK position.
- Turn the ignition switch to the ON position, and wait for at least 60 seconds.
- Check the DTCs.
OK: DTC B1153/25 is not output.
HINT: Codes other than code B1153/25 may be output at this time, but they are not related to this check.
END
CHECK CENTER AIRBAG SENSOR ASSEMBLY
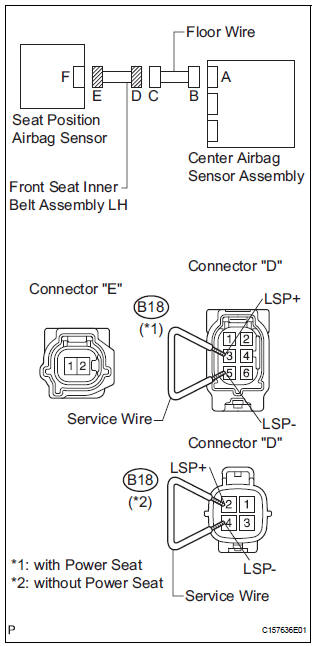
- Disconnect the service wire from connector "B".
- Disconnect the floor wire connector from the front seat inner belt assembly LH.
- with Power seat: Using a service wire, connect B18-3 (LSP+) and B18-5 (LSP-) of connector "D".
NOTICE: Do not forcibly insert a service wire into the terminals of the connector when connecting.
Standard resistance

REPAIR OR REPLACE FLOOR WIRE
12 CHECK FRONT SEAT INNER BELT ASSEMBLY LH (SHORT TO B+)
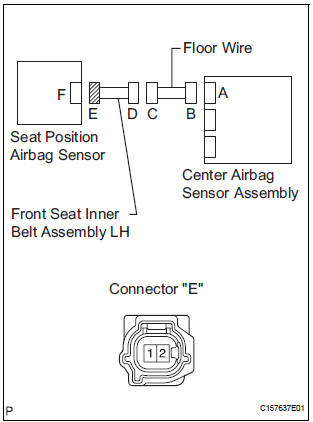
- Turn the ignition switch to the LOCK position.
- Disconnect the negative (-) terminal cable from the battery, and wait for at least 90 seconds.
- Disconnect the floor wire connector from the front seat inner belt assembly LH.
- Connect the negative (-) terminal cable to the battery, and wait for least 2 seconds.
- Turn the ignition switch to the ON position.
- Measure the voltage according to the value(s) in the table below.
Standard voltage

REPAIR OR REPLACE FLOOR WIRE
13 CHECK FRONT SEAT INNER BELT ASSEMBLY LH (SHORT TO GROUND)
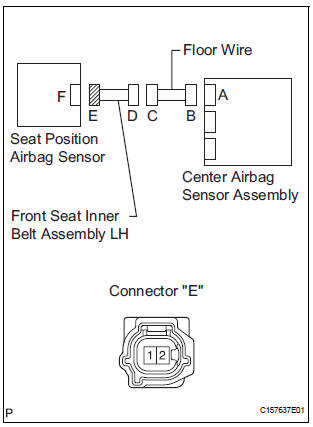
- Disconnect the floor wire connector from the front seat inner belt assembly LH.
- Measure the resistance according to the value(s) in the table below.
Standard resistance

REPAIR OR REPLACE FLOOR WIRE
14 CHECK FRONT SEAT INNER BELT ASSEMBLY LH (SHORT)
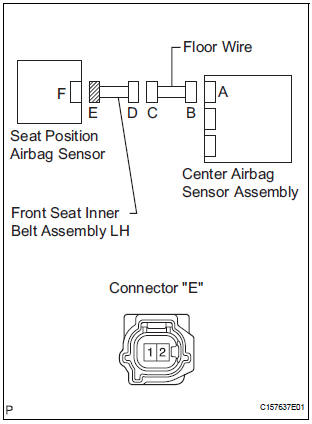
- Disconnect the floor wire connector from the front seat inner belt assembly LH.
- Measure the resistance according to the value(s) in the table below.
Standard resistance

REPAIR OR REPLACE FLOOR WIRE
Test yourself
A quick Toyota Sienna quiz: every answer comes with an explanation and a link to the manual page.