Installation
HINT:
Perform "Inspection After Repairs" after replacing the engine assembly, cylinder head sub-assembly, camshaft, No. 2 camshaft, No. 3 camshaft sub-assembly, No. 4 camshaft sub-assembly, camshaft timing gear assembly, camshaft timing exhaust gear assembly, piston sub-assembly or piston ring.
Click here 
1. INSTALL ENGINE HANGER
Click here
2. REMOVE ENGINE FROM ENGINE STAND
(a) Attach an engine sling device and hang the engine assembly with a chain block.
NOTICE:
Pay attention to the angle of the engine sling device as the engine assembly or engine hangers may be damaged or deformed if the angle is incorrect.
(b) Lift the engine assembly and remove it from the engine stand.
(c) Place the engine assembly onto a work bench.
3. INSTALL ENGINE ASSEMBLY
HINT:
Perform "Inspection After Repairs" after replacing the engine assembly.
Click here
(a) Attach an engine sling device and hang the engine assembly with a chain block.
NOTICE:
Pay attention to the angle of the engine sling device as the engine assembly or engine hangers may be damaged or deformed if the angle is incorrect.
(b) Slowly lower the engine assembly into the engine assembly compartment.
(c) Install the front engine mounting insulator LH with the 3 nuts and 2 bolts. Torque: Nut A : 72 N·m {734 kgf·cm, 53 ft·lbf} Nut B : 50 N·m {510 kgf·cm, 37 ft·lbf} |
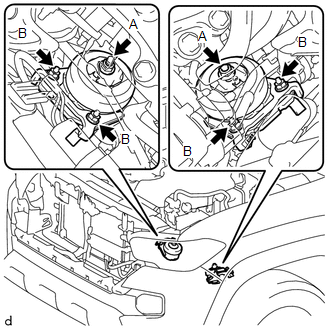 |
(d) Install the front engine mounting insulator RH with the 3 nuts and 2 bolts.
Torque:
Nut A :
72 N·m {734 kgf·cm, 53 ft·lbf}
Nut B :
50 N·m {510 kgf·cm, 37 ft·lbf}
(e) Remove the 4 bolts, No. 1 engine hanger and No. 2 engine hanger.
4. INSTALL DRIVE PLATE AND RING GEAR SUB-ASSEMBLY (for Automatic Transmission)
(a) Using SST, hold the crankshaft.
SST: 09213-54015
91651-60855
SST: 09330-00021
(b) Install the crank angle sensor plate, drive plate and ring gear sub-assembly and rear drive plate spacer to the crankshaft.
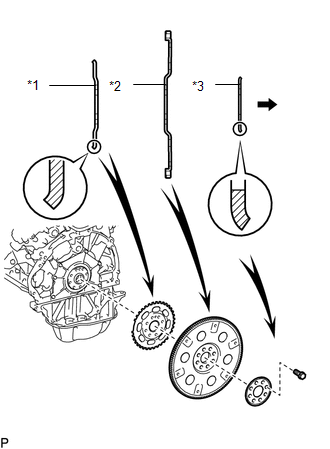 Text in Illustration
*1 |
Crank Angle Sensor Plate |
*2 |
Drive Plate and Ring Gear Sub-assembly |
*3 |
Rear drive plate Spacer |
 |
Automatic Transmission Side |
HINT:
As the crank angle sensor plate, drive plate and ring gear sub-assembly and rear drive plate spacer are not reversible, be sure to install it in the direction shown in the illustration.
(c) Clean the bolts and bolt holes.
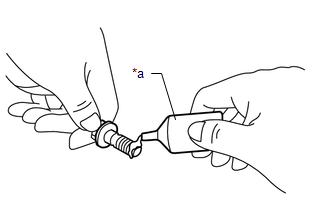
(d) Apply adhesive to 2 or 3 threads at the end of the 8 bolts. Text in Illustration
Adhesive: Toyota Genuine Adhesive 1324, Three Bond 1324 or equivalent |
 |
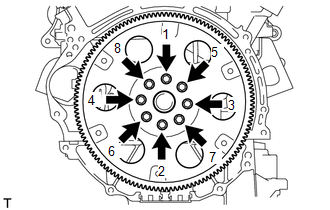
(e) Uniformly install and tighten the 8 bolts in several steps in the sequence shown in the illustration. Torque: 83 N·m {846 kgf·cm, 61 ft·lbf} NOTICE: Do not start the engine for at least an hour after installing the drive plate. |
 |
5. INSTALL FLYWHEEL SUB-ASSEMBLY (for Manual Transmission)
(a) Using SST, hold the crankshaft.
SST: 09213-54015
91651-60855
SST: 09330-00021
(b) Install the crank angle sensor plate and flywheel sub-assembly to the crankshaft.
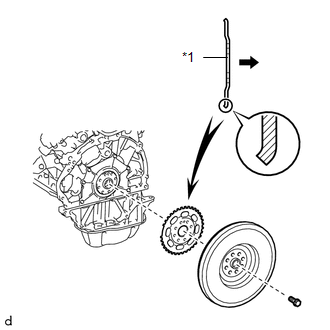 Text in Illustration
*1 |
Crank Angle Sensor Plate |
|
Manual Transmission Side |
(c) Clean the bolts and bolt holes.
(d) Apply adhesive to 2 or 3 threads at the end of the 8 bolts. Text in Illustration
Adhesive: Toyota Genuine Adhesive 1324, Three Bond 1324 or equivalent |
|
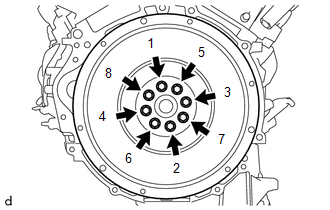
(e) Uniformly install and tighten the 8 bolts in several steps in the sequence shown in the illustration. Torque: 30 N·m {306 kgf·cm, 22 ft·lbf} |
 |
(f) Mark paint marks on the bolt heads on the engine upper side.
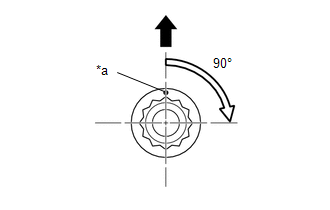 Text in Illustration
*a |
Paint Mark |
|
Engine Upper Side |
(g) Tighten the bolts 90° in the sequence shown in the illustration.
NOTICE:
Do not start the engine for at least an hour after installing the flywheel sub-assembly.
6. INSTALL CLUTCH DISC ASSEMBLY (for Manual Transmission)
Click here
7. INSTALL CLUTCH COVER ASSEMBLY (for Manual Transmission)
Click here
8. CONNECT SUCTION HOSE SUB-ASSEMBLY
(a) Connect the suction hose sub-assembly with the bolt.
Torque:
7,5 N·m {76 kgf·cm, 66 in·lbf}
(b) Attach the clamp to connect the wire harness to the suction hose sub-assembly.
(c) Connect the engine oil pressure switch assembly connector.
9. CONNECT ENGINE WIRE
Click here
10. CONNECT NO. 1 FUEL TUBE SUB-ASSEMBLY
(a) Connect the No. 1 fuel tube sub-assembly to the fuel delivery pipe sub-assembly.
Click here
11. CONNECT NO. 2 FUEL TUBE SUB-ASSEMBLY
Click here
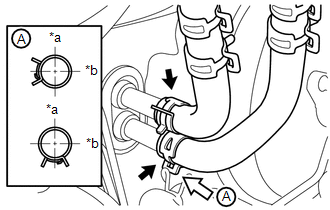
12. CONNECT WATER HOSE SUB-ASSEMBLY
(a) Connect the water hose sub-assembly. Text in Illustration
HINT: The direction of the hose clip is indicated in the illustration. |
 |
13. CONNECT UNION TO CHECK VALVE HOSE (for Vacuum Brake Booster)
Click here
14. CONNECT ENGINE WIRE
(a) Attach the grommet to the wire harness support. Text in Illustration
|
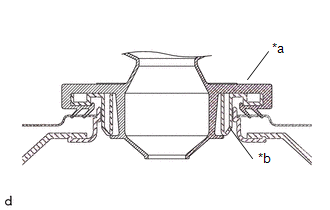 |
(b) Pass the wire harness into the vehicle and install the wire harness support.
(c) Connect the 7 ECM connectors.
(d) Attach the clamp to connect the engine wire.
(e) Install the instrument lower panel assembly.
Click here
(f) Attach the claw to connect the engine wire.
(g) Attach the claw to connect the engine wire to the engine room relay block.
(h) Install the nut.
Torque:
8,5 N·m {87 kgf·cm, 75 in·lbf}
(i) Connect the engine wire connector.
(j) Attach the clamp to connect the engine wire.
15. INSTALL EXHAUST MANIFOLD SUB-ASSEMBLY LH (for Manual Transmission)
Click here
16. INSTALL NO. 2 EXHAUST MANIFOLD HEAT INSULATOR (for Manual Transmission)
Click here
17. INSTALL EXHAUST MANIFOLD SUB-ASSEMBLY RH (for Manual Transmission)
Click here
18. INSTALL NO. 1 EXHAUST MANIFOLD HEAT INSULATOR (for Manual Transmission)
Click here
19. INSTALL COOLER COMPRESSOR ASSEMBLY
Click here
20. CONNECT DISCHARGE HOSE SUB-ASSEMBLY
Click here
21. CONNECT SUCTION HOSE SUB-ASSEMBLY
Click here
22. INSTALL GENERATOR ASSEMBLY
Click here
23. CONNECT VANE PUMP ASSEMBLY
(a) Install the vane pump assembly with the 2 bolts.
Torque:
21 N·m {214 kgf·cm, 15 ft·lbf}
(b) Install the bolt to connect the earth wire harness.
Torque:
8,5 N·m {87 kgf·cm, 75 in·lbf}
(c) Connect the oil pressure switch connector.
NOTICE:
Make sure that no oil adheres to the connector.
24. INSTALL FAN AND GENERATOR V BELT
Click here
25. INSTALL INTAKE AIR SURGE TANK ASSEMBLY
Click here
26. INSTALL THROTTLE BODY BRACKET
Click here
27. INSTALL NO. 1 SURGE TANK STAY
Click here
28. INSTALL NO. 2 SURGE TANK STAY
Click here
29. INSTALL RADIATOR ASSEMBLY
Click here
30. INSTALL FAN SHROUD
Click here
31. CONNECT TRANSMISSION OIL COOLER HOSE (for Automatic Transmission)
Click here
32. CONNECT RADIATOR RESERVE TANK HOSE
Click here
33. INSTALL NO. 2 RADIATOR HOSE
Click here
34. INSTALL NO. 1 RADIATOR HOSE
Click here
35. INSTALL RADIATOR SIDE DEFLECTOR LH
Click here
36. INSTALL RADIATOR SIDE DEFLECTOR RH
Click here
37. INSTALL RADIATOR SUPPORT TO FRAME SEAL
Click here
38. INSTALL AIR CLEANER CASE SUB-ASSEMBLY
(a) Install the air cleaner case sub-assembly with the 3 bolts.
Torque:
12 N·m {122 kgf·cm, 9 ft·lbf}
(b) Install the air cleaner filter element sub-assembly.
39. INSTALL AIR CLEANER FILTER ELEMENT SUB-ASSEMBLY
40. INSTALL AIR CLEANER CAP SUB-ASSEMBLY WITH AIR CLEANER HOSE
Click here
41. INSTALL RADIATOR GRILLE
Click here
42. INSTALL V-BANK COVER SUB-ASSEMBLY
Click here
43. INSTALL BATTERY TRAY
44. INSTALL BATTERY
45. INSTALL BATTERY CLAMP SUB-ASSEMBLY
Click here
46. CONNECT CABLE TO POSITIVE BATTERY TERMINAL
Torque:
5,4 N·m {55 kgf·cm, 48 in·lbf}
47. INSTALL FRONT FENDER SEAL LH (for Manual Transmission)
Click here
48. INSTALL FRONT FENDER SEAL RH (for Manual Transmission)
Click here
49. INSTALL FRONT FENDER APRON UPPER SEAL LH
(a) Install the front fender apron upper seal LH with the 5 clips.
50. INSTALL FRONT FENDER APRON UPPER SEAL RH
(a) Install the front fender apron upper seal RH with the 5 clips.
51. INSTALL HOOD SUB-ASSEMBLY
(a) Install the hood sub-assembly with the 4 bolts.
Torque:
13 N·m {133 kgf·cm, 10 ft·lbf}
(b) Connect the washer nozzle hose.
52. ADJUST HOOD SUB-ASSEMBLY
Click here
53. INSTALL AUTOMATIC TRANSMISSION ASSEMBLY (for Automatic Transmission)
Transmission | See page |
|---|---|
AC60E |
|
AC60F |
|
54. INSTALL MANUAL TRANSMISSION ASSEMBLY (for Manual Transmission)
Click here
55. CONNECT CABLE TO NEGATIVE BATTERY TERMINAL
Torque:
5,4 N·m {55 kgf·cm, 48 in·lbf}
NOTICE:
When disconnecting the cable, some systems need to be initialized after the cable is reconnected.
Click here
56. ADD ENGINE COOLANT
Click here
57. ADD ENGINE OIL
Click here
58. INSPECT FOR FUEL LEAK
Click here
59. INSPECT FOR ENGINE OIL LEAK
Click here
60. INSPECT FOR EXHAUST GAS LEAK
Click here
61. CHECK ENGINE OIL LEVEL
Click here
62. PERFORM RESET MEMORY (for Automatic Transmission)
Click here
63. INSPECT IGNITION TIMING
Click here
64. INSPECT ENGINE IDLE SPEED
Click here
65. INSPECT CO/HC
Click here
66. CHARGE REFRIGERANT (for HFC-134a(R134a))
Click here
67. CHARGE REFRIGERANT (for HFO-1234yf(R1234yf))
Click here
68. WARM UP ENGINE (for HFC-134a(R134a))
Click here
69. WARM UP ENGINE (for HFO-1234yf(R1234yf))
Click here
70. CHECK FOR REFRIGERANT GAS LEAK (for HFC-134a(R134a))
Click here
71. CHECK FOR REFRIGERANT GAS LEAK (for HFO-1234yf(R1234yf))
Click here
72. INSTALL NO. 1 ENGINE UNDER COVER SUB-ASSEMBLY
Torque:
30 N·m {306 kgf·cm, 22 ft·lbf}
73. INSTALL NO. 2 ENGINE UNDER COVER SUB-ASSEMBLY (w/ Off Road Package)
Torque:
30 N·m {306 kgf·cm, 22 ft·lbf}
Test yourself
A quick Toyota Tacoma quiz: every answer comes with an explanation and a link to the manual page.