Front Passenger Side Seat Belt Warning Light Malfunction
The occupant classification ECU detects the state of the front seat inner belt assembly RH and load sensor when the front passenger side seat is occupied with the ignition switch ON. If the front passenger side seat belt is not fastened, the front passenger side seat belt warning light on the accessory meter assembly blinks. If the seat belt is fastened, the warning light goes off.
WIRING DIAGRAM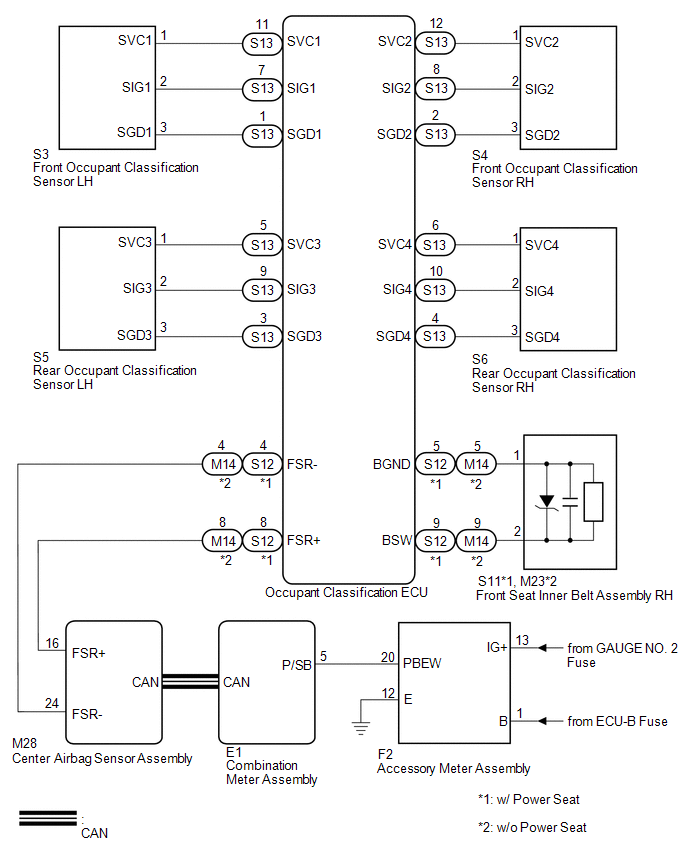
CAUTION / NOTICE / HINT
NOTICE:
- Inspect the fuses for circuits related to this system before performing the following inspection procedure.
- The seat belt warning system uses the CAN communication system. First, confirm that there is no malfunction in the CAN communication system. Refer to the How to Proceed with Troubleshooting procedure (See page
 ).
CHECK DTC OUTPUT (CAN COMMUNICATION SYSTEM)
(a) Clear the DTC (See page ).
(b) Recheck for DTCs.
Result | Proceed to |
|---|---|
DTC is not output |
A |
DTC is output |
B |
| B |  | GO TO CAN COMMUNICATION SYSTEM |
|

CHECK DTC OUTPUT (OCCUPANT CLASSIFICATION SYSTEM)
(a) Clear the DTC (See page ).
(b) Recheck for DTCs.
Result | Proceed to |
|---|---|
DTC is not output |
A |
DTC is output |
B |
| B | | GO TO OCCUPANT CLASSIFICATION SYSTEM |
|
CHECK DTC OUTPUT (AIRBAG SYSTEM)
(a) Clear the DTC (See page ).
(b) Recheck for DTCs.
Result | Proceed to |
|---|---|
DTC is not output |
A |
DTC is output |
B |
| B | | GO TO AIRBAG SYSTEM |
|
PERFORM ACTIVE TEST USING TECHSTREAM
(a) Connect the Techstream to the DLC3.
(b) Turn the ignition switch to ON.
(c) Turn the Techstream on.
(d) Enter the following menus: Body Electrical / Combination Meter / Active Test.
(e) Perform the Active Test according to the display on the Techstream.
Combination Meter (Combination Meter Assembly)Tester Display | Test Part | Control Range | Diagnostic Note |
|---|---|---|---|
Front Passenger Side Seat Belt |
Front passenger side seat belt warning light |
OFF or ON |
Confirm that the vehicle stopped with the engine idling |
OK:
The front passenger side seat belt warning light on the accessory meter assembly operates normally.
| OK | | REPLACE COMBINATION METER ASSEMBLY |
|
CHECK HARNESS AND CONNECTOR (BATTERY AND BODY GROUND)
(a) Disconnect the F2 connector. |
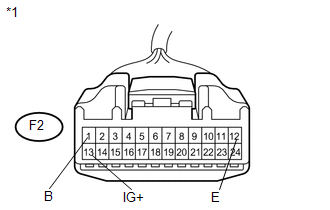 |
(b) Measure the voltage and resistance according to the value(s) in the table below.
Standard Voltage:
Tester Connection | Condition | Specified Condition |
|---|---|---|
F2-1 (B) - Body ground |
Always |
11 to 14 V |
F2-13 (IG+) - Body ground |
Ignition switch ON |
11 to 14 V |
F2-13 (IG+) - Body ground |
Ignition switch off |
Below 1 V |
Standard Resistance:
Tester Connection | Condition | Specified Condition |
|---|---|---|
F2-12 (E) - Body ground |
Always |
Below 1 Ω |
*1 |
Front view of wire harness connector (to Accessory Meter Assembly) |
| NG | | REPAIR OR REPLACE HARNESS OR CONNECTOR |
|
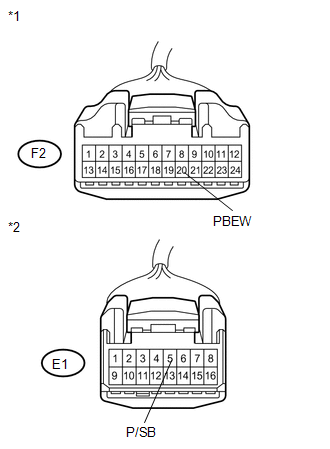
CHECK HARNESS AND CONNECTOR (COMBINATION METER - ACCESSORY METER)
(a) Disconnect the E1 connector. |
 |
(b) Measure the resistance according to the value(s) in the table below.
Standard Resistance:
Tester Connection | Condition | Specified Condition |
|---|---|---|
E1-5 (P/SB) - F2-20 (PBEW) |
Always |
Below 1 Ω |
F2-20 (PBEW) - Body ground |
Always |
10 kΩ or higher |
*1 |
Front view of wire harness connector (to Accessory Meter Assembly) |
*2 |
Front view of wire harness connector (to Combination Meter Assembly) |
| NG | | REPAIR OR REPLACE HARNESS OR CONNECTOR |
|
REPLACE ACCESSORY METER ASSEMBLY
(a) Replace the accessory meter assembly (See page ).
|
CHECK FRONT PASSENGER SIDE SEAT BELT WARNING LIGHT
(a) Check the front passenger side seat belt warning light operation (See page ).
| OK | | END (ACCESSORY METER ASSEMBLY WAS DEFECTIVE) |
| NG | | REPLACE COMBINATION METER ASSEMBLY |
Test yourself
A quick Toyota Venza quiz: every answer comes with an explanation and a link to the manual page.