Installation
1. INSTALL TIMING CHAIN COVER SUB-ASSEMBLY
(a) Apply a light coat of engine oil to 2 new oil pump gaskets and new oil hole cover gasket. |
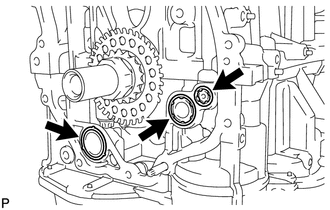 |
(b) Install the 2 new oil pump gaskets and new oil hole cover gasket to the stiffening crankcase.
(c) Align the drive rotor spline and the crankshaft timing sprocket as shown in the illustration. |
 |
(d) Apply seal packing in a line to the timing chain cover sub-assembly as shown in the following illustration.
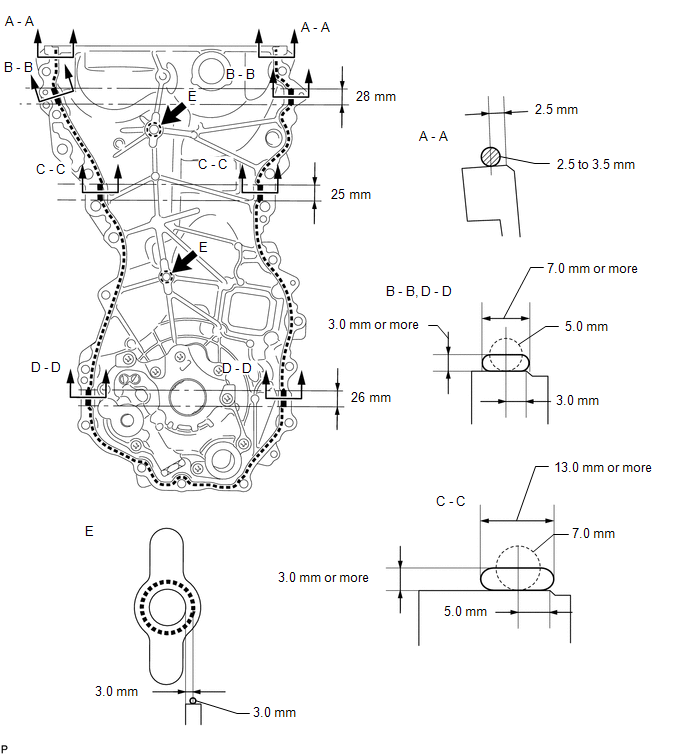
Seal packing:
Toyota Genuine Seal Packing Black, Three Bond 1207B or equivalent.
Seal Packing Application Chart:
Area | Seal Packing Diameter (Round) | Distance from Edge of Cover to Center of Seal Packing | Seal Packing Application Length |
|---|---|---|---|
Seal Packing Dimension (Flat) |
|||
Dashed Line |
2.5 to 3.5 mm (0.0984 to 0.138 in.) |
2.5 mm (0.0984 in.) |
- |
- |
|||
A - A |
2.5 to 3.5 mm (0.0984 to 0.138 in.) |
2.5 mm (0.0984 in.) |
- |
- |
|||
B - B |
5.0 mm (0.197 in.) |
3.0 mm (0.118 in.) |
28 mm (1.10 in.) |
7.0 mm (0.276 in.) or more wide and 3.0 mm (0.118 in.) or more thick |
|||
C - C |
7.0 mm (0.276 in.) |
5.0 mm (0.197 in.) |
25 mm (0.984 in.) |
13.0 mm (0.512 in.) or more wide and 3.0 mm (0.118 in.) or more thick |
|||
D - D |
5.0 mm (0.197 in.) |
3.0 mm (0.118 in.) |
26 mm (1.02 in.) |
7.0 mm (0.276 in.) or more wide and 3.0 mm (0.118 in.) or more thick |
|||
E |
3.0 mm (0.118 in.) |
3.0 mm (0.118 in.) |
- |
- |
NOTICE:
- When the contact surfaces are wet, clean the surfaces with non-residue solvent before applying seal packing.
- Install the timing chain cover sub-assembly within 3 minutes and tighten the bolts within 10 minutes after applying seal packing.
- After applying seal packing to the timing chain cover sub-assembly, install the engine mounting bracket RH within 10 minutes.
- Do not apply oil for at least 4 hours after the installation.
- Do not start the engine for at least 4 hours after the installation.
(e) Temporarily install the timing chain cover sub-assembly with the 17 bolts and 2 nuts. Bolt Length:
NOTICE: Make sure there is no oil on the bolts. If there is oil on the bolts, clean them before installing them. |
 |
(f) Tighten the 17 bolts and 2 nuts in several steps, in the sequence shown in the illustration. Torque: for bolt 1, 2, 3 and 4 : 55 N·m {561 kgf·cm, 41 ft·lbf} except bolt 1, 2, 3 and 4 : 21 N·m {214 kgf·cm, 15 ft·lbf} |
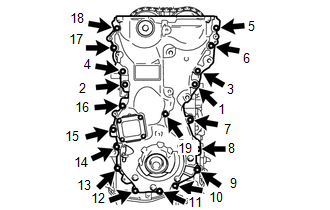 |
2. INSTALL ENGINE MOUNTING BRACKET RH
(a) Install the engine mounting bracket RH, and install the 5 bolts in the order shown in the illustration. Torque: for bolt 1, 2 and 3 : 55 N·m {561 kgf·cm, 41 ft·lbf} for bolt 4 and 5 : 21 N·m {214 kgf·cm, 15 ft·lbf} NOTICE: After applying seal packing to the timing chain cover sub-assembly, install the engine mounting bracket RH within 10 minutes. |
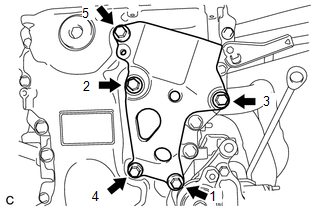 |
3. INSTALL TIMING CHAIN COVER OIL SEAL

4. INSTALL CRANKSHAFT PULLEY
5. INSTALL CRANKSHAFT POSITION SENSOR
6. INSTALL V-RIBBED BELT TENSIONER ASSEMBLY
7. INSTALL CYLINDER HEAD COVER SUB-ASSEMBLY
8. INSTALL IGNITION COIL ASSEMBLY
9. REMOVE ENGINE STAND
(See page )
Test yourself
A quick Toyota Venza quiz: every answer comes with an explanation and a link to the manual page.