General body repairs, exterior
Assembly overview - door components
In this manual: General body repairs, exterior
~1min read
 Note
Only the left side is shown. The right side is similar.
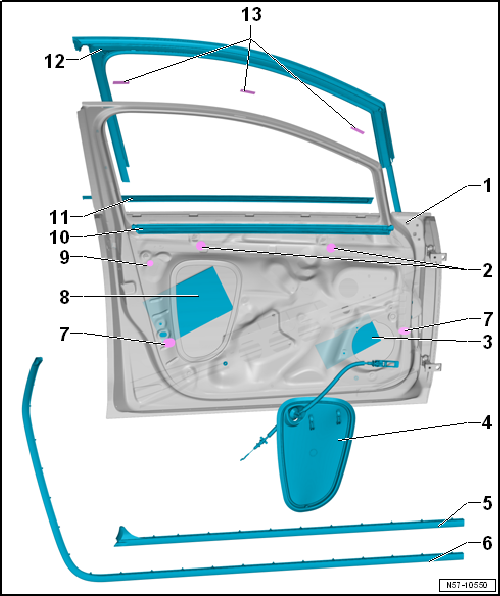
| 1 - | Front door |
- Removing and installing → Chapter
- Adjusting → Chapter
| 2 - | Sticker |
- Diameter 28 mm
- If necessary, manufacture using commercially available textile adhesive tape
| 3 - | Insulation |
- Self-adhesive
- Installing
- If necessary, cut to dimension, 200 mm x 100 mm. Position as shown in illustration.
- Warm using hot air blower -V.A.G 1416- and push on to outer door panel with force.
| 4 - | Inner door cover |
- Removing and installing → Chapter
| 5 - | Door joint seal |
- For 4-door model
- Removing and installing → Chapter
| 6 - | Door joint seal |
- For 2-door model
- Removing and installing → Chapter
| 7 - | Sticker |
- Diameter 32 mm.
- If necessary, manufacture using commercially available textile adhesive tape
| 8 - | Insulation |
- Self-adhesive
- Installing
- If necessary, cut to dimension, 250 mm x 160 mm. Position as shown in illustration.
- Warm using hot air blower -V.A.G 1416- and push on to outer door panel with force.
| 9 - | Sticker |
- Diameter 19 mm
- If necessary, manufacture using commercially available textile adhesive tape
| 10 - | Inner window slot seal |
- Removing and installing → Chapter
| 11 - | Outer window slot seal |
- Removing and installing → Chapter.
| 12 - | Window channel |
- Removing and installing → Chapter.
| 13 - | Sticker |
- Qty. 3 for 4-door model
- Qty. 4 for 2-door model
- 15 mm x 50 mm
- If necessary, manufacture using commercially available textile adhesive tape.
Test yourself
A quick Volkswagen Golf quiz: every answer comes with an explanation and a link to the manual page.
Was this page helpful?