Airbag
Tools
Required Special Tools and Testing Equipment
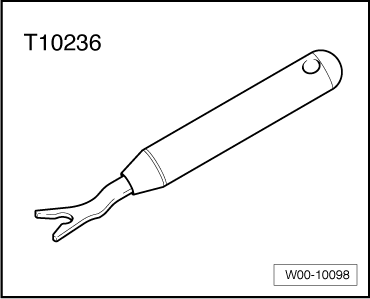
- Window Release Tool -T10236-
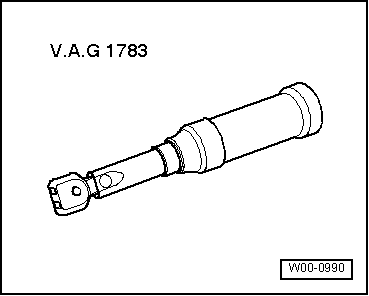
- Torque Wrench 1783 - 2-10Nm -VAG1783-
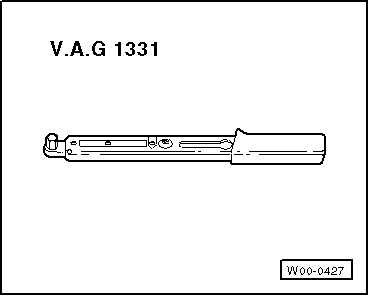
- Torque Wrench 1331 5-50Nm -VAG1331-
Airbags, Safety Precautions
Caution
- Testing, assembly, and repair work may only be performed by qualified personnel.
- When working on the airbag system, the battery ground cable must be disconnected. No waiting time is necessary after disconnecting the battery. When connecting the airbag system to a voltage source, there must be no person present inside the vehicle.
- Before picking up (touching) the airbag unit, the mechanic/technician must electrostatically discharge him/herself. This is achieved by touching a suitable metal part, for example, a water pipe, heater pipe or metal support.
- Airbag units should be installed immediately upon removal from shipping package.
- Airbag unit is to be returned to the shipping package when there is an interruption in work.
- It is not permitted to leave airbag unit unattended.
- Airbag units that have been removed should be stored so that padded side is facing up.
- Airbag units that have fallen onto a hard surface or show signs of damage must not be installed.
Additional Safety Precautions for Head Curtain Airbag
→ Chapter "Airbag Unit Disposal"
→ Chapter "Airbag, Deactivating"
Airbag Unit Disposal
Caution
- Always replace damaged pillar trim panels, never repair.
- Head curtain airbags must not be kinked or twisted.
- After body repairs, inspect the body for weld splatter, deformations and chafing areas near the head curtain airbag (compare with opposite side if necessary).
- If a deployed head curtain airbag is replaced, the headliner, door seals with molding, curtain airbag guides, grab handle brackets, and the A-, B-, C- and D-pillar trim (if equipped) must be replaced. If there is damage, the rear interior reading lamps, the roof grab handles and the roof end strip must be replaced.
- Testing, assembly, and repair work may only be performed by qualified personnel.
- When working on the airbag system, the battery ground cable must be disconnected. No waiting time is necessary after disconnecting the battery. When connecting the airbag system to a voltage source, there must be no person present inside the vehicle.
- Before picking up (touching) the airbag unit, the mechanic/technician must electrostatically discharge him/herself. This is achieved by touching a suitable metal part, for example, a water pipe, heater pipe or metal support.
- Airbag units should be installed immediately upon removal from shipping package.
- Airbag unit is to be returned to the shipping package when there is an interruption in work.
- It is not permitted to leave airbag unit unattended.
- Airbag units that have been removed should be stored so that padded side is facing up.
- Airbag units that have fallen onto a hard surface or show signs of damage must not be installed.
- Airbag units that have not ignited must be returned in original packaging for proper recycling/disposal in accordance with national legislation! If questions arise, contact the distributor or importer!
- Airbag units that have ignited can be disposed of with industrial waste.
Airbag Units, Removing and Installing after Collision
Accident with Airbag Deployment
Always replace the following components after an accident when airbag has deployed:
- All deployed airbag units.
- Front passenger airbag unit support when the front passenger airbag unit has deployed.
- Return spring with slip ring, if driver airbag is deployed.
- All seat belts with deployed seat belt tensioners.
- If needed (visual inspection), the following must also be replaced: all faulty components.
Accident without Airbag Deployment
- If the airbag indicator lamp (K75) does not indicate a malfunction, it is not necessary to replace any of the airbag components. Seat belts must be checked separately.
Airbag Control Module -J234-, Removing and Installing
Removing
WARNING
Follow all safety precautions when working on an airbag.
- Disconnect the vehicle battery.
- Remove the footwell trim panel.
Note
For the sake of illustration, center console is not depicted in the illustrations.
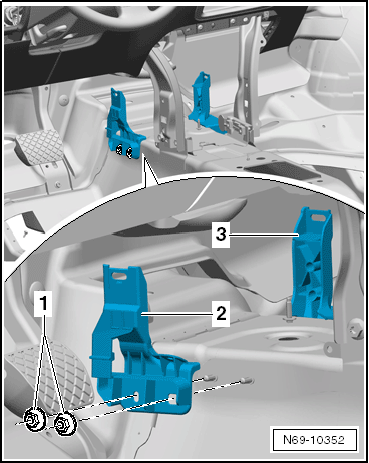
- Remove the two nuts -1- (2 N·m)
- Remove the left bracket -2-, remove the right bracket -3-.
- Open the connector lock mechanism and pull it off the control module.
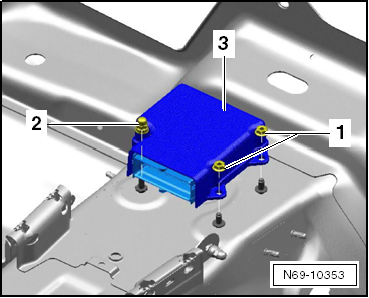
- Remove the nuts -1- and -2- (9 N·m).
- Remove the control module -3- from the vehicle.
Installing
WARNING
Follow all safety precautions when working on an airbag.
- Install in reverse order of removal.
- Switch the ignition on.
WARNING
Make sure that no persons are in the vehicle.
- Connect the battery.
- If the control unit was replaced, it must be coded. Adapting components (coding).
Driver Side Airbag Unit, Removing and Installing, through 05.2011
Removing
WARNING
Follow all safety precautions when working on an airbag.
Note
- Removal and installation of airbag unit is described for multi-function steering wheel.
- The screwdriver mentioned in the following should be about 175 mm long and have a blade width of 7 mm.
- Disconnect the vehicle battery.
- Adjust steering wheel height so that it is located in the highest position.
- Adjust the steering wheel depth (reach) so it is in the fully extended position.
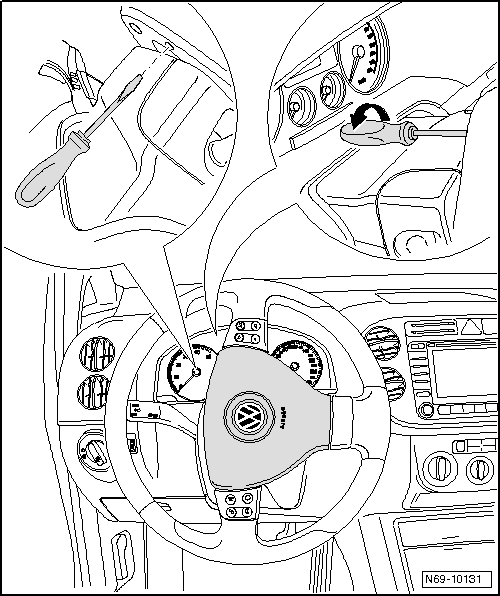
- Turn the steering wheel into the position depicted.
- Insert a screwdriver into hole on rear side of steering wheel until it stops (approximately 8 mm).
- Turn the screwdriver in the direction of the driver door -arrow-; this unlocks the airbag unit catch on the right side of the steering wheel.
- Turn the steering wheel 180º and disengage airbag unit locking mechanism on left side of steering wheel as described.
- Turn the steering wheel back 90º into center position.
- Remove the airbag unit from the steering wheel.
WARNING
Electrostatic discharges can lead to unintended deployment of the airbag. Therefore, the technician must discharge static electricity from the body before disconnecting the ignition wire and ground wire. This is done, for example, by briefly touching the body or the door striker.
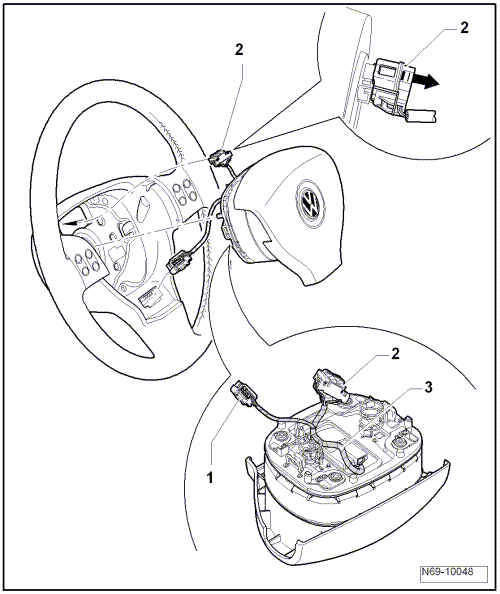
- Press the connector lock and disconnect the connector -1-.
Note
This connector is only installed with the multifunction steering wheel.
- Release the connector lock in the direction of the -arrow- and disconnect airbag connector -2-.

Installing
Note
- Removal and installation of airbag unit is described for multi-function steering wheel.
- The screwdriver mentioned in the following should be about 175 mm long and have a blade width of 7 mm.
- Check whether the wiring harness -3- is routed as shown in the illustration
- Insert the airbag connector -2- into connector coupling. Airbag connector must click into place.
- Insert the connector -1- into connector coupling.
- Push the airbag unit into steering wheel.
- Check whether the airbag unit is engaged on the left and right-hand side of the steering wheel.
- Switch the ignition on.
WARNING
Make sure that no persons are in the vehicle.
- Connect the battery.
Driver Side Airbag Unit, Removing and Installing, from 06/2011
Note
- The following describes removing and installing the airbag unit inside a multifunction steering wheel.
- The screwdriver mentioned in the following should be about 175 mm long and have a blade width of 7 mm.
Removing
WARNING
Follow all safety precautions when working on an airbag.
- Disconnect the battery ground cable with the ignition turned on.
- Move the steering wheel to the lowest position.
- Adjust the steering wheel depth (reach) so it is in the fully extended position.
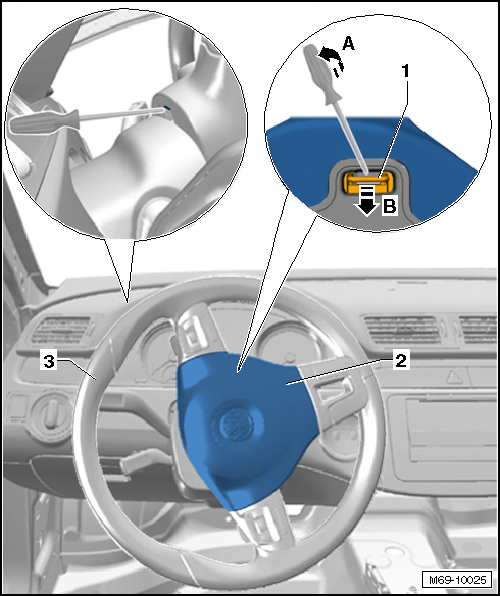
- Turn the steering wheel to the position illustrated.
- Insert a screwdriver all the way into the hole on the back of the steering wheel (approximately 8 mm).
- Turn the screwdriver toward the driver door -arrow A-. This will unlock the airbag unit locking mechanism -1- in direction of the -arrow B-, on the right side of the steering wheel.
Note
If it is not a multifunction steering wheel, then the airbag unit must be removed from the steering wheel bezel on the upper edge after actuating the lock.
- Turn the steering wheel 180º and the airbag unit locking mechanism on the left side of the steering wheel will unlock as described.
Note
If it is not a multifunction steering wheel, then the airbag unit must be removed from the steering wheel bezel on the upper edge after actuating the lock.
- Turn the steering wheel back to its center position.
- Loosen the airbag unit from the steering wheel.
WARNING
Before handling pyrotechnic components (for example, disconnecting the connector), the person handling it must "discharge static electricity". This can be done by touching the door striker pin, for example.
- Release the connector lock and disconnect the airbag connector -2-.
- Release the connector lock and disconnect the connector -1-. This is required only on the multifunction steering wheel.
- Connect the airbag connector -2- with the wiring harness to the back of the airbag unit.

Installing
WARNING
Follow all safety precautions when working on an airbag.
- Connect the airbag connector -2- in the connector. The airbag connector must click into place
- Connect the connector -1- in the connector. This is required only on the multifunction steering wheel
- Push the airbag unit into the steering wheel
- Gently pull on the airbag unit to make sure the it is locked securely inside steering wheel on the left and right sides
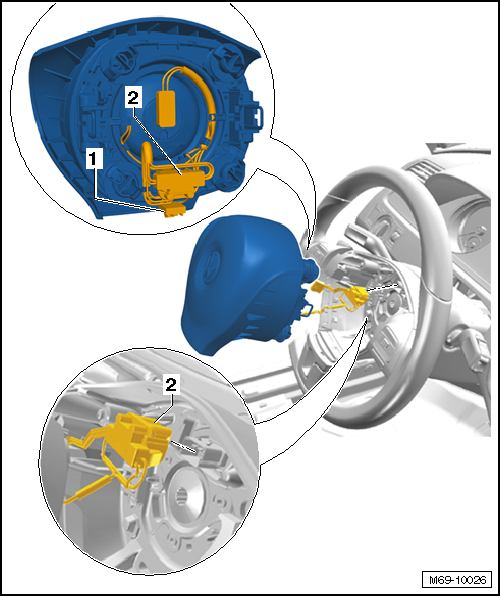
Note
- Make sure the connectors are installed all the way and engage audibly.
- Make sure the wires do not get caught.
WARNING
The ignition must be on when connecting the battery. If pyrotechnic components (for example, airbag, belt tensioner) are not repaired correctly, they may deploy unintentionally after connecting battery. There must not be anyone inside the vehicle when connecting the battery.
- Connect the battery ground cable with the ignition turned on.
- Check and erase the airbag control module DTC memory because faults can be stored from when the connectors are disconnected use the Vehicle Diagnostic Tester.
Return Spring with Slip Ring, Removing and Installing
Airbag Spiral Spring/Return Spring With Slip Ring -F138- is a construction-specific component of steering column switches.
Front Passenger Side Airbag Unit, Removing and Installing
Removing
WARNING
Follow all safety precautions when working on an airbag.
- Disconnect the vehicle battery.
- Remove right side instrument panel cover.
- Remove the Glove Compartment Lamp -W6-.
- Remove the glove compartment.
WARNING
Electrostatic discharges can lead to unintended deployment of the airbag. Therefore, the technician must discharge static electricity from the body before disconnecting the ignition wire and ground wire. This is done, for example, by briefly touching the body or the door striker.
- Disconnect the wiring harness from the front passenger side airbag.
- Remove the two bolts -1- (9 N·m).
- Remove the two bolts -2- and -3- (9 N·m).
- Remove the passenger airbag -4- from the mounts.
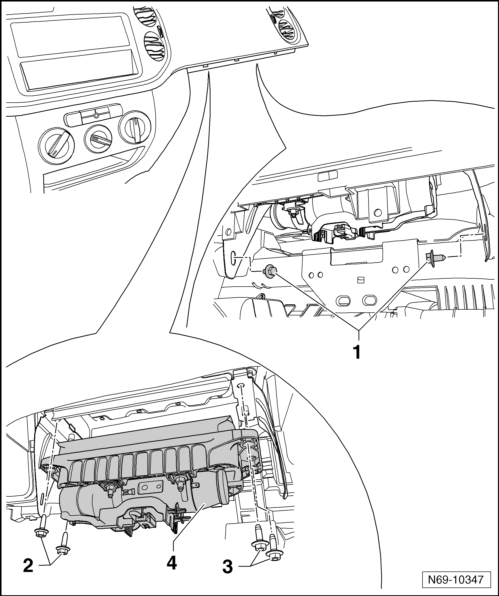
Installing
- Install in reverse order of removal.
Note
Insert the bolts -2- and -3- (9 N·m) with locking compound D 197 300 A1.
Check Whether an Additional Ground Cable Must be Routed in the Vehicle:
WARNING
If a passenger airbag is replaced, an additional ground cable must be routed in the vehicle in some cases.
Check whether a ground cable is routed on the passenger airbag housing:
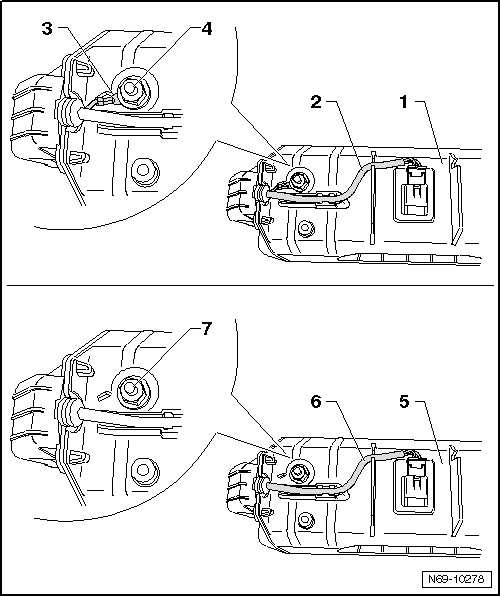
- With a passenger airbag with ground line -1-, the wiring harness -2- is a three-connector harness, and in addition, another cable -3- is secured on the threaded pins -4-.
- With a passenger airbag without ground line -5-, the wiring harness -6- is a two-connector harness and no additional cable is secured on the threaded pins -7-.
On a Passenger Airbag without Ground Cable, Route an Additional Ground Cable in Vehicle:
Note
Use a cable (cable diameter 1 mm, length 600 mm) from the Wiring Harness Repair Set -VAS1978- or the Wiring Harness Repair Set -VAS1978A-.
- Remove the right B-pillar upper trim.
- Remove the lower trim on the right B-pillar.
- Remove passenger side A-pillar trim.
- Secure the end of ground wire with the bolt -1- on right side of passenger airbag.
- Route the ground wire correctly to right side of passenger footwell.
Note
Lengthen the ground cable if needed using materials from the Wiring Harness Repair Set -VAS1978- or the Wiring Harness Repair Set -VAS1978A-.
- Secure other end of ground cable to ground bolt -2-.
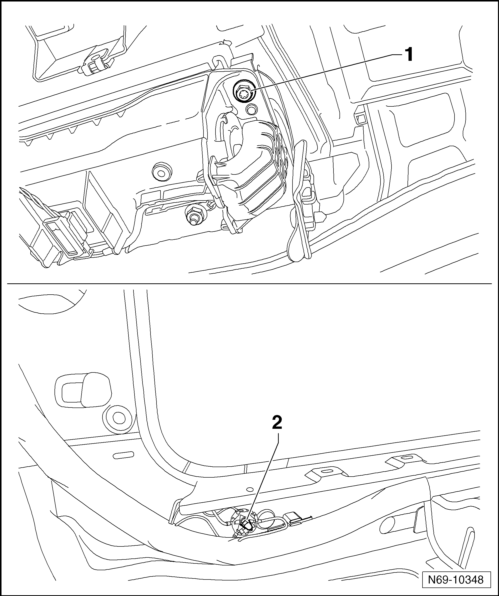
- Switch the ignition on.
WARNING
Make sure that no persons are in the vehicle.
- Connect the battery.
Driver and Passenger Side Airbag, Removing and Installing
Note
The following describes the removing and installing on the left side of the vehicle. Removing and installing on the right side is identical.
Removing
WARNING
Follow all safety precautions when working on an airbag.
- Mount the Engine/Transmission Holder - Seat Repair Fixture -VAS6136- on the Engine and Gearbox Bracket -VAS6095A-.
- Remove the front seat.
- Secure the seat to the Engine/Transmission Holder - Seat Repair Fixture -VAS6136-.
- Press the release button if equipped and pull the headrest out of the backrest.
- Remove the headrest.
- Remove the front seat belt latch.
- Remove the tunnel-side trim panel.
Passenger Seat without Height Adjustment
- Remove the backrest adjustment wheel.
- Remove the sill-side trim panel.
Passenger Seat with Pass-Through
- Remove the sill-side trim panel.
Seats with Manual Height Adjustment
- Remove the backrest adjustment wheel.
- Remove the sill-side trim panel.
Power Driver Seat
- Remove the sill-side trim panel.
- Disconnect the two backrest motor wiring harnesses on the bottom side of the seat frame. Detach the wiring harnesses from the seat frame.
All Vehicles
- Remove the backrest.
- Remove the lumbar adjustment lever, if equipped.
- Remove the backrest and folding table, if equipped.
- Remove the cover and cushion from the front seat backrest.
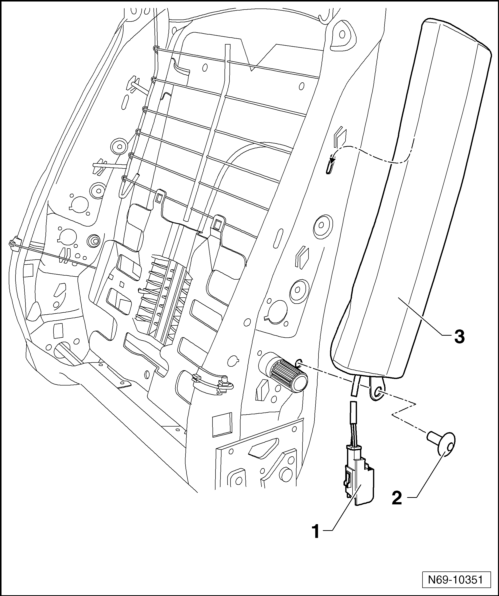
- Loosen the wiring harness -1- from backrest frame.
- Remove the bolt -2- (9 N·m).
- Remove the side airbag -3- from the mount in the backrest frame.
Installing
- Install in reverse order of removal.
- Switch the ignition on.
WARNING
Make sure that no persons are in the vehicle.
- Connect the battery.
Rear Side Airbag, Removing and Installing
Note
The following describes removing and installing on the right side of the vehicle. Removal and installation for the left side is identical.
Removing
WARNING
Follow all safety precautions when working on an airbag.
- Disconnect the vehicle battery.
- Move the right rear bench seat all the way forward.
- Remove the rear wheel housing trim (with rear side airbag).
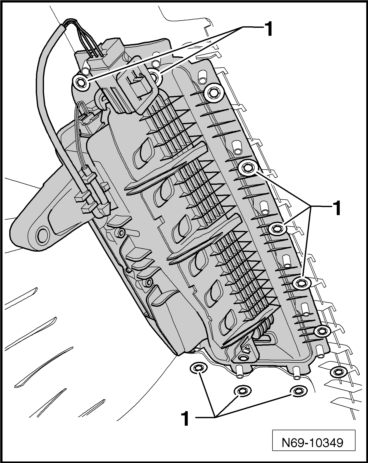
- Remove all 11 lock washers -1-.
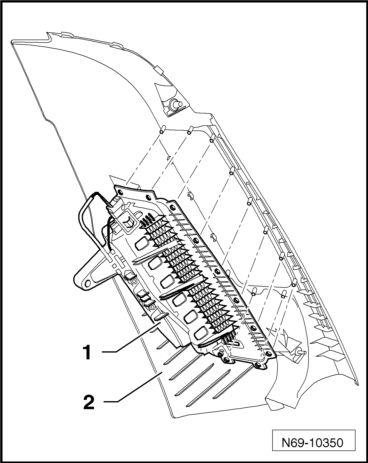
- Loosen the side airbag -1- from the trim -2-.
Installing
- Install in reverse order of removal.
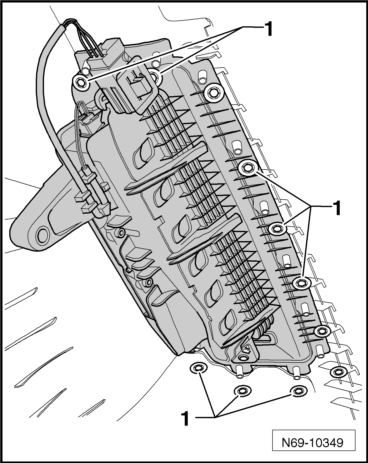
- When installing, replace all 11 lock washers -1-.
- Switch the ignition on.
WARNING
Make sure that no persons are in the vehicle.
- Connect the battery.
Driver and Passenger Head Curtain Airbags, Removing and Installing
Note
The following describes removing and installing on the right side of the vehicle. Removal and installation for the left side is identical.
Removing
WARNING
Observe the safety precautions when working on airbags.
- Disconnect the vehicle battery.
- Remove the front interior and reading lamps:
- Vehicle without Panorama sunroof
- Vehicle with Panorama sunroof
Vehicles with a Roof Console
- Remove the roof console.
Vehicles Equipped with a Screen Separator
- Remove the bolt -2- (8 N·m) in the respective mounts -1-.
All Vehicles
- Remove roof end strip.
- Remove the A-pillar upper trim panel.
- Remove the B-pillar upper trim.
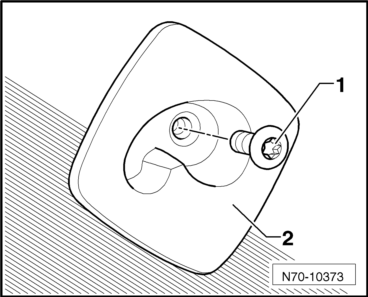
- Remove the roof grab handles.
- Remove the sun visors.
- Fold rear seat backrests forward.
- Move the front seats all the way forward and fold the backrests.
- Remove the headliner.
- Place a flat O-ring pliers in both clip openings -1- and carefully remove the clips out of the opening in the body.
- Remove the clips -2-, -3- and -4-, as described, out of the opening in the body.
WARNING
If one of the four clips were damaged while removing, the head curtain airbag must be replaced!
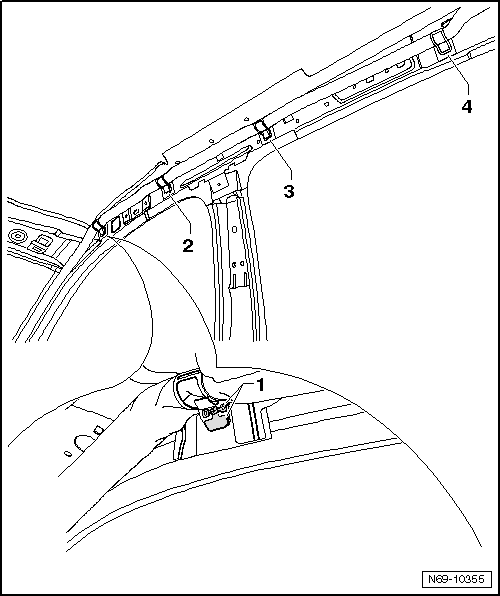
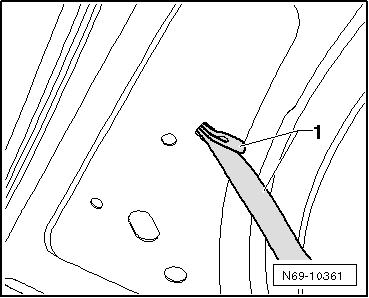
- Carefully remove the clip -1- from the A-pillar mount using the Window Release Tool -T10236-.
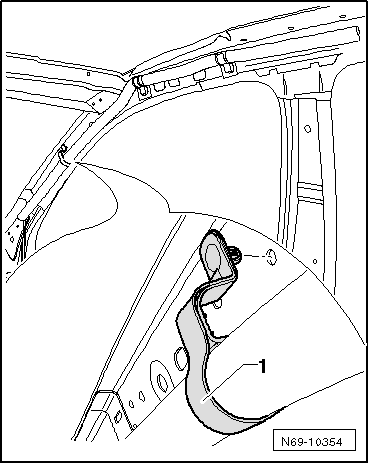
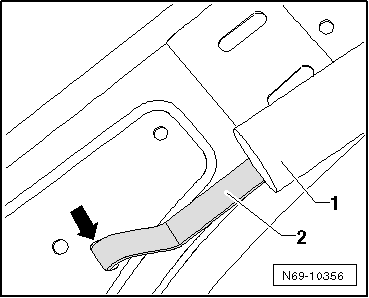
- At the bottom of the A-pillar, pull the band -2- from the side curtain airbag -1-, as far as possible and out of the opening in the body -arrow-.
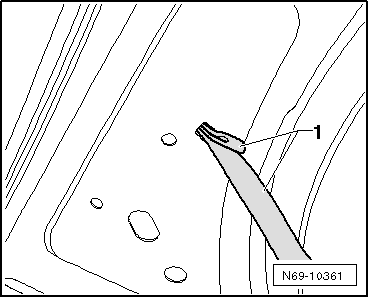
- Guide the band -1- out using a feeler gauge and needle nose pliers.
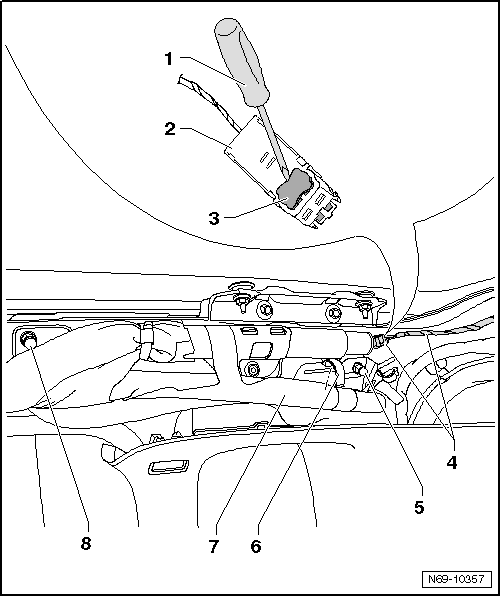
- Pry the connector lock -3- using a small screwdriver -1- out of the connector -2-.
WARNING
Electrostatic discharges can lead to unintended deployment of the airbag. Therefore, the technician must discharge static electricity from the body before disconnecting the ignition wire and ground wire. This is done, for example, by briefly touching the body or the door striker.
- Disconnect the wiring harness -4- from the head curtain airbag.
- On vehicles equipped with a Panorama sunroof, remove the water drain hose from the gas generator bracket.
- Remove the roller -7- from the clamp -6-.
- Remove the bolts -5- and -8-.
- Remove the gas generator, including the retaining place, from the threaded pin.
- Remove the head curtain airbag from vehicle through the rear lid.

Installing
- Guide the side curtain airbag, through the rear lid, into the vehicle.
- Secure the gas generator including the retaining plate with the bolts -5- and -8- (9 N·m).
- On vehicles equipped with a Panorama sunroof, mount the water drain hose in the gas generator retaining plate.
- Slide the roller -7- into the clamp -6-.
- Connect the harness connector -4- to the head curtain airbag.
- Press the clamps into the openings in the body in the sequence -4-, -3-, -2- and -1- .

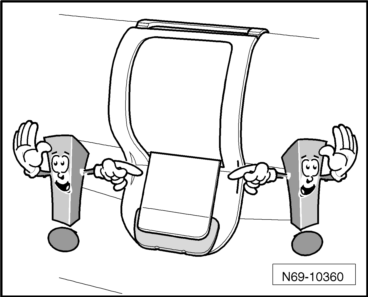
WARNING
After clipping the head curtain airbag, make sure the four clamps on both sides are securely latched.
Clamps Latched on Both Sides
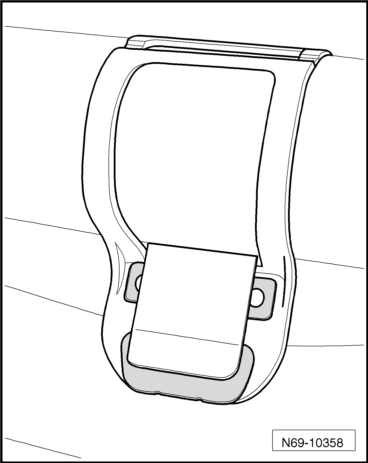
Clamps Latched on One Side
- Latch the clamp catches on both sides.
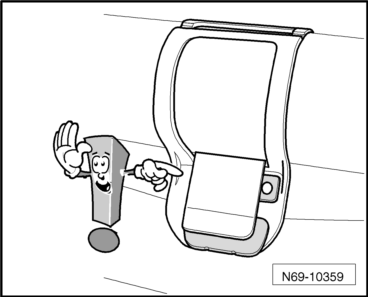
Clamp Not Latched
- Latch the clamp catches on both sides.
- Press the clip -1- into the mount on the A-pillar.

Caution
To prevent rattling, apply felt tape around the latch to secure the clip -1- if necessary.
- Slide the band -1- into the opening in the body.
- The rest of the assembly is performed in the reverse order.
- Switch the ignition on.
WARNING
Make sure that no persons are in the vehicle.
- Connect the battery.
Front Passenger Occupant Detection Sensor -G128-, Removing and Installing
Removing
WARNING
Always replace the front seat cushion if replacing the Front Passenger Occupant Detection Sensor -G128-.
- Mount the Engine/Transmission Holder - Seat Repair Fixture -VAS6136- on the Engine and Gearbox Bracket -VAS6095A-.
- Remove the front seat.
- Secure the seat to the Engine/Transmission Holder - Seat Repair Fixture -VAS6136-.
- Remove the front seat belt latch.
- Remove the tunnel-side trim panel.
- Remove the drawer mount, if equipped.
- Remove the drawer mount, if equipped.
Passenger Seat without Height Adjustment
- Remove the backrest adjustment wheel.
- Remove the sill-side trim panel.
Passenger Seat with Pass-Through
- Remove the sill-side trim panel.
- Remove the bracket, trim panel, and sill-side.
Front Seats with Manual Height Adjustment
- Remove the backrest adjustment wheel.
- Remove the sill-side trim panel.
Power Driver Seat
- Remove the sill-side trim panel.
- Remove the bracket, trim panel, and sill-side.
- Disconnect the two backrest motor wiring harnesses on the bottom side of the seat frame. Detach the wiring harnesses from the seat frame.
All Seats
- Cut the cable tie from the mesh hose cable tie and pull the wiring harness from the side airbag through it.
Note
On vehicles with a luggage pass-through, it is sufficient to fold the backrest forward, it does not have to be removed.
- Remove the backrest.
- Remove the front seat cover and cushion.
WARNING
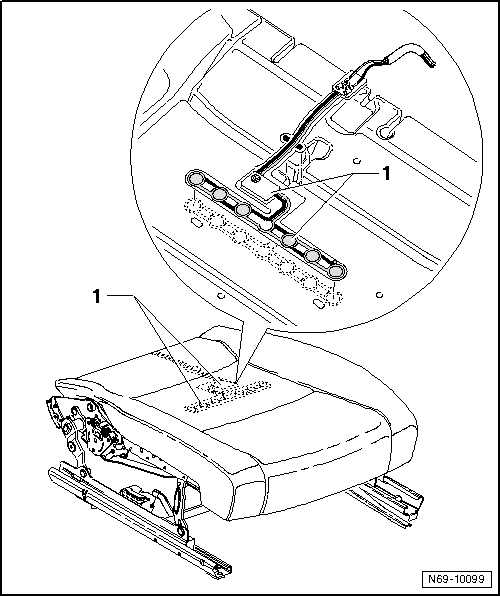
The Front Passenger Occupant Detection Sensor -G128--1- is glued to the seat cushion padding. It cannot be removed and installed separately. The sensor must be replaced with the padding.
Installing
WARNING
Always replace the front seat cushion if replacing the Front Passenger Occupant Detection Sensor -G128-.
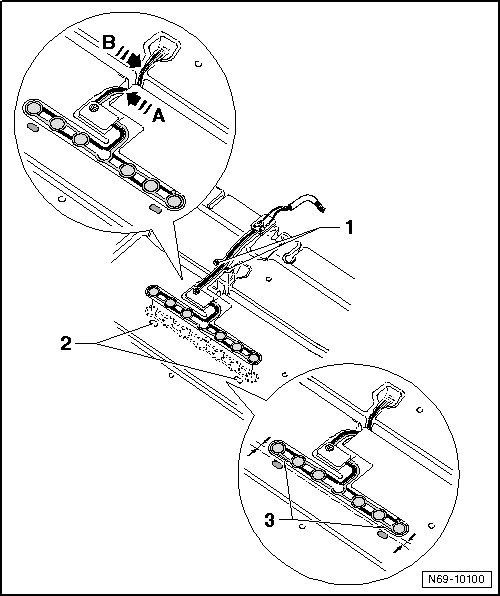
- Press the wiring harness into the rear channel in the cushion in the area of the positioning aid -1-.
- Press the wiring harness into the recess in the cushion at the areas indicated by the -A and B arrows-.
- Align the sensor positioning aid -3- with the cushion positioning aid -2-.
Caution
Ensure distance from sensor to positioning aids -2- is constant -arrows- when doing this.
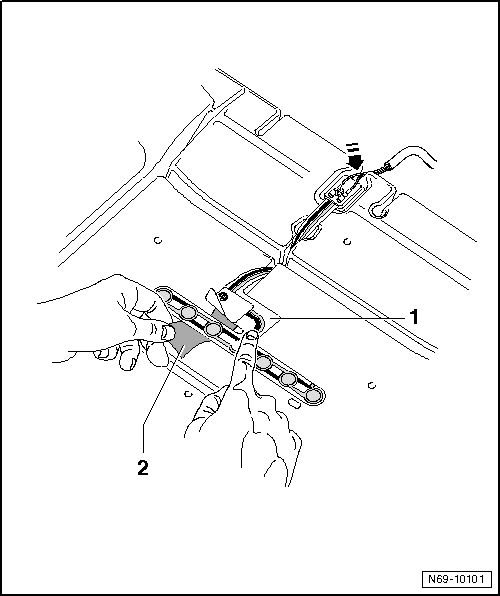
- Secure the aligned sensor -1- with the right hand, remove the adhesive tape strips -2- and bond the sensor to the cushion.
- Press the wiring harness in rear area into cushion opening -arrow-.
- Connect the wiring harness with the vehicle electrical system.
Installing of remaining components is reverse of removal.
- After installing, perform a function check with the ignition on.
Components, Adapting
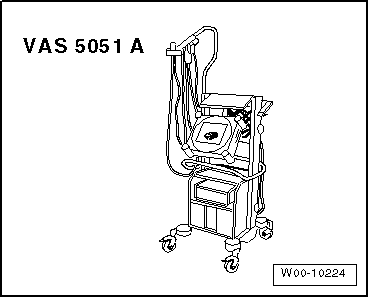
- Vehicle Diagnostic Tester
- 5m Diagnosis Lead -VAS5051/1- or Diagnosis Lead for LT2 -VAS5051/3-
Select "Guided Fault Finding" on the Vehicle Diagnostic Tester.
After all control modules have been interrogated:
- Press the Go to button.
- Select "Function/component selection".
- Select "Body".
- "Body Repairs"
- Select "01 - OBD-capable systems".
- Select "Airbag".
- Select "Functions".
- Select "Action".
Test yourself
A quick Volkswagen Tiguan quiz: every answer comes with an explanation and a link to the manual page.