Generator
General Information
Note
Check the generator. Refer to Wiring Diagrams, Fault Finding Electrical Systems and Installed Locations.
Generator on A Vehicle with the Start/Stop System:
Up to now, the generator and the voltage regulator were connect to the engine- and vehicle electrical system control module by a single cable. If the vehicle has the Start/Stop System, the information is transmitted to the data bus diagnosis interface via the LIN data bus. The data bus diagnosis interface then sends the information to the other control modules, such as the engine control module, via the CAN data bus.
B+ Wire, Securing on Generator
Caution
If the B+ wire is not tightened to the specification, the following risks may occur:
- The battery is not completely charged.
- The complete vehicle electrical system systems/electronics may fail (disabled vehicle).
- Fire hazard due to sparking.
- Damage to electronic components and control modules caused by excessive voltage.
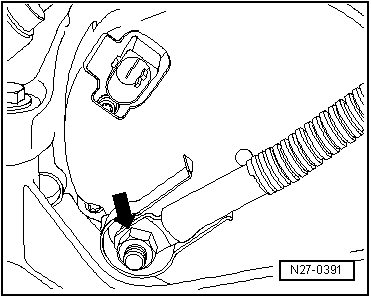
Tighten the nut on the B+ wire -arrow- to 15 N·m.
Ribbed Belt, Checking
Caution
Replace a damaged ribbed belt to prevent failures and malfunctions.Generator -C-, Checking
- Check the Generator -C- using the Vehicle Diagnostic Tester.
Ribbed Belt Pulley on Generator, Removing and Installing
Ribbed Belt Pulley without Freewheel, Removing and Installing
Special tools and workshop equipment required
- Generator Belt Socket -3310-
- Torque Wrench 1332 40-200Nm -VAG1332-
Removing
- Remove the generator.
- Clamp the generator in a vise at the mounting points.
- Use the Generator Belt Socket -VAS3310- to remove the ribbed belt pulley mounting nut from the generator shaft.

Installing
Install in reverse order of removal. Note the following:
- Tighten the threaded connection to 65 N·m.
Ribbed Belt Pulley with Freewheel Hub, Removing and Installing, Bosch
Special tools and workshop equipment required
- Multi-Tooth Adapter -3400-
- Torque Wrench 1332 40-200Nm -VAG1332-
Removing
- Remove the generator.
- Clamp the generator in a vise at the mounting points.
- Remove the cap from the ribbed belt pulley with freewheel.
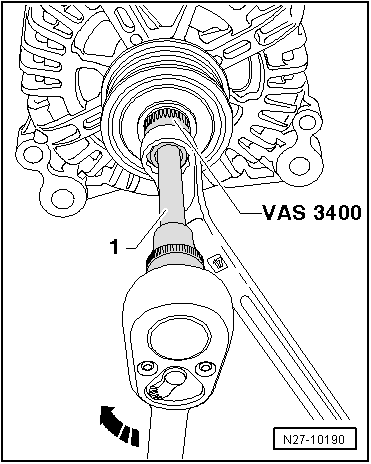
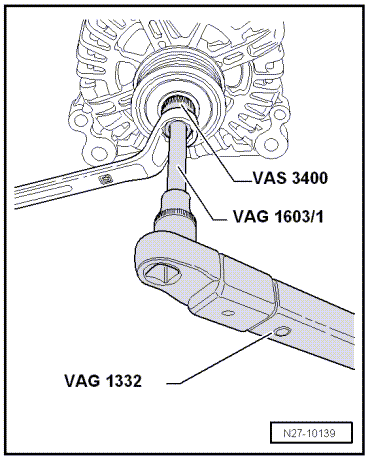
- Insert the Multi-Tooth Adapter -VAS3400- into the ribbed belt pulley with freewheel of the generator using a box wrench (17 mm).
- Place an M10 multipoint socket -1- into the generator shaft.
- Turn the threaded connection to the right while counter-holding it with the box wrench.
- Hold the ribbed belt pulley with freewheel in place by hand and turn it at the generator input shaft until the ribbed belt pulley can be removed with freewheel.
Installing
Install in reverse order of removal. Note the following:
- Next, screw the ribbed belt pulley with freewheel by hand onto the generator input shaft to the stop.
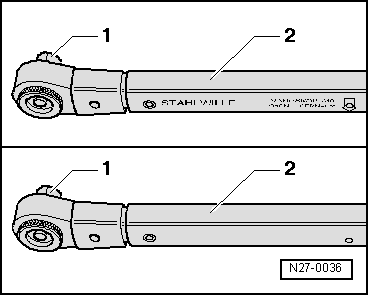
The Torque Wrench 1332 40-200Nm -VAG1332- must be rearranged for installing the ribbed belt pulley with freewheel as follows:
- Release the insert -1- and remove it from the handle part -2-.
- Turn the handle part -2- of the torque wrench 180º and reinsert the socket.
- Set the rotation direction of the torque wrench socket to "left".

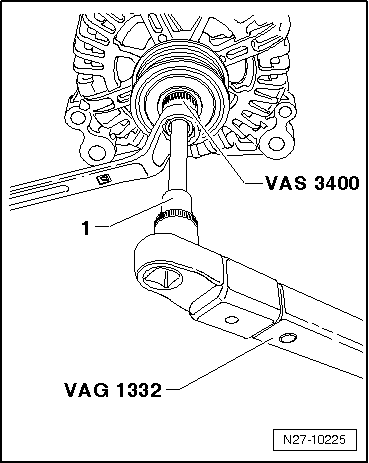
- Place an M10 multipoint socket -1- into the generator shaft.
- Counterhold the Multi-Tooth Adapter -VAS3400- with the box wrench (17 mm).
- Use the Torque Wrench 1332 40-200Nm -VAG1332- to tighten the ribbed belt pulley with freewheel by turning the generator input shaft to the left.
- Tighten the threaded connection to 80 N·m.
Ribbed Belt Pulley with Freewheel Hub, Removing and Installing, Valeo
Special tools and workshop equipment required
- Multi-Tooth Adapter -3400-
- Torque Wrench 1332 40-200Nm -VAG1332-
- Torx Key Socket Set -VAG1603A/1-
Removing
- Remove the generator.
- Clamp the generator in a vise at the mounting points.
- Remove the cap from the ribbed belt pulley with freewheel.
- Insert the Multi-Tooth Adapter -VAS3400- into the ribbed belt pulley with freewheel of the generator using a box wrench (17 mm).
- Install the Torx Key Socket Set -VAG1603A/1- in the generator shaft.
- Turn the threaded connection to the right while counter-holding it with the box wrench.
- Hold the ribbed belt pulley with freewheel in place by hand and turn it at the generator input shaft until the ribbed belt pulley can be removed with freewheel.

Installing
Install in reverse order of removal. Note the following:
- Next, screw the ribbed belt pulley with freewheel by hand onto the generator input shaft to the stop.
The Torque Wrench 1332 40-200Nm -VAG1332- must be rearranged for installing the ribbed belt pulley with freewheel as follows:
- Release the insert -1- and remove it from the handle part -2-.
- Turn the handle part -2- of the torque wrench 180º and reinsert the socket.
- Set the rotation direction of the torque wrench socket to "left".
- Install the Torx Key Socket Set -VAG1603A/1- in the generator shaft.
- Counterhold the Multi-Tooth Adapter -VAS3400- with the box wrench (17 mm).
- Use the Torque Wrench 1332 40-200Nm -VAG1332- to tighten the ribbed belt pulley with freewheel by turning the generator input shaft to the left.
- Tighten the threaded connections to 80 N·m.
Generator Voltage Regulator
Voltage Regulator, Removing and Installing, Bosch
Special tools and workshop equipment required
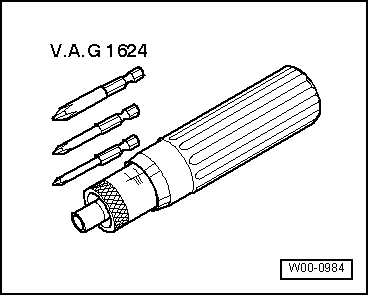
- Torque Screwdriver -VAG1624-
Removing
- Remove the generator.
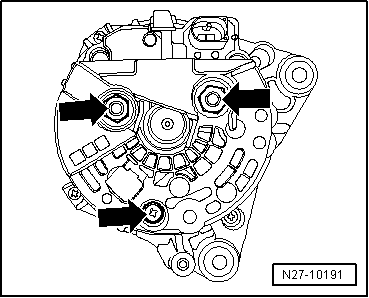
- Unscrew the mounting bolt and nuts -arrows- (4,5 N·m) and remove the protective cap from the generator.
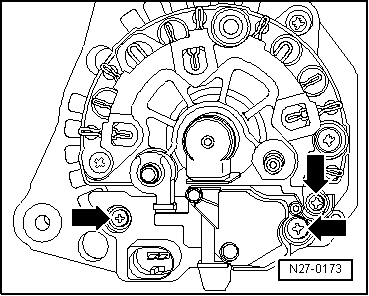
- Remove the mounting bolts of the voltage regulator -arrows- (2 N·m).
- Remove the voltage regulator from the generator.
Installing
Install in reverse order of removal. Note the following:
- Tighten all threaded connections to the indicated tightening specifications.
- M5 bolt protective cap to generator - 4,5 N·m
- M4 mounting bolt voltage regulator and generator - 2 N·m
Voltage Regulator, Removing and Installing, Valeo
Special tools and workshop equipment required
- Torque Wrench 1783 - 2-10Nm -VAG1783-
Removing
- Remove the generator.
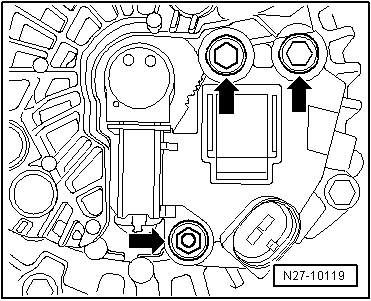
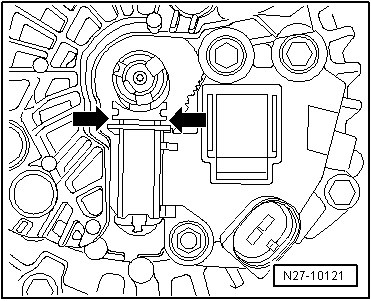
- Remove the clamping rings -arrows- and remove the protective cap from the generator.

- Remove the mounting bolts of the voltage regulator -arrows- (2 N·m).
- Remove the voltage regulator from the generator.
Installing
Install in reverse order of removal. Note the following:
- Release the retaining tabs -arrows- and remove the protective cap from the voltage regulator.
- Push the carbon brushes into the voltage regulator housing and insert the voltage regulator into the generator.
- Tighten all threaded connections to the indicated tightening specifications.
- Voltage regulator to generator 2 N·m.
- Protective cap to generator 4,5 N·m
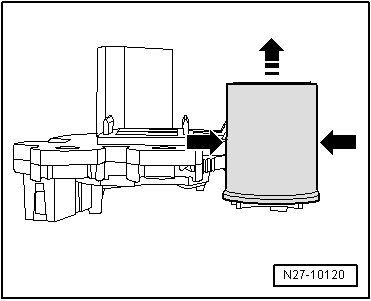
- Push the protective cap into the guide rails -arrows- until it engages audibly.
Cruise Control System
All instructions and information on this chapter can be found in the "Electrical Equipment General Information" repair manual in ELSA.
Special Tools
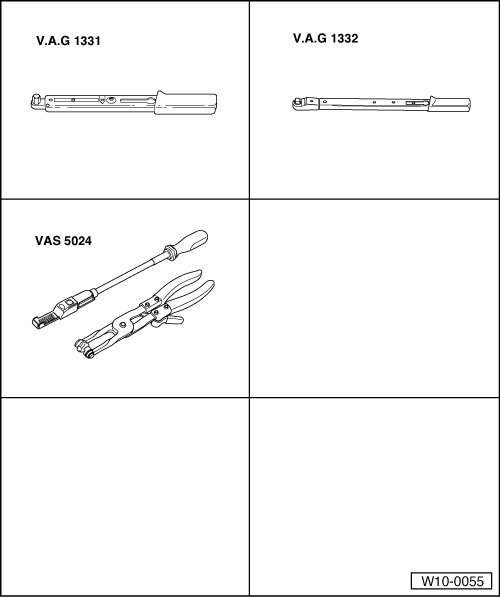
Special tools and workshop equipment required
- Torque Wrench 1331 5-50Nm -VAG1331-
- Torque Wrench 1332 40-200Nm -VAG1332-
- Hose Clip Pliers -VAS6340-
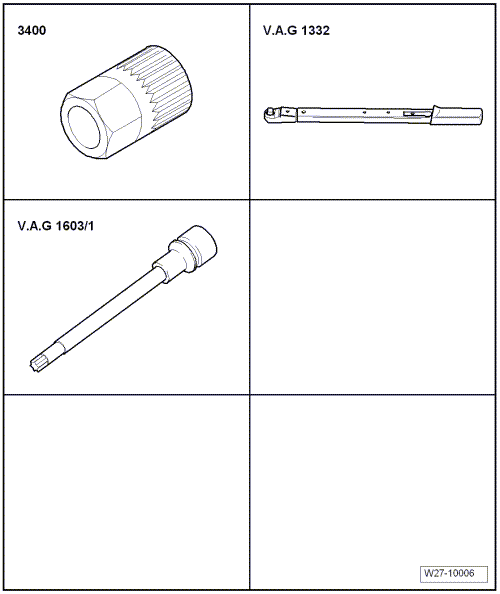
- Multi-Tooth Adapter -3400-
- Torque Wrench 1332 40-200Nm -VAG1332-
- Torx Key Socket Set -VAG1603A-
- Locking Pin -T10060A-

- Torque Screwdriver -VAG1624-
- Torque Wrench 1783 - 2-10Nm -VAG1783-

- Generator Belt Socket -3310-

Test yourself
A quick Volkswagen Tiguan quiz: every answer comes with an explanation and a link to the manual page.