Rear Parallel Parking Assist Sensor Mount, Replacing
Parallel Parking Assist Sensor Mount in Rear Bumper Cover, Painting
The sensor mounts in the rear bumper cover are made of two pieces and they are clipped into the bumper cover. The new sensor mounts must be painted to match the color of the bumper cover before installing.
- Rear Bumper Cover Sensor Bracket, Painting.
- Parallel Parking Assistance Sensor Bracket Allocation to Installation Location in Rear Bumper Cover.
- Sensor Bracket in Rear Bumper Cover, Removing and Installing.
The new sensor mounts must be painted to match the color of the bumper cover before installing. The following requirements must be observed when painting the sensor mounts to ensure the parking aid system will work correctly.
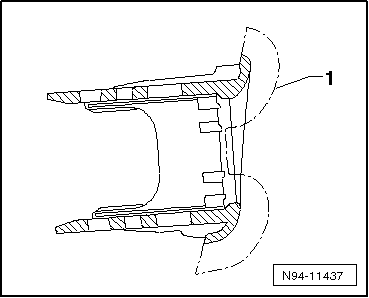
- Use isopropyl alcohol to de-grease the new sensor mounts in the area to be painted -1-.
- Paint the sensor mounts in the area to be painted -1- the same color as the bumper cover.
Note
Only paint the inside of the sensor mount in the indicated area. If this is not observed, it may lead to difficulty when assembling or malfunctions in the parallel parking assist system.
Parallel Parking Assist Sensor Mount Allocation to Installation Location in Rear Bumper Cover
The sensor mounts in the rear bumper cover are made of two pieces and they are clipped into the bumper cover. The new sensor mounts must be painted to match the color of the bumper cover before installing.
- Rear Bumper Cover Sensor Bracket, Painting.
- Parallel Parking Assistance Sensor Bracket Allocation to Installation Location in Rear Bumper Cover.
- Sensor Bracket in Rear Bumper Cover, Removing and Installing.
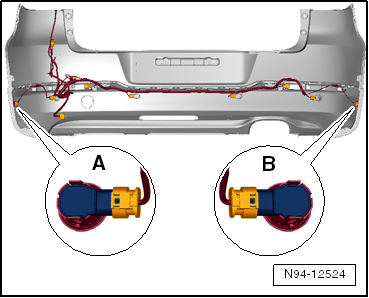
Sensor mounts are designed in different shapes and must be matched to the respective component location in the rear bumper cover.
Parallel parking assistance sensor mount allocation on the inside of the rear bumper cover:
- Right Rear Parallel Parking Assistance Sensor -G717-
- Left Rear Parallel Parking Assistance Sensor -G716-
Parallel Parking Assist Sensor Bracket in Rear Bumper Cover, Removing and Installing
The sensor mounts in the rear bumper cover are made of two pieces and they are clipped into the bumper cover. The new sensor mounts must be painted to match the color of the bumper cover before installing.
- Rear Bumper Cover Sensor Bracket, Painting.
- Parallel Parking Assistance Sensor Bracket Allocation to Installation Location in Rear Bumper Cover.
- Sensor Bracket in Rear Bumper Cover, Removing and Installing.
Removing
- Remove the parallel parking assist sensor from the rear bumper cover.
- Squeeze both retainers -arrows- to release the outer ring -1-.
- Remove the outer ring -1- from the sensor mount toward the rear.
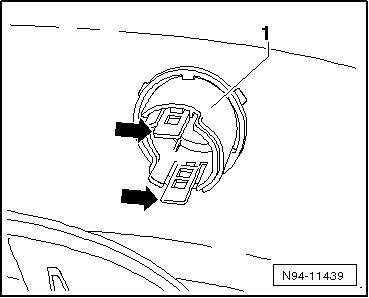
- Pull the sensor mount -1- toward the outside and out of the hole in the bumper cover.

Installing
Install in reverse order of removal. Note the following:
Note
Make sure the openings for the sensor connection are facing in the right direction when installing the sensor mount as illustrated. The sensors wires will be too short if the sensor bracket is installed in the wrong direction.
Parallel Parking Assistance Button -E581-
Parallel Parking Assistance Button -E581-, Removing and InstallingThe parallel parking assistance button is installed in the center console storage compartment in front of the gearshift lever. It contains the Parallel Parking Assistance Indicator Lamp -K241- and cannot be disassembled further.
Removing and installing the Parallel Parking Assistance Button -E581- is identical to removing and installing all buttons in the center console storage compartment. It is explained in the chapter "Buttons in Center Console Storage Compartment".Parallel Parking Assistance Button -E581-, Checking
The parallel parking assistance button is installed in the center console storage compartment in front of the gearshift lever. It contains the Parallel Parking Assistance Indicator Lamp -K241- and cannot be disassembled further.- Check the Parallel Parking Assistance Button -E581- using the Vehicle Diagnostic Tester.
Parking Aid Warning Buzzer
General InformationThe Parallel Parking Assistance Control Module -J791- also controls the park assist and parallel parking assist functions. The parking aid buzzer also produces the warning for the parallel parking assist.
Component location warning buzzer:- The Front Parking Aid Warning Buzzer -H22- is located behind the instrument cluster above the relay panel.
- The Front Parking Aid Warning Buzzer -H22- is located behind the instrument panel relay panel above the Parallel Parking Assistance Control Module -J791-.
- The Rear Parking Aid Warning Buzzer -H15- is located behind the right side trim panel.
Front Parking Aid Warning Buzzer -H22-, Removing and Installing
Removing
- Switch off the ignition and all electrical consumers and remove the ignition key.
- Remove the instrument cluster.
- Loosen both expanding rivets -arrows- and remove the Front Parking Aid Warning Buzzer -H22-. Pay attention to the wires still connected.
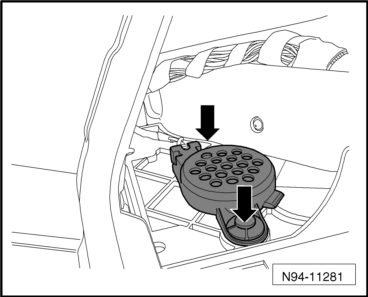
- Disconnect the connector -arrow- and remove the Front Parking Aid Warning Buzzer -H22--1- from the vehicle.

Installing
Install in reverse order of removal.
Front Parking Aid Warning Buzzer -H22- Volume, Adjusting
- Adjust the Front Parking Aid Warning Buzzer -H22- volume using the Vehicle Diagnostic Tester.
Front Parking Aid Warning Buzzer -H22- Tone, Adjusting
- Adjust the Front Parking Aid Warning Buzzer -H22- tone using the Vehicle Diagnostic Tester.
Rear Parking Aid Warning Buzzer -H15-, Removing and Installing
Removing
- Remove the right side trim panel inside the luggage compartment.
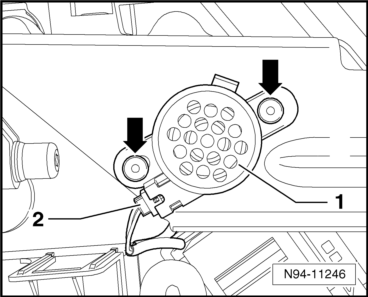
- Disconnect the connector -1-.
- Loosen the expanding rivets -arrows- and remove the Rear Parking Aid Warning Buzzer -H15--1-.
Installing
Install in reverse order of removal.
Rear Parking Aid Warning Buzzer -H15- Volume, Adjusting
- Adjust the Rear Parking Aid Warning Buzzer -H15- volume using the Vehicle Diagnostic Tester.
Rear Parking Aid Warning Buzzer -H15- Tone, Adjusting
- Adjust the Rear Parking Aid Warning Buzzer -H15- tone using the Vehicle Diagnostic Tester.
Test yourself
A quick Volkswagen Tiguan quiz: every answer comes with an explanation and a link to the manual page.