Suspension, Wheels, Steering
Subframe, Servicing
In this manual: Suspension, Wheels, Steering
21steps
~126min
4/5difficulty
Done 0 of 21
Special tools and workshop equipment required
- Bearing Installer - Wheel Hub/Bearing Kit -T10205-
- Torque Wrench 1332 40-200Nm -VAG1332-
- Hydraulic Press -VAS6178-
- Pneumatic/Hydraulic Foot Pump -VAS6179-
- Rubber Bushing Assembly Device Kit -VAS6779A-
- Press Plate -VW401-
- Press Piece - Multiple Use -VW412-
Replace the Bonded Rubber Bushing for the Pendulum Support.
- Remove the front noise insulation.
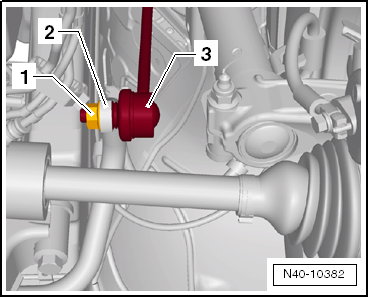
- Remove the hex nut -1- from the right and left coupling rod -3-.
- Remove the coupling rod -3- from the stabilizer bar -2- on the left and right sides.
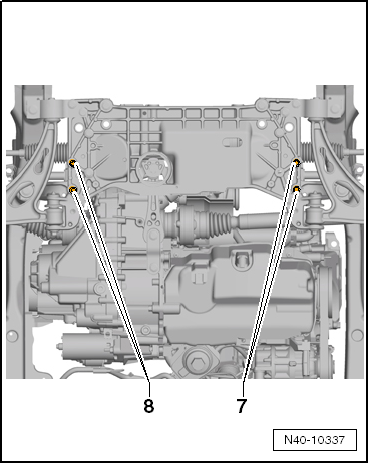
- Remove the stabilizer bar bolts -7 and 8-.
Leave the stabilizer bar in the installed position on the vehicle.
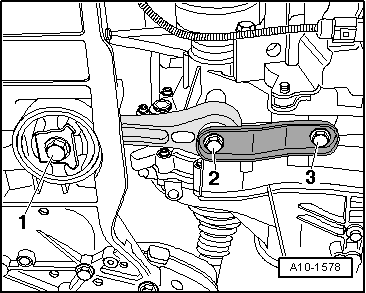
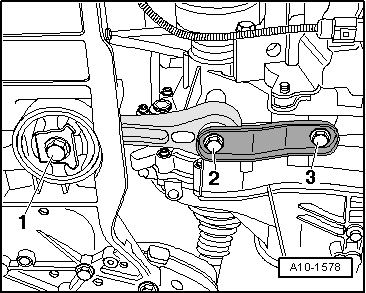
- Remove the bolt -1-.
- Remove the bolts -2 and 3-.
- Remove the pendulum support.
Pressing Out the Bonded Rubber Bushing
- Install the Rubber Bushing Assembly Device Kit -VAS6779A- on the subframe as shown.
- Position the Rubber Bushing Assembly Device Kit - Thrust Piece -VAS6779/1--1- with the flat side -arrow- on the bonded rubber bushing in the direction of travel.

- Rubber Bushing Assembly Device Kit - Thrust Piece -VAS6779/1-
- Hydraulic Press - Bushing Tool Kit -Tube -VAS6779/4-, with the small outer diameter to the sub frame.
- Rubber Bushing Assembly Device Kit -Thrust Piece -VAS6779/5-
- Hydraulic Press -VAS6178- with Bearing Installer - Wheel Hub/Bearing Kit - Pressure Head -T10205/13-
- Rubber Bushing Assembly Device Kit - Hexagon Nut -VAS6779/3-
- Rubber Bushing Assembly Device Kit - Threaded Rod -VAS6779/2-
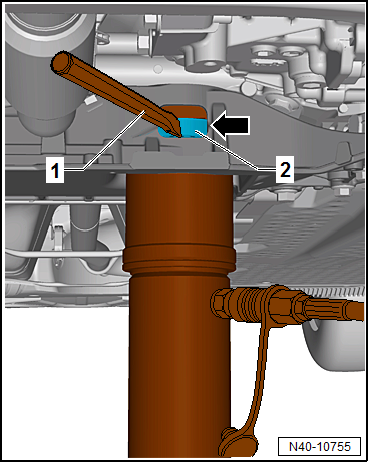
- Press out both bonded rubber bushings until the upper bonded rubber bushing -2- is visible in the pendulum support opening -arrow- in the subframe.
- Perform a visual inspection of the upper bonded rubber bushing outer race -2-.
If the upper bonded rubber bushing outer race -2- is deformed, it must be destroyed through the opening for the pendulum support -arrow- in the subframe.
- Using a chisel or similar tool -1-, make a break in the upper bonded rubber bushing outer race -2-.
Note
This work sequence is necessary to prevent tilting of the bonded rubber bushing outer race in the area of the pendulum support opening in the subframe.
- Completely press out both bonded rubber bushings at the same time.
Preparing Bonded Rubber Bushings Before Pressing In
Note
- There are two different versions of the pendulum support bonded rubber bushing: the T version -I- and the V version -II-.
- Refer to the Parts Catalog for the allocation.
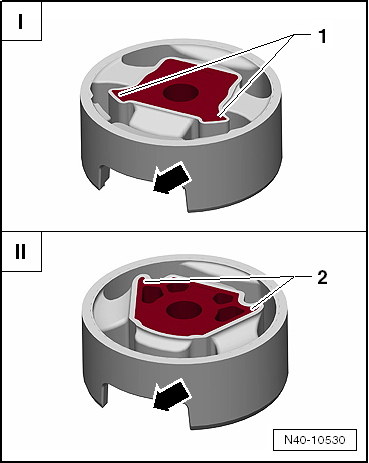
- The corners on the inner core -1- face toward the opening for the pendulum support -arrow- (T version).
- The corners on the inner core -2- face away from the opening for the pendulum support -arrow- (V version).
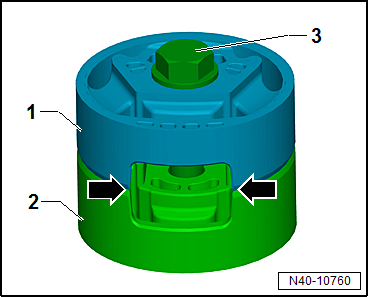
- Place the bonded rubber bushings -1 and 2- on top of each other so the openings -arrows- lay directly over each other.
- Tighten the bonded rubber bushings -1 and 2- using the original bolt -3- hand tight.
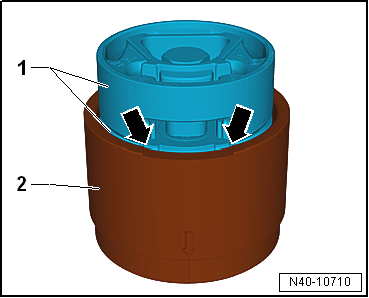
- Place the bonded rubber bushing -1- with the bolt head facing up in the larger diameter of the Rubber Bushing Assembly Device Kit - Funnel -VAS6779/6--2-.
- Align the bonded rubber bushing -1- in the Rubber Bushing Assembly Device Kit - Funnel -VAS6779/6--2-. The opening in the bonded rubber bushing must directly face the recess -arrows- in the Rubber Bushing Assembly Device Kit - Funnel -VAS6779/6--2-.
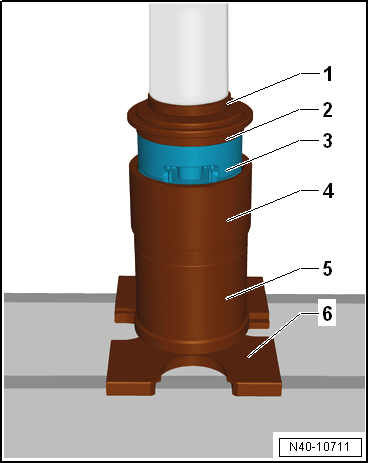
- Press the bonded rubber bushing -3- in the Rubber Bushing Assembly Device Kit - Funnel -VAS6779/6- until it stops as shown in the illustration.
- Press Piece - Multiple Use -VW412-
- Rubber Bushing Assembly Device Kit -Thrust Piece -VAS6779/5-, the side with the letter "A" points up
- Bonded rubber bushing
- Rubber Bushing Assembly Device Kit - Funnel -VAS6779/6-
- Rubber Bushing Assembly Device Kit - Tube -VAS6779/4-
- Press Plate -VW401-
- Remove the bolt from the bonded rubber bushing.
- Place the Hydraulic Press - Bushing Tool Kit-Counter Hold -VAS6779/7--1- front left in the direction of -arrow- on the subframe -2-.
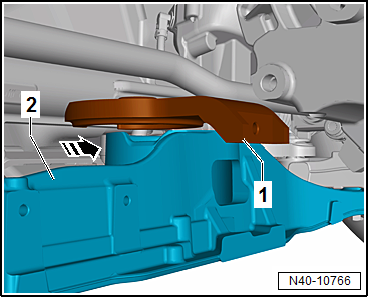
- Insert the Rubber Bushing Assembly Device Kit - Insert -VAS6779/7-1A--1- in the pendulum support opening in the subframe.
- Attach the Rubber Bushing Assembly Device Kit - Insert -VAS6779/7-1A- with the bolt -arrow- on the Hydraulic Press - Bushing Tool Kit-Counter Hold -VAS6779/7--2-.
- Pay attention that the Rubber Bushing Assembly Device Kit - Counterhold -VAS6779/7-1A--1- is seated correctly in the subframe opening -arrow-.

Installing the Bonded Rubber Bushings
- Install the Rubber Bushing Assembly Device Kit -Threaded Rod -VAS6779/2--7- in the Rubber Bushing Assembly Device Kit - Counterhold -VAS6779/7--1-.
- Install the Rubber Bushing Assembly Device Kit -VAS6779- as shown in the illustration on the subframe.
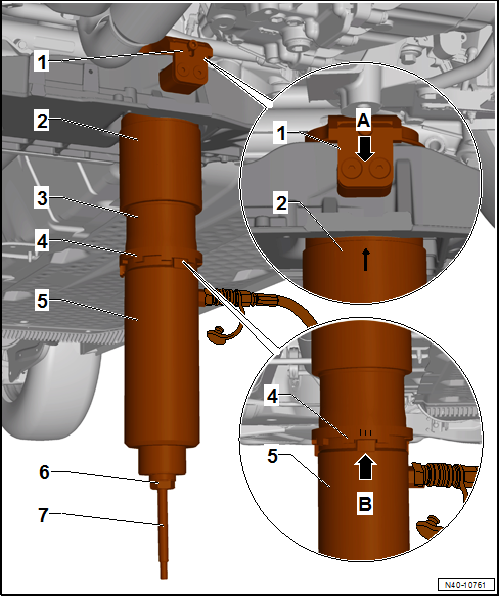
- Rubber Bushing Assembly Device Kit - Counterhold -VAS6779/7-
- Hydraulic Press - Bushing Tool Kit - Funnel -VAS6779/6-, -arrow marking- on the Funnel must be opposite of both bolts -arrow A-.
- Rubber Bushing Assembly Device Kit - Thrust Piece -VAS6779/9-
- Hydraulic Press - Bushing Tool Kit -Incremental Ring -VAS6779/8-, the marking -III- on the Incremental Ring must point to the cam -arrow B- on the Hydraulic Press - Bushing Tool Kit -Thrust Piece -VAS6779/9-.
- Hydraulic Press -VAS6178- with Bearing Installer - Wheel Hub/Bearing Kit Pressure Head -T10205/13-
- Hydraulic Press - Bushing Tool Kit - Hexagon Nut -VAS6779/3-
- Hydraulic Press - Bushing Tool Kit - Threaded Rod -VAS6779/2-
- Press in both bonded rubber bushings at the same time.
- Remove the Rubber Bushing Assembly Device Kit -VAS6779- from the subframe and check the position of the pressed in bonded rubber bushing.
- Fasten the stabilizer bar with the subframe and the coupling rod.
- Insert the pendulum support.
- Install the bolts -2 and 3- and tighten.
- Install the bolt -1- and tighten.
- Install the front noise insulation.
Tightening Specifications
| Bolt | Tightening Specification |
Pendulum support to the transmission M10 x 35
|
50 N·m + 90º |
Pendulum support to the transmission M10 x 75
|
50 N·m + 90º |
Pendulum support to the transmission M12 x 1.5 x 50
|
60 N·m + 90º |
Pendulum support to the transmission M12 x 1.5 x 85
|
60 N·m + 90º additional turn |
Pendulum support to the subframe M14 x 1.5 x 70
|
100 N·m + 90º |
Stabilizer bar to coupling rod
|
65 N·m |
Stabilizer bar to subframe
|
20 N·m + 90º |
Test yourself
A quick Volkswagen Tiguan quiz: every answer comes with an explanation and a link to the manual page.
Was this page helpful?