Suspension, Wheels, Steering
Ball Joint, Checking
In this manual: Suspension, Wheels, Steering
2steps
~12min
1/5difficulty
Done 0 of 2
Axial Play, Checking
- Forcefully pull control arm down in the direction of -arrow- and press it up again.
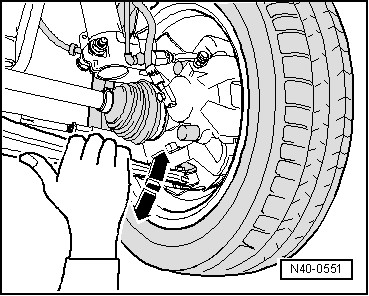
Radial Clearance, Checking
- Forcefully push the lower part of wheel inward and outward in the direction of -arrow-.
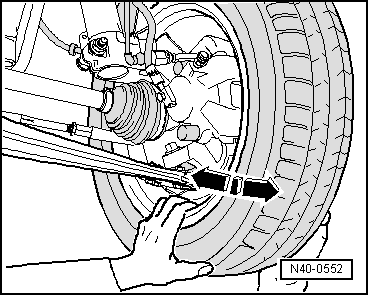
Note
- There should not be any noticeable or visible "play" in either of the two checks.
- Pay attention to the lower ball joint while performing checks.
- Make allowance for any wheel bearing play or "play" in the upper strut mount
- Check the rubber boot for damage and replace the lower ball joint, if necessary.
Ball Joint, Removing and Installing
Special tools and workshop equipment required
- Puller - Ball Joint -3287A-
- Torque Wrench 1332 40-200Nm -VAG1332-
- Engine and Gearbox Jack -VAS6931-
- Digital Torque Wrench -VAG1756A-
- Drive Shaft Remover -T10520-
Removing
- Loosen drive axle bolt on the wheel hub.
- Remove the wheel.
- Remove the nuts -arrows-.
- Pull the drive axle slightly off the wheel hub.

If the drive axle cannot be pulled out of the wheel bearing, then the drive axle can be pushed out of the wheel bearing using the Drive Shaft Remover -T10520-.
Before using the Drive Shaft Remover -T10520-, make sure that the thrust piece -1- is installed.

Using the Drive Shaft Remover -T10520-:
- Secure the Drive Shaft Remover -T10520--1- with three wheel bolts -2- on the wheel hub, so that the drive axle -3- can be pressed out.

- Follow the specified sequence exactly.
- Tighten the knurled nut -1- hand-tight.
- Only turn the bolt -2- using a wrench and press out the drive axle using the Drive Shaft Remover -T10520-.
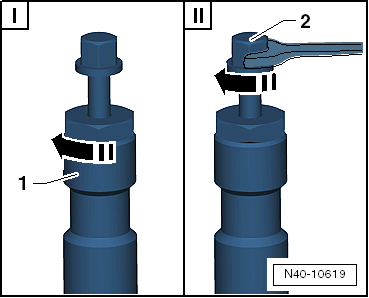
Note
At the end of the tasks or to set back, the spindles must be brought back into the original position so that the hydraulic operation can be used.
- Remove the ball joint from the control arm and at the same time swivel the wheel bearing housing to the outside.
- Bend control arm as far downward as necessary.
- Attach the Puller - Ball Joint -3287A- as depicted in illustration and press out ball joint.
Note
- Place Engine and Gearbox Jack -VAS6931- or something similar underneath (danger of accident if parts fall off when ejecting ball joint).
- To protect ball joint thread, leave nut on a few turns.
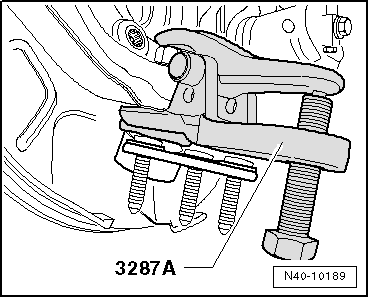
Installing
- Remove the drive axle from the wheel hub.
- Insert ball joint into wheel bearing housing.
- Install the new self-locking nut while counterholding using Internal Torx Bit -T40- from the Torx Key Socket Set -VAG1603A-.
- Install drive axle in wheel hub.
- Tighten nuts -arrows-.
Note
Make sure the ball joint boot is not damaged or twisted.
- Install the wheel and tighten.
- Tighten drive axle bolt onto the wheel hub.

Note
Vehicle must not be standing on its wheels when doing this, otherwise wheel bearing will be damaged.
Tightening Specifications
| Component | Tightening Specification |
Ball joint to aluminum control arm:
|
60 N·m |
Ball joint to sheet steel control arm
|
100 N·m |
Ball joint to wheel bearing housing
|
60 N·m |
Drive axle to wheel hub
|
70 N·m + 90º |
Test yourself
A quick Volkswagen Tiguan quiz: every answer comes with an explanation and a link to the manual page.
Was this page helpful?