General Information
Paint structure of factory paint finish
Structure of solid-colour paint, conventional
Film thickness approx. 80-120 µm
- Steel sheet
- Zinc phosphating
- Electrophoretic primer
- Interim filler
- 2K solid-colour topcoat
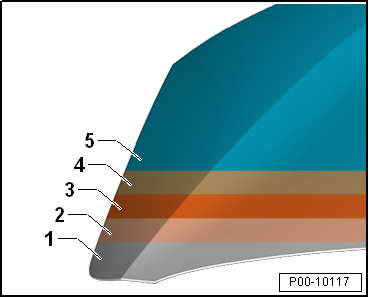
Structure of solid-colour paint, waterborne basecoat
Film thickness approx. 80-130 µm
- Steel sheet
- Zinc phosphating
- cathodic electrodeposition coating (CED)
- Waterborne filler
- Waterborne basecoat
- 2K clearcoat
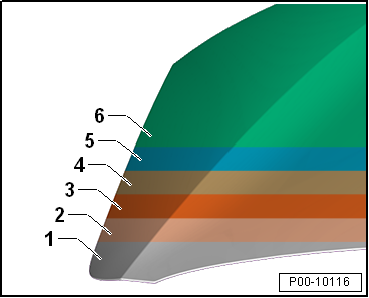
Structure of metallic and pearl effect paint, water-based basecoat
Film thickness approx. 80-130 µm
- Steel sheet
- Zinc phosphating
- cathodic electrodeposition coating (CED)
- Waterborne filler
- Water-based metallic/pearl effect basecoat
- 2K clearcoat
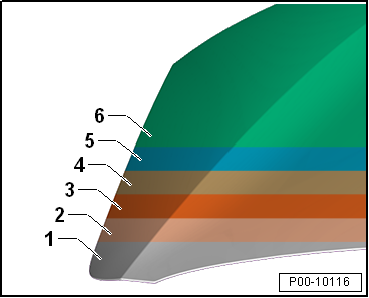
Structure of two-coat paint system, conventional
Film thickness approx. 100 µm
- Steel sheet
- Zinc phosphating
- cathodic electrodeposition coating (CED)
- Interim filler
- Solid color topcoat
- 2K clearcoat
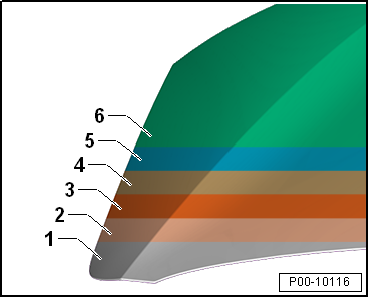
Structure of Process 2010 paint system, water-based basecoat
Film thickness approx. 80-120 µm
- Steel sheet
- Zinc phosphating
- cathodic electrodeposition coating (CED)
- Water-based basecoat (functional layer)
- 2K clearcoat
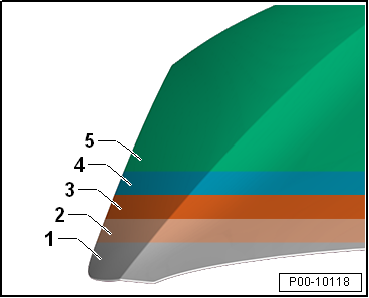
Structure of three-coat paint system, water-based basecoat
Film thickness approx. 80-140 µm
- Steel sheet
- Zinc phosphating
- cathodic electrodeposition coating (CED)
- Waterborne filler
- Water-based basecoat (color-giving base shade)
- Water-based basecoat (effect layer)
- 2K clearcoat

Note
- The approximate film thickness can vary depending on the color shade and indicates differences depending on location, vertical or horizontal surfaces.
- On individual vehicles, the stated values may be exceeded after refinishing or multiple repainting. This does not need to be communicated.
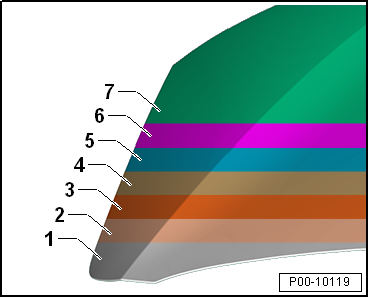
Paint structure of a service refinish
Double-sided galvanized sheet metal
Previous tests on flanged joints have led to the use of double-sided galvanized sheet metal only. Only here can the cathodic protection and the barrier effect of the zinc coating work together optimally. In particular, the cut edges, which are less well protected by paint (edge coverage), are additionally protected.

Note
- Make sure
- that all sheet metal edges are well deburred during bodywork repair.
- that the zinc and e-coat (KTL) layers are completely present on inner surfaces that are not painted.
- that inner weld flanges and ground-through spots are reworked with stainless steel spray -D 007 600 A1-.
Filler work
To restore the body surfaces to their original contour, filler materials are now considered indispensable in body repair and paint shops. Attention must be paid to the different substrate requirements.
Product information:
- "Body filler"
Primer
The primer is the most important component of the corrosion protection system, as it prevents water and oxygen from reaching the metal surface. Original replacement parts are generally coated with a black e-coat (KTL) primer. The type of primer used depends on the application.

Note
- Ground-through spots or weld seams must be recoated with corrosion protection primer as soon as possible.
- The e-coat (KTL) primer is not resistant to UV or acids. Replacement parts must therefore also be painted on the inside.
- After corrosion repair and on bare metal substrate, seal with 2K wash primer -LHV 043 000 A2- and then apply 2K HS performance filler.
Product information:
- "Metal primer"
- "Plastic primer"
Filler
The filler makes only a minor contribution to corrosion protection. Nevertheless, a suitable filler is indispensable in service repair.
Functions:
- The filler protects the body from stone chips. In the stone chip protection area, therefore, pay attention to the appropriate film thickness.
- The filler is used for surface preparation. Sanding scratches can be leveled.
- Tinted filler improves hiding power for poorly covering shades.
Product information:
- "Filler"
PVC seam sealing and underbody protection

Note
- During repair, the seam sealing must be restored to match the original appearance and film thickness.
- To avoid damage and malfunctions, sealing seams in the area of assembly-dependent attachments must be smoothed flat.
- Water drain holes must remain open.
- All threaded studs and weld nuts with M thread, as well as all other studs and mating surfaces for assembly, must remain functional after the sealing is applied.
- The sealing material must not be applied to bare sheet metal, but only to filled substrates.
To prevent water from penetrating flanges, the sheet metal seam is sealed with paste-type, solvent-free PVC in critical areas of the body. As protection against stone chips and as anti-drumming protection, a PVC layer of varying thickness is also sprayed on at precisely defined areas on the underbody and in the wheel housings.

Note
- Before sealing/applying underbody protection, always isolate the surface with primer and filler.
- After corrosion repair and on bare metal substrate, seal with 2K wash primer -LHV 043 000 A2- and then apply 2K HS performance filler.
- When applying underbody protection, observe the specified film thicknesses.
Product information:
- "Underbody protection"
- "Stone chip protection"
- "Sealing materials"
Topcoat/basecoat
For topcoat/basecoat, the decorative application is the main focus. It makes only a minor contribution to corrosion protection.
Depending on the pigment content, the colors have different hiding power. The manufacturer's instructions must be observed.
Product information:
- "Topcoats"
Clearcoat
For clearcoat, the decorative application is the main focus. The clearcoat also makes only a minor contribution to corrosion protection. The clearcoat protects the topcoat/basecoat from UV radiation and environmental influences such as acid attack from bird droppings.
Product information:
- "Clearcoats"
Wax preservation/cavity preservation
Wax preservation/cavity preservation plays a decisive role in corrosion protection. Depending on the application, different materials are available in service. The excellent protective effect of these materials is based on the following properties:
- hydrophobic (water-repellent).
- good adhesion.
- no rust creepage.
- Water vapor permeability approx. 1,500 times lower than a paint layer of the same thickness.
Product information:
- "Preservation"
- "Wax underbody protection"
Reduced paint structure engine compartment and inside of hood

Note
The paint in the "engine compartment and inside of hood" may differ from the exterior paint in paint structure and color shade, depending on the model. This deviation is production-related and does not constitute a defect.
Work instruction for underbody and stone chip protection

Note
- When repairing the underbody and stone chip protection, its appearance and film thickness must be restored to match the original condition.
- Water drain holes must remain open.
- All threaded studs and weld nuts with M thread, as well as all other studs and mating surfaces for assembly, must remain functional after the sealing is applied.
Damage caused by accident (replacement part)
- New part: clean thoroughly with silicone remover.
- Scuff the factory primer (sanding pad).
- Clean again with long-action silicone remover.
- At sanded-through areas, apply 2K wash primer -LHV 043 000 A2-.
- Allow to dry (observe drying time).
- Then apply filler with 2K-HS-Performance-Füller.
- Allow to dry (observe drying time).
- Dry-sand the filler with sanding paper (P400-P500), avoiding sanding through.
- Clean the surface with long-action silicone remover.
- Apply suitable stone chip protection "Steinschlagschutz".
- Allow to dry (observe drying time).
- If necessary, rework/smooth the texture.
- Clean the substrate with water-based silicone remover.
- Then build up the paint with topcoat or basecoat and clearcoat.
Damage from accident (repair)
- Thoroughly clean the damaged component/area.
- Remove underbody protection using brush blaster -VAS 6446-.
- Dent out the damaged area and sand down to bare sheet metal.
- Remove any corrosion with brush blaster -VAS 6446-, and fine-sand the transition areas.
- Clean the substrate with long-action silicone remover.
- Apply 2K wash primer -LHV 043 000 A2-.
- Allow to dry (observe drying time).
- Then apply filler with 2K-HS-Performance-Füller.
- Allow to dry (observe drying time).
- Sand the filler.
- Clean the substrate with long-action silicone remover.
- Apply suitable body filler.
- Sand the body filler with sanding paper (P80-P240), feathering the transition areas generously.
- Clean the substrate with long-action silicone remover.
- Apply 2K wash primer.
- Then apply filler with 2K-HS-Performance-Füller.
- Allow to dry (observe drying time).
- Dry-sand the filler in the stone chip protection area with sanding paper (P400-P500), avoiding sanding through.
- Clean the surface with long-action silicone remover.
- Apply suitable stone chip protection "Steinschlagschutz".
- Allow to dry (observe drying time).
- If necessary, rework/smooth the texture.
- Dry-sand the entire filler area with sanding paper (P400-P500).
- Clean the substrate with water-based silicone remover.
- Build up the paint with topcoat or basecoat and clearcoat.
Cracks in stone chip protection

Note
Repair as described in "Damage from accident (repair)".
Damage from stone impact (gravel, granulate, etc.)
- Thoroughly clean the damaged areas.
- Sand damaged areas with sanding pad. For deeper chips, dry-sand with sanding paper (P120-P240).
- Clean the substrate with long-action silicone remover.
- At sanded-through areas, apply 2K wash primer -LHV 043 000 A2-.
- Allow to dry (observe drying time).
- Then apply filler with 2K-HS-Performance-Füller.
- Allow to dry (observe drying time).
- Dry-sand the filler with sanding paper (P400-P500), avoiding sanding through.
- Clean the substrate with long-action silicone remover.
- Apply suitable stone chip protection "Steinschlagschutz" to the damaged areas. For large damaged areas, the entire area must be reworked.
- Allow to dry (observe drying time).
- If necessary, rework/smooth the texture.
- Clean the surface with water-based silicone remover.
- Then build up the paint with topcoat or basecoat and clearcoat.
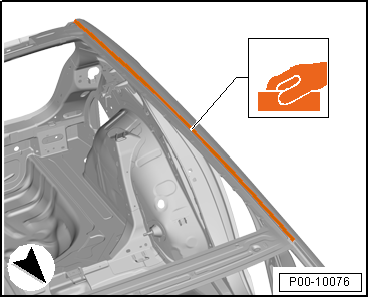
Pre-treatment of the bonding surface when replacing laser-brazed roofs
- Dry-sand the KTL primer on the roof bonding surface to bare metal with P180 sanding paper.
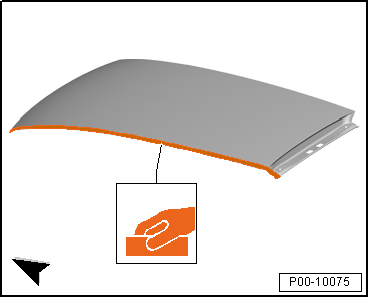
- Dry-sand the bonding surface of the roof pillars to bare metal with P180 sanding paper.

Note
Sanded-through areas outside the body bonding must be primed with 2K wash primer -LHV 043 000 A2- and then filler-coated with 2K-HS-Performance-Füller.
- Clean bonding areas with silicone remover.
- Replace roof → Body center, roof, frame.
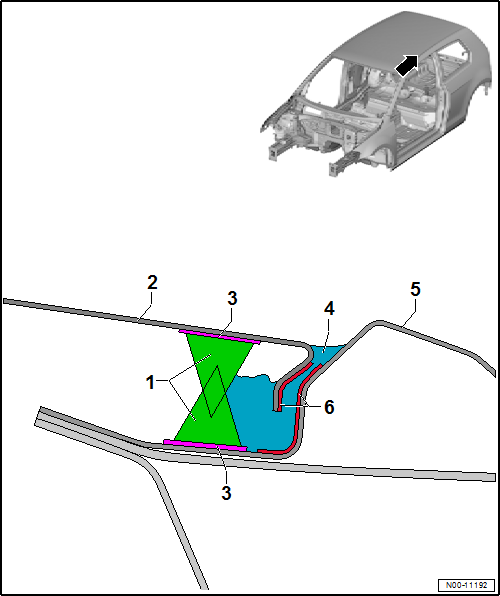
- 2K window adhesive
- Roof
- Glass/paint primer
- 2K body adhesive
- Roof rail/side panel
- Area sanded to bare metal
Corrosion protection measure for fender in contact area of wheel housing liner

Note
- The corrosion protection measure in the fender flange must be applied to all new replacement parts where the additional sealing is not factory-fitted.
- The additional sealing is intended to prevent possible corrosion-related chafing points of the wheel housing liner in the fender flange.
- Apply filler on the inside and outside of the fender.
- After the filler has dried, apply and spread the sealant -D 511 500 A2- in the contact area of the wheel housing liner (fender flange).
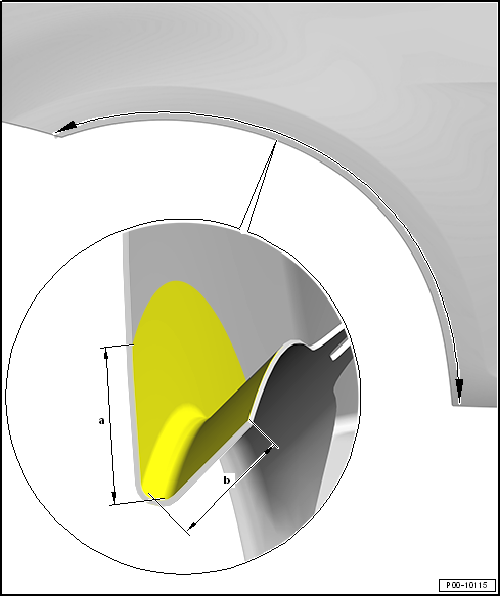
Dimension a - -20 mm
- Height of seal
Dimension b - -10 mm
- Width of seal

Note
Dimension b may vary, as there are fenders with flange edges of different widths. Always make sure the entire flange edge is sealed.
Before installation, seal the inside of the wheel arch and the web plate with cavity preservation.
Product information:
- "Preservation"
Repair instructions for flange corrosion
Corrosion on flange edges, for example on the hood, door or tailgate
- Remove corrosion areas with "Brush blaster set, pneumatic -VAS 6446-" or "Rod blaster set -VAS 6776-".
- Feather out transitions with P360-P400 sanding paper.
- Clean the substrate with silicone remover.
- After corrosion repair and before sealing, isolate the substrate with 2K wash primer -LHV 043 000 A2-, and then filler-coat with 2K-HS-Performance-Füller.
- After the filler has dried, dry-sand the filler-coated area with P400-P500, avoiding sanding through under any circumstances. Then clean the sanded areas with silicone remover.
- After the filler has dried and been sanded, thinly seal the sheet metal edges in the flange area with fine-seam sealer "Sealing materials". The fine-seam sealer must be matched to the original condition, see → "Vehicle-specific paint information" for the respective vehicle.

Note
- During repair, the seam sealing must be restored to match the original appearance and film thickness.
- To avoid damage and malfunctions, sealing seams in the area of assembly-dependent attachments must be smoothed flat.
- Water drain holes must remain open.
- All threaded studs and weld nuts with M thread, as well as all other studs and mating surfaces for assembly, must remain functional after the sealing is applied.
- The sealing material must not be applied to bare sheet metal, but only to filled substrates.
- Restore the rest of the paint build-up according to manufacturer specifications.
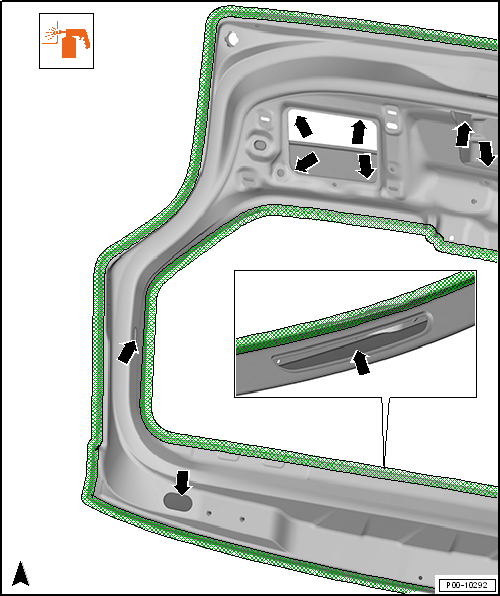
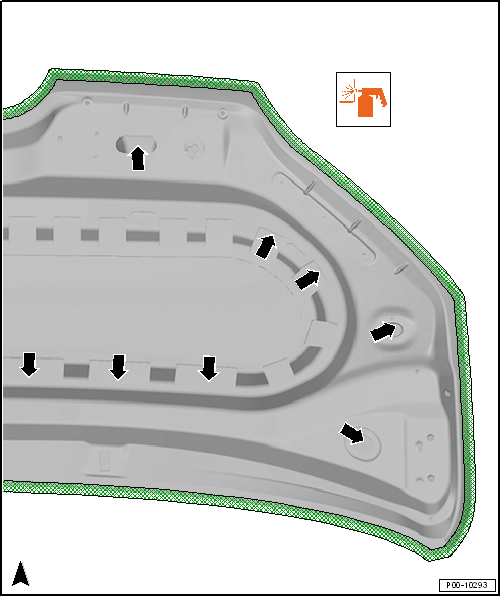
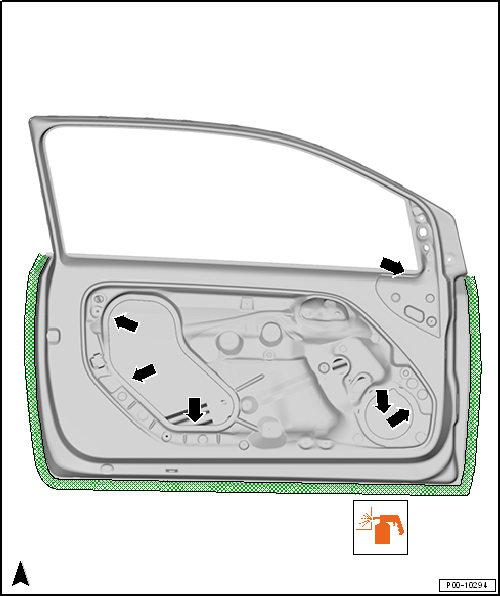
- Cavity-preserve the entire flange area with "Pressure cup gun -V.A.G 1538-" using "Preservation".

Note
Repair is only effective if the flange area can be sealed airtight from the inside (so that no moisture can penetrate).
Cavity preservation area, example tailgate
Cavity preservation area, example hood
Cavity preservation area, example door
Corrosion protection of body, attachment and welded parts
Attachment parts
- Fenders, doors, lids and flaps must also be coated completely on the inside. One spray pass wet-on-wet is sufficient for this.
- Before installation, seal the inside of the attachment parts with cavity preservation "Preservation" to restore the original condition. See "Vehicle-specific paint information".
- Vehicles with wheel housing liners must receive additional rub protection at the wheel arch: "Corrosion protection measure for fender in contact area of wheel housing liner".
Welded parts
- On all welded parts, except the roof, the inside must be fully primed and filler-coated. The visible inner surfaces must be coated with one spray pass of basecoat and clearcoat. If necessary, this can be done before welding in. If in doubt, the production specification applies.
- If sealing work is required, it is carried out only after the specified paint build-up.
- All cavity-forming parts, such as pillars, sills, side panels, etc., must be coated with cavity preservation "Preservation".
All parts that are coated in production with noise-damping or stone-chip protection material (e.g. wheel housing, underbody panel, front/rear closing panel or outer sill panel) must be coated as follows:
- Wheel housings and underbody with sprayable seam sealer "Sealing materials"
- Compensate larger gaps or increased layer thicknesses with backing material adhesive sealant -D 511 500 A2-
- Sill area, lower side panel, closing panel corners with stone-chip protection "Stone-chip protection"
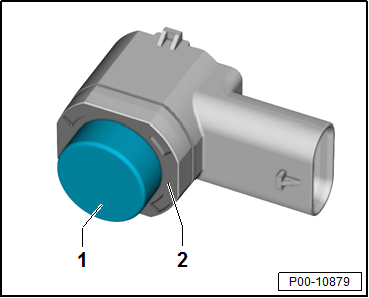
Painting the parking aid sensor
To rule out malfunctions of the parking aid sensor (park assist), the following parameters must be strictly observed when painting:
Painting new part
- Maximum film thickness 125 µm; a film thickness measurement after painting must be carried out without fail
- Maximum curing temperature 1 hour at 90 °C
Painting old part
- Paint removal (sanding) only down to the primer
- Minimum film thickness of 5 - 10 µm of coating must be retained
- Maximum film thickness 125 µm; a film thickness measurement after painting must be carried out without fail
- Maximum curing temperature 1 hour at 90 °C
Electrical conductivity
- Paint or paint overspray must not get into the connector; pin contact must be guaranteed after painting
Cleaning
- Immersing in cleaning solutions without first masking the connector pins is prohibited
Function check
- Connect the vehicle diagnostic tester and check function → Electrical System General Information.
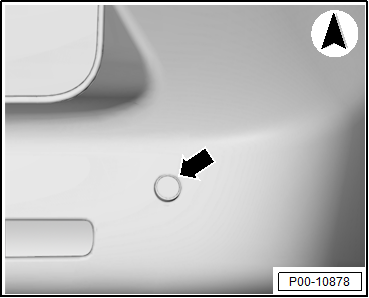
Repair paint build-up and film thicknesses
- Primed new part with replacement part primer: 2 - 10 µm
- Filler: 30 - 40 µm
- Solid basecoat: 10 - 20 µm
- Metallic/pearl effect basecoat: 20 - 25 µm
- Clearcoat: 35 - 50 µm
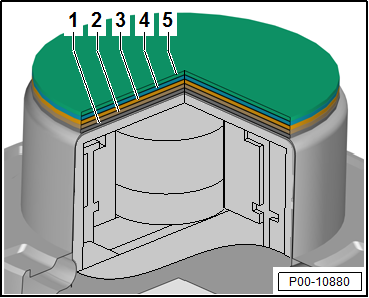
Painted area
- The painted area of the sensor is the front and side face of the diaphragm. The side face is painted from the front edge of the diaphragm to the rear, at a minimum of 3 to a maximum of 4 mm.
- No paint is permitted in this area.
ACC-Adaptive Cruise Control

Note
- On vehicles with ACC, the cover in the right-hand part of the front bumper must not be painted during repair painting or replacement. The ACC system behind it may lose its function due to the additional paint film thickness.
- The cover of the distance control sensor in the bumper trim grille is made of radar-transparent material. The cover is heated to prevent possible functional restrictions caused by snow and ice build-up.
- Any changes to the surface, such as subsequent painting, stickers and other items attached afterwards, can lead to malfunctions.
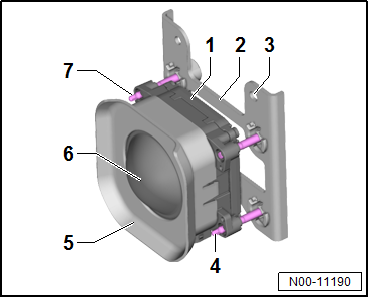
Adaptive cruise control control unit -J428-
The illustration shows the adaptive cruise control control unit -J428- on the Golf. The illustration may differ for other vehicle models.
- Adapter plate
- Bracket
- Mounting hole
- Adjusting screw, vertical
- Trim panel
- Adaptive cruise control sensor/adaptive cruise control control unit
- Adjusting screw, horizontal