Starter motor
Assembly overview - Starter motor
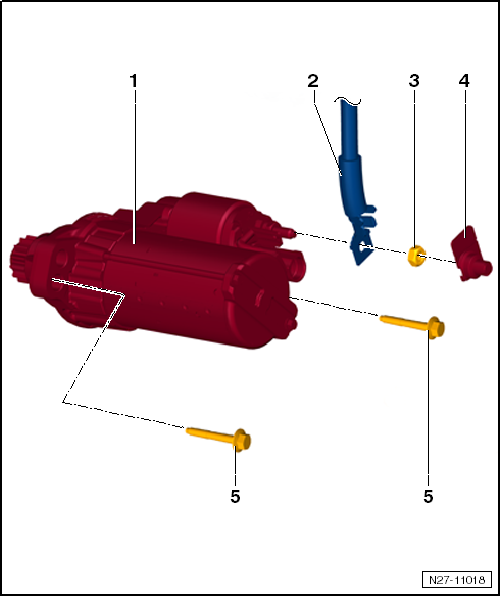
- Starter motor
- Remove and install
- check
- B+ cable connection to starter motor
- B+ cable retaining nut to starter motor
- M8
- Tightening torque: 15 N·m
- Shield cap
- Starter motor mounting bolts
- M10 x 55
- Tightening torque: 40 N·m
Removing and installing starter motor
Removing and installing starter motor, manual transmission
Replacing the starter motor on vehicles with start-stop system:
Due to the higher demands placed on the starter motor when the start-stop system is active, e.g. in city traffic, the cycle durability has been increased and the starter ring gear has been reinforced.
When replacing the starter motor, make sure to use the correct spare part numbers in → ETKA (Electronic Parts Catalogue). The components adapted for the start-stop system are not specially marked and differ little or not at all in appearance from conventional components.
Required special tools, testers and equipment, and auxiliary items
- Torque wrench -V.A.G 1331-
Removing
- Remove battery tray.
- Unclip the gear selector cables from the transmission.

- Pry off cover cap -2- and unscrew the retaining nut underneath.
- Remove B+ cable -1- from the terminal thread.
- Unlock and disconnect electrical connector -3-.
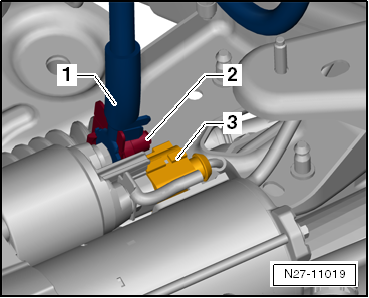
- Unscrew the starter motor mounting bolts -2-.
- Remove starter motor -1- upwards out of the vehicle.
Installing
Installation is performed in the reverse order of removal, observing the following:
Tightening torques
- "Assembly overview - Starter motor"
Removing and installing starter motor, automated manual transmission
Replacing the starter motor on vehicles with start-stop system:
Due to the higher demands placed on the starter motor when the start-stop system is active, e.g. in city traffic, the cycle durability has been increased and the starter ring gear has been reinforced.
When replacing the starter motor, make sure to use the correct spare part numbers in → ETKA (Electronic Parts Catalogue). The components adapted for the start-stop system are not specially marked and differ little or not at all in appearance from conventional components.
Required special tools, testers and equipment, and auxiliary items
- Torque wrench -V.A.G 1331-
Removing
- Remove battery tray.

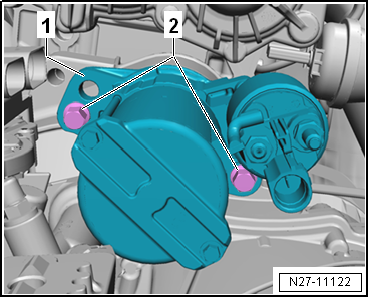
- Pry off cover cap -2- and unscrew the retaining nut underneath.
- Remove B+ cable -1- from the terminal thread.
- Unlock and disconnect electrical connector -3-.

- Unscrew the starter motor mounting bolts -2-.
- Remove starter motor -1- upwards out of the vehicle.
Installing
Installation is performed in the reverse order of removal, observing the following:
Tightening torques
- "Assembly overview - Starter motor"

Checking starter motor
- Connect vehicle diagnostic tester.
- Check starter motor → Vehicle diagnostic tester.
Cruise control system (CCS)
All instructions and notes for this chapter can be found in the repair guide "Electrical System General Information". A link to this repair guide is currently not possible for technical reasons. Please select the repair guide "Electrical System General Information" manually in ELSA.