Battery
Assembly overview - battery
Warnings and safety precautions
All instructions and notes for this chapter can be found in the repair guide "Electrical System General Information". A link to this repair guide is currently not possible for technical reasons. Please select the repair guide "Electrical System General Information" manually in ELSA.
Battery terminal bolt
All instructions and notes for this chapter can be found in the repair guide "Electrical System General Information". A link to this repair guide is currently not possible for technical reasons. Please select the repair guide "Electrical System General Information" manually in ELSA.
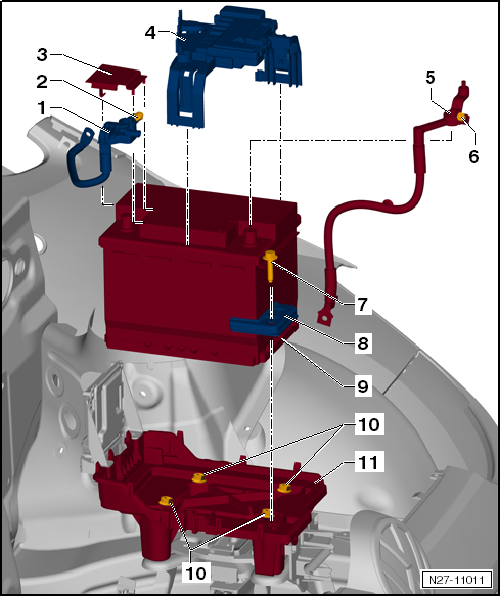
- Battery terminal clamp, ground cable
- Observe notes on bolting the battery terminals
- Depending on equipment, the battery monitoring control module -J367- may be installed here.
- Removing and installing battery monitoring control module -J367-
- Tightening torque nut on body: 20 N·m
- Fastening nut, battery terminal clamp, ground cable
- M6
- Tightening torque: 6 N·m
- Cover cap, ground cable
- E-box with bracket
- Remove and install
- Tightening torque fastening nut, E-box to battery terminal clamp, positive lead: 6 N·m
- Battery terminal clamp, positive lead
- Tightening torque fastening nut, E-box to battery terminal clamp, positive lead: 6 N·m
- Fastening nut, battery terminal clamp, positive lead
- Observe notes on bolting the battery terminals
- M6
- Tightening torque: 6 N·m
- Clamp plate fastening bolt
- M8
- Tightening torque: 9 N·m
- Clamp plate
- Observe installation note
- Battery
- On vehicles with start-stop system: observe notes on replacing the battery.
- Remove and install
- Battery carrier fastening nuts
- M6
- Tightening torque: 9 N·m
- Battery carrier
- Remove and install
- Battery carrier fastening nuts to body: 15 N·m
- Mounting bolts, engine control module bracket to battery carrier: 8 N·m
Removing and installing battery
Required Special Tools, Test and Measuring Equipment and Auxiliary Items
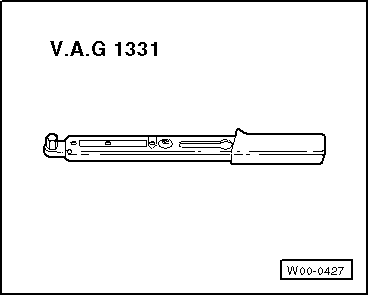
- Torque Wrench -V.A.G 1331-

WARNING!
Risk of injury! Observe warnings and safety regulations!

Caution!
When disconnecting and connecting the battery, follow the procedure described in the repair manual.
Replacing the battery on vehicles with start-stop system:
Due to the higher cycle stability requirements, vehicles with start-stop system use a special starter battery.
When replacing the starter battery, make sure to use the correct replacement part number in → ETKA (Electronic Parts Catalog). Starter batteries for use in vehicles with start-stop system are marked "AGM" (Absorbent Glass Mat) or "EFB" (Enhanced Flooded Battery).

Note
- On vehicles with battery sensor (start-stop system), battery registration must be performed after installing a new starter battery.
- Battery registration transmits the technical values of the new battery to the battery monitoring system.
- Perform battery registration.
Removing
- Disconnect battery.
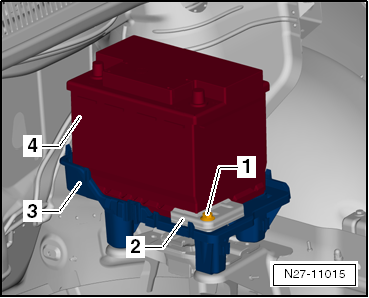
- Unscrew mounting bolt -1- and remove clamp plate -2-.
- Remove battery -4-.
Installing

Caution!
If the battery is not securely installed, the following risks apply:
- Shortened service life due to vibration damage (risk of explosion).
- Damage to the battery grid plates.
- Damage to the battery case caused by the hold-down bracket (possible acid leakage, high follow-up costs).
- Reduced crash safety.
Installation is carried out in the reverse order, observing the following:

- Place battery -4- on battery carrier -3- and slide it to the rear.
- Fit clamp plate -2- and tighten with mounting bolt -1-.
- After installation, check that the battery is held firmly.
- Connect battery.

Note
- On vehicles with battery sensor (start-stop system), battery registration must be performed after installing a new starter battery.
- Battery registration transmits the technical values of the new battery to the battery monitoring system.
- Perform battery registration.
Tightening torques
- "Assembly overview - Battery"
Removing and installing ground cable with battery monitor control module -J367-
Required Special Tools, Test and Measuring Equipment and Auxiliary Items
- Torque Wrench -V.A.G 1331-
Removing
- Disconnect electrical connector -2- on battery monitor control module -J367- -3-.
- Remove battery -A-.
- Remove engine control module.

- Unscrew nut -1-.
- Remove ground cable from battery monitor control module -J367- -2-.
Installing
Installation is carried out in the reverse order, observing the following:
- Adapt battery monitor control module -J367-.
Tightening torques
- "Assembly overview - Battery"
Adapting battery monitor control module -J367-
After installing a new starter battery or a new battery monitor control module -J367-, the battery monitor control module -J367- must be adapted.
- Connect the vehicle diagnostic tester.
- Adapt battery monitor control module -J367- → Vehicle diagnostic tester.
Disconnecting and connecting battery
Required Special Tools, Test and Measuring Equipment and Auxiliary Items
- Torque Wrench -V.A.G 1331-
Charging battery or jump starting vehicles with start-stop system:
When charging or jump starting vehicles with start-stop system, observe the following: Using the charging cable, first connect the positive terminals, then connect the vehicle body ground. This ensures that the battery sensor is not bypassed. Charging the battery directly at the negative terminal bypasses the battery sensor, and the battery data is not recorded by the sensor during charging. The battery condition values stored in the data bus diagnostic interface will then no longer match the values of the charged battery.

WARNING!
Risk of injury! Observe warnings and safety regulations!
Disconnecting battery

Note
- Disconnecting the battery ground cable (interrupting the power supply) enables safe work on the electrical system.
- Disconnecting the battery positive cable is only required for removing the battery.
- Switch off ignition and all electrical consumers and remove the ignition key.
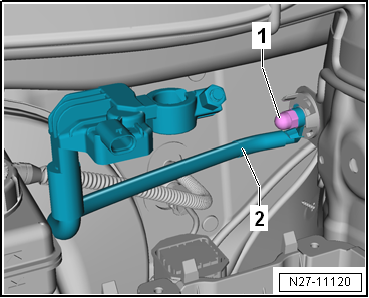
- If fitted, fold up the cover cap of the ground cable battery terminal clamp.

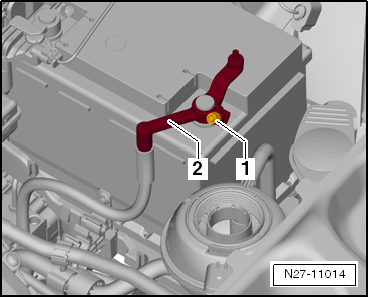
- First loosen the nut of the ground cable battery terminal clamp -1- and pull the terminal clamp off the battery negative terminal.
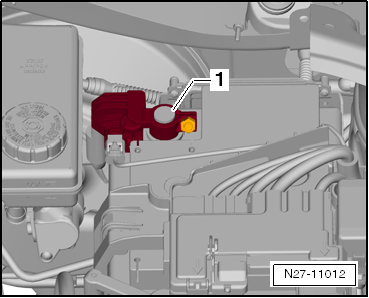
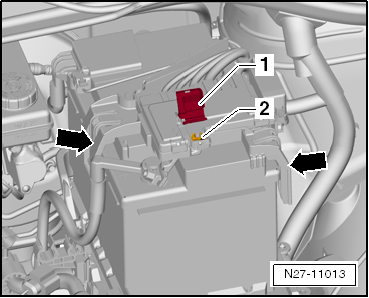
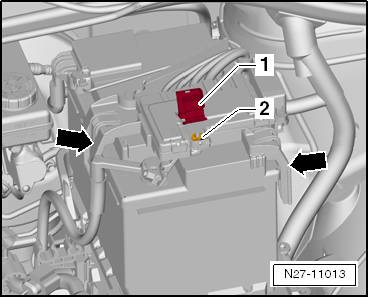
- Fold up the cover on E-box -1- and unscrew fastening nut -2-.
- Release the latches -arrows- of the E-box bracket on both sides and lift the E-box together with the bracket off the battery upward.
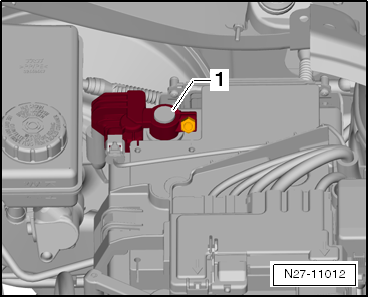
- Then loosen the nut of the positive cable battery terminal clamp -1- and pull terminal clamp -2- off the battery positive terminal.
Connecting battery

Caution!
Observe the bolting of the battery terminals.
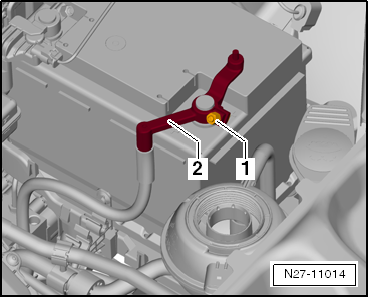
- Push the positive cable battery terminal clamp -2- onto the battery positive terminal. Tighten fastening nut -1- to the tightening torque specified in the assembly overview.
- Place the E-box together with the bracket on the battery and engage securely -arrows-.
- Screw on fastening nut -2- and tighten to the tightening torque specified in the assembly overview.
- Close cover -1- and engage it.
- Push the ground cable battery terminal clamp -1- onto the battery negative terminal.
- Tighten the fastening nut.
- Carry out the work steps listed in the table.
Work steps after connecting the battery:

The table can be printed out if required.
Tightening torques
- "Assembly overview - Battery"
Removing and installing battery carrier
Required Special Tools, Test and Measuring Equipment and Auxiliary Items
- Torque Wrench -V.A.G 1331-
Removing
- Remove battery.
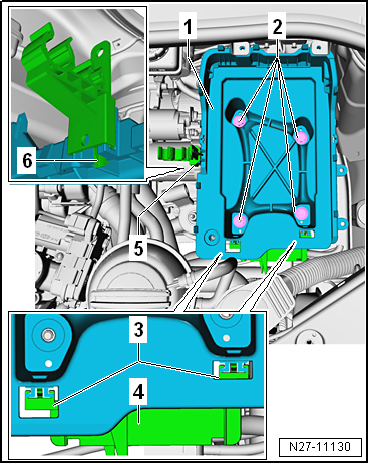
- Unscrew fastening nuts and bolts -2-.
- Unlock the two latches -3- and pull cable bracket -4- off the battery carrier.
- Unclip all lines from the refrigerant line bracket -5-.
- Pull locking button -6- on the underside of refrigerant line bracket -5- and pull the bracket upward off the battery carrier.
- Lift battery carrier -1-.
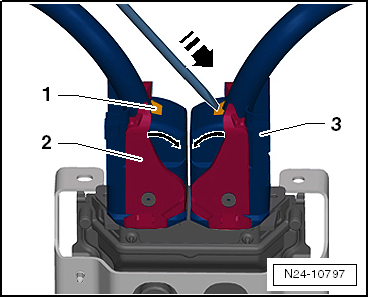
- Disconnect electrical connectors on engine control module by pressing locking device -1- with a screwdriver in the -arrow- direction.
- Swing locking bracket -2- in the -arrow- direction and pull connector -3- off the engine control module.
Installing
Installation is carried out in the reverse order, observing the following:
Tightening torques
- "Assembly overview - Battery"
Checking battery
Checking battery → Electrical system general information.
The battery -A- is monitored by the data bus diagnostic interface -J533- in self-diagnosis in the "Guided Fault Finding" mode → Vehicle diagnostic tester.
Charging battery
Charging battery → Electrical system general information.